Last week, we took a quick peek at the annual Adobe Max conference that was held in Los Angeles this year. I promised a closer look at some of the new or improved applications and the first of those will be Photoshop 2019 CC on the desktop. Artificial intelligence, which Adobe calls "Sensei" has enabled features such as content-aware fill and content-aware move. This year, content-aware fill has received what can only be called a massive update, but that's not all.
 Let's look at content-aware fill first. Maybe I spotted an attractive scene while driving, stopped to take a photo, and negligently parked so that the vehicle was in my photograph. This photo was provided by Adobe and it's already marked here for content-aware fill.
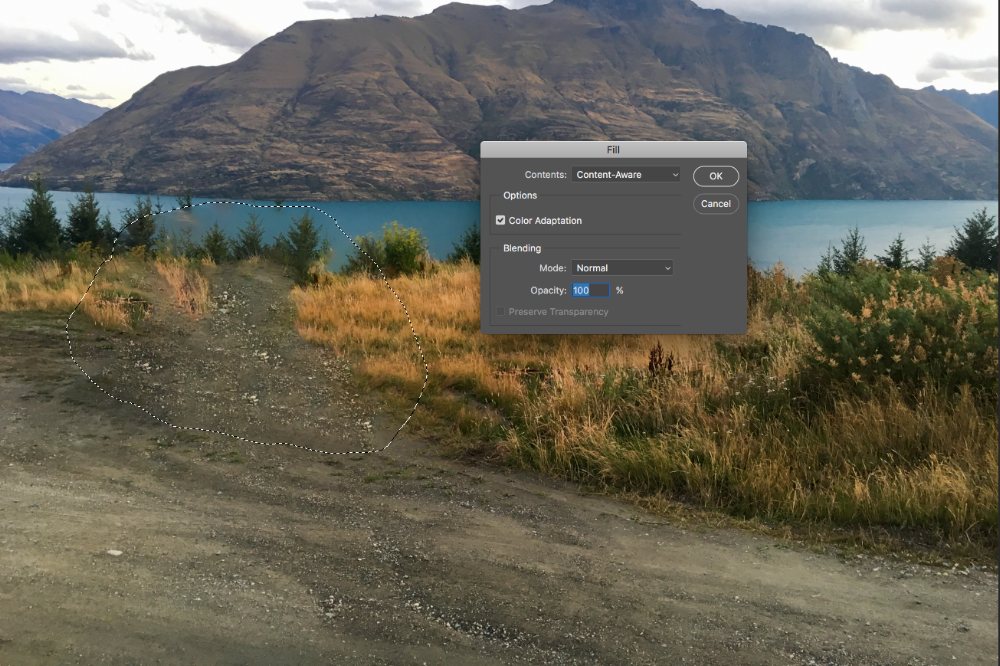 The result, while good, creates what looks rather like a pathway where no pathway existed.
Ideally, that area would look more like the rest of the shoulder of the road and until now that would have required using the clone stamp tool. This wouldn't be a difficult task, but it would take time to accomplish and one of Adobe's stated goals in to allow Sensei to take over routine, repetitive, boring tasks
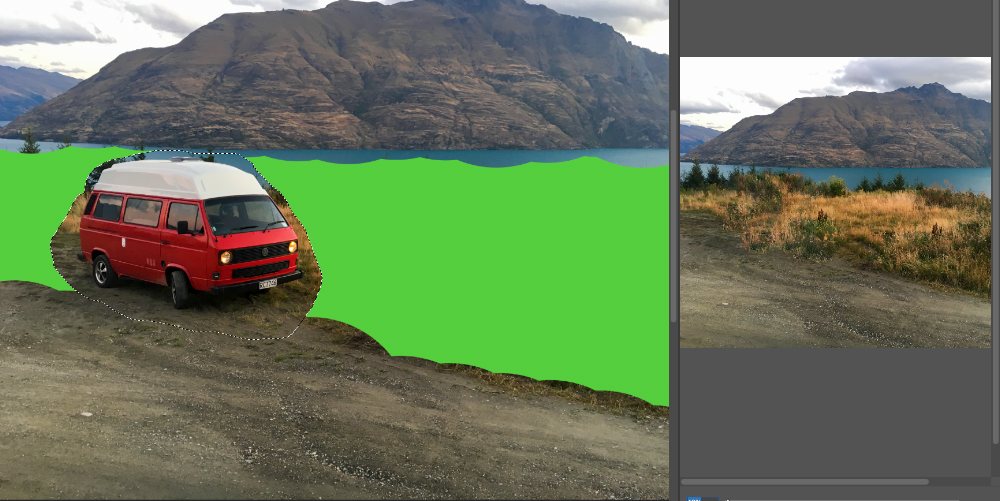 Content aware fill now allows the user to specify the area that the process will examine. The source area is shown with a green mask so that Sensei will concentrate on the water and the vegetation instead of the roadway and the result is much better.
 Now the area that has been filled looks more like the surrounding area. This is the kind of work that's ideal for artificial intelligence as Sensei examines only the area that the user specifies as what should be cloned to fill the area where the car is located.
Some of the other changes can be illustrated better with a video.
The first might seem silly, but believe me when I say that thousands of Photoshop users cheered and applauded when it was announced at the Max conference that the resize function would maintain the object's proportions.
Until now, resizing a layer or text in Photoshop often introduced distortion because proportion wasn't locked by default. Grabbing a corner to scale something would stretch the image vertically or horizontally. On rare occasions, a designer might want to do that, but in most cases that's not the intended result. To maintain the item's proportion, the user had to hold the Shift key while resizing and accidentally releasing the key a bit too early resulted in a distorted image and no small amount of muttering by the designer, who then had to press Ctrl-Z and repeat the process.
Now, the default retains proportion and for those rare instances when there's a need to create distortion, pressing the Shift key allows it.
Another long-time frustration has been the Undo function. Ctrl-Z in most modern applications allows for multiple undos, but much of Photoshop's core functionality isn't exactly modern. A History function was added several years ago so that users could look back through each step taken during the current session and revert to any step along the way.
Here's an example. Let's say you've created some text. Next you want to change to a different typeface, change the color, and then rotate it -- possibly several times to get the angle just right. Then you add a bevel effect. At that point, you stop to look at what you've done and decide that everything after changing the typeface was a bad idea. In other words, you don't want the bevel effect, you don't want any of the various rotations, and you believe that the color you selected is wrong -- but you do want the typeface.
Previously, Ctrl-Z would simply toggle between the last step, adding the bevel effect, and the previous state. To go further back, you'd need to find the History panel and delete the unwanted steps. Now Ctrl-Z steps back through each step and if you accidentally go too far and want to restore an action you've undone, just press Shift-Ctrl-Z.
Perhaps the most promising and welcome addition to Photoshop is a Frame tool. Those familiar with the publishing application, InDesign, will already understand how this works. After creating a frame to hold a graphic, the user places the graphic in the frame. This allows the image to be cropped, resized, and placed.
Until now, placing a second image in a Photoshop file involved placing the second image, either embedded or by reference, and then using various masking tools to crop it. Placing an image inside a frame ensures that the image is no larger than the frame, so resizing is minimized and the frame automatically crops away those parts of the image that are outside.
Windows computers can accumulate a lot of electronic trash over time. Non-essential files can be less apparent if you have a desktop computer with a gargantuan hard drive or several drives, but the clutter can cause problems for those who have notebook computers.
When the computer crashes, it probably creates a log file and a memory dump. When Windows updates arrive, the operating system retains the old version in case you want to roll back to the previous version. Web browsers cache a lot of files. Nearly every application creates temporary files and far too many of those applications don't clean up after themselves.
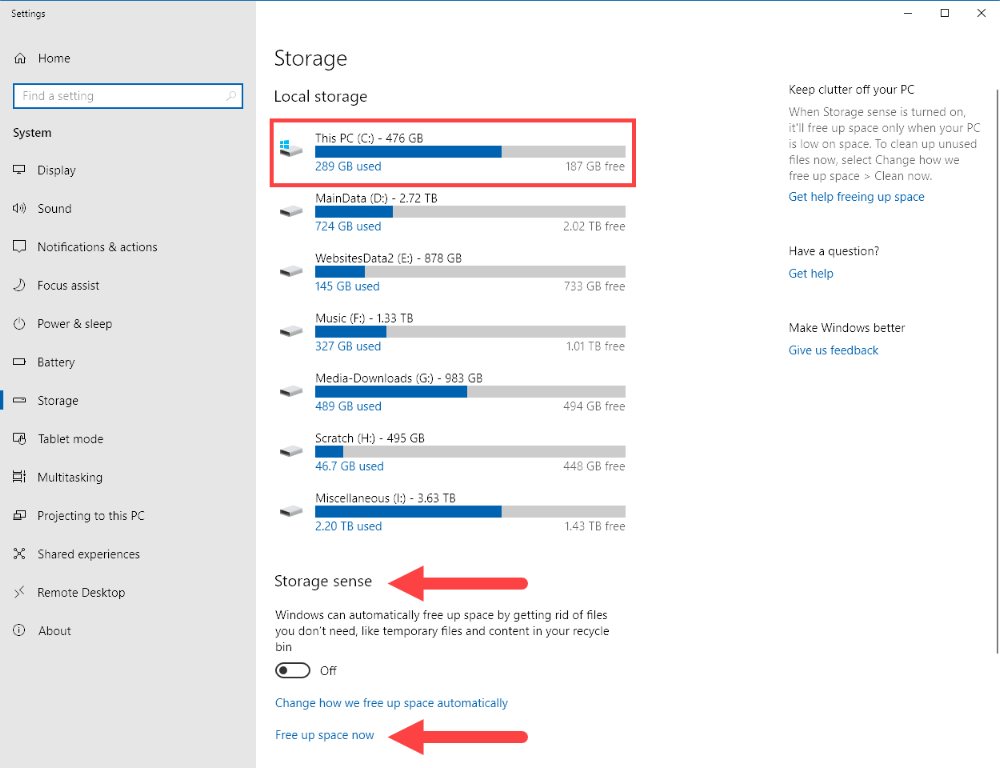 You may have used Microsoft's Disk Clean-up utility, but Windows 10 has a better option. Open Settings and navigate to the Storage panel. The disk drive with the greatest impact on performance is the boot drive, typically C. This could be a 4TB mechanical drive, a smaller mechanical drive, or a solid-state drive. SSDs are much faster than mechanical drives, but they also cost more and are usually smaller: 500GB is a common size.
 Further down on the Storage panel, you'll see Storage Sense, a way to automate the process of keeping the disk clean, and an option called Free up space now. Let's look at that first because Storage Sense is turned off by default and not everyone wants Windows to delete files automatically.
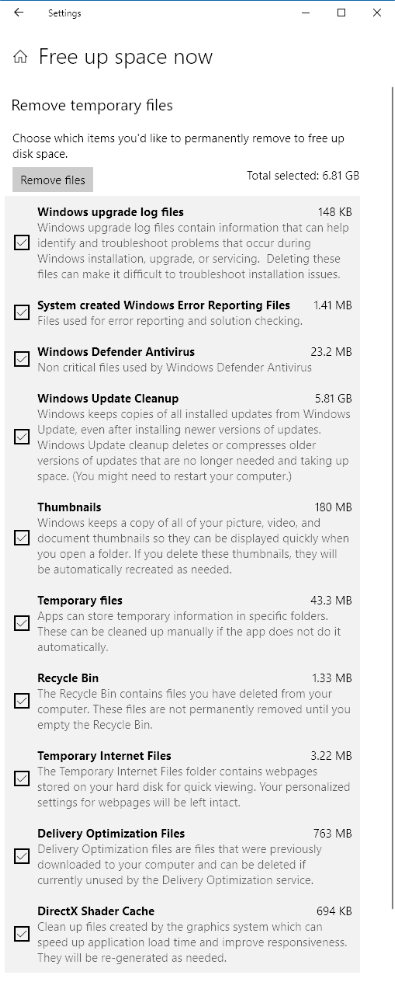
Selecting Free up space now opens another dialog that shows various categories of files that can be removed. In the case illustrated, less than 7GB will be freed up, which isn't significant on a 500GB drive. The user can decide which categories of files to delete and which to retain, then click the Remove Files button. The largest component being removed here is nearly 6GB of Windows update files.
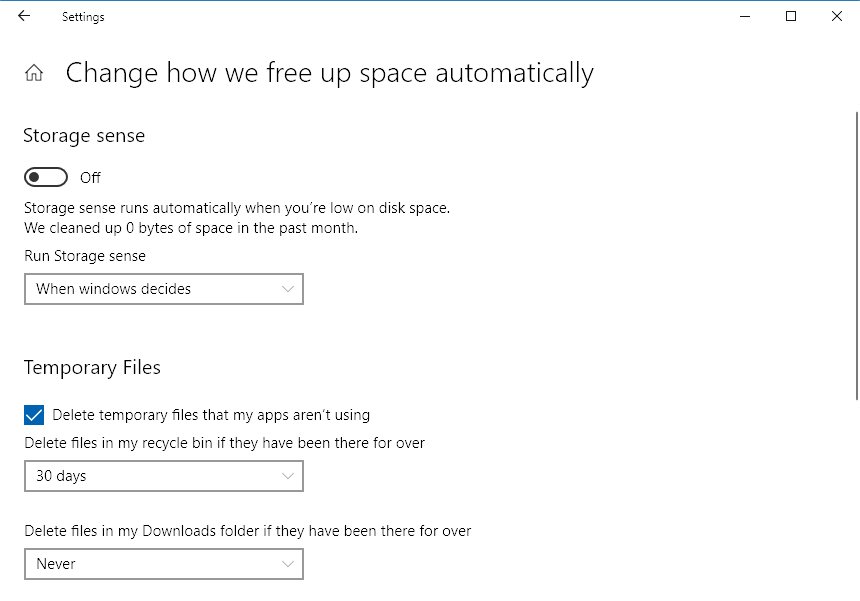 If you do want to turn Storage Sense on, click Change how we free up space automatically before turning it on. You can set a schedule (daily, weekly, monthly) or let Windows decide. Then choose whether or not to delete temporary files and on what interval (daily, every 2 weeks, every 30 days, every 60 days, or never) and when Windows deletes downloaded files using the same schedule options. I've left this option turned off and set a reminder so that I'll look at it occasionally.
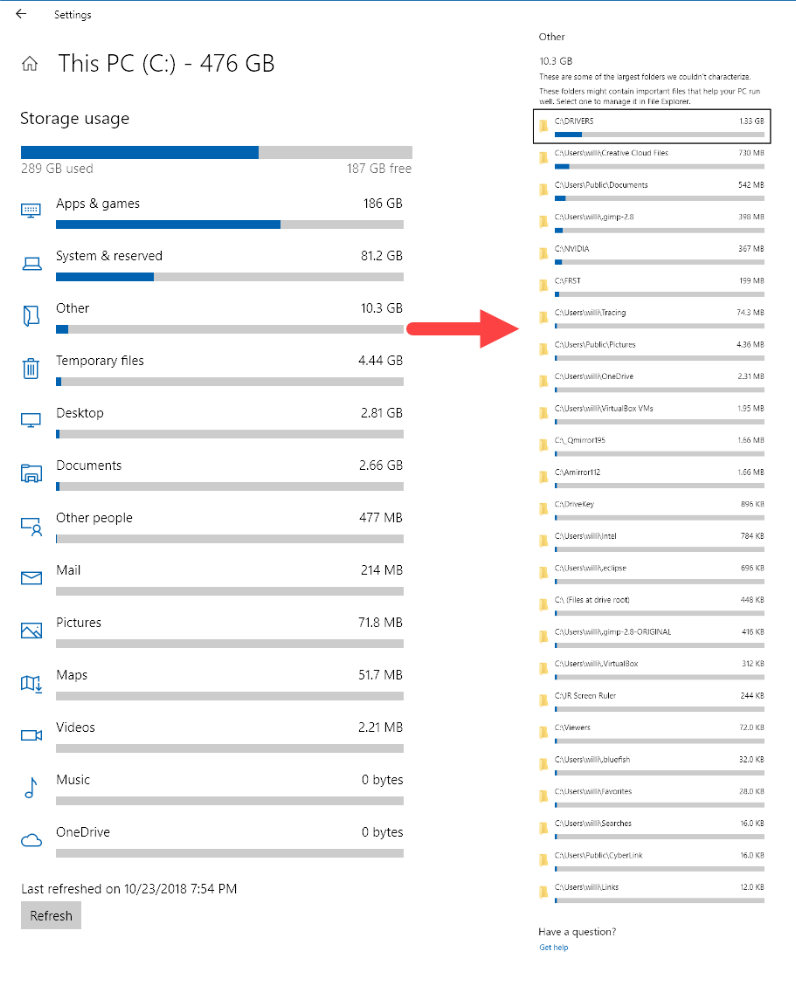 While you're on the main storage screen, you can click the line beside any disk drive to see a list that shows various classifications showing how the disk space is used and then drill down further on any of the classifications. That will open another display showing various locations and clicking one of the locations will open a Windows Explorer instance so you can examine individual files.
One word of caution here: Never delete any file or folder unless you know exactly what it is and you're certain that it isn't essential to the computer's operation.
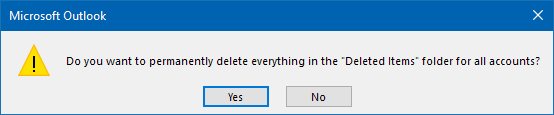 Some applications offer choices for what to do with files that are probably no longer needed. Microsoft Outlook, for example, offers to delete all files that are in "Deleted items". Other email programs have settings that control when deleted items are purged from the system.
Shortly before noon a week ago Friday, the normally quiet 4-bay disk enclosure that connects disk drives to my primary computer (a notebook) began rumbling. Within a few minutes it had progressed from being slightly noisy to sounding like a 1943 International Harvester stake truck. This is not a welcome sound.
I hope that's not a disk drive was my first thought. The SMART monitor said that all 4 disks were healthy, but I removed each disk to see if the noise would stop. It didn't, so that confirmed that the problem was with the Orico disk enclosure.
That's good because recovering from a disk failure is no fun. All essential files are backed up to CrashPlan (on-line) and to external USB drives. And the most critical of the files are copied to a network attached storage drive. I was never concerned about losing data, but I was concerned about losing time.
Eliminating the disk drives as the source of the unwelcome sound meant that the problem was the enclosure's cooling fan. A YouTube video shows how to replace the fan, but first I would need a replacement fan. At best, that would take a day or two and I didn't want to lose the entire weekend, so I ordered a new disk enclosure and specified Saturday delivery. Swapping the disks between enclosures would take less than a minute.
What's annoying is that this should never have happened.
The manufacturer could have chosen to use a fan with ball bearings. Instead, some bean counter probably decided that less expensive sleeve bearings would be acceptable. The profit per unit sold might have increased by 50 cents or a dollar. If you'd like to see a 5-minute explanation of the differences between the two kinds of bearings by a really excitable guy, check this out.
Choosing the least expensive component is a problem with computers: Manufacturers choose components based on cost, not performance. To some extent, Mac users are protected because Apple specifies top quality components. But Apple also selects components that are identical to those used in Windows systems and then marks them up far more than is reasonable.
So nothing is perfect and maybe all we can hope for is to find a way to be ready for sudden failures. I had a noon conference call and managed to join it less than 5 minutes late, having shut down the Windows computer and switching to a Mac. For the rest of the day and most of Saturday, I was fully a Mac user.
I could have switched to a Microsoft Surface tablet and would have if the outage had been expected to last for more than a day. A second Windows system was also available, along with a couple of computers that run Linux and a Chromebook. The key is to have some kind of backup system available when you need it ... and maybe to avoid purchasing devices that use roller bearings.
The newer version of the Orico enclosure has an internal power supply, so there's no external brick. The individual bays no longer have locks, so users won't be able to lock the bay and then lose the key. Given how these devices are used, locking was silly anyway. And the fan appears to be of higher quality than in the first unit.
Last Sunday, after I reported "problem solved" in Spare Parts, I found that the display port monitors on my primary computer weren't being detected, following a power-off reboot. I couldn't go on-line to download files needed to fix the problem because high winds had knocked internet service out. From there, it became even stranger.
The problem appeared to have been solved by switching to the display port connections, but that wasn't the case. A considerable amount of research suggests that this is not an uncommon problem and that few of the proposed solutions work.
I downloaded Display Driver Uninstaller to remove all video drivers from the computer, downloaded the latest Nvidia drivers, booted to safe mode, blew away the existing drivers, rebooted, ran the Nvidia installer (twice, with a reboot between sessions), and then used the device manager to have Windows update the drivers. About 3 hours (and a lot of muttering) later, the monitors were once again operational.
Everything seemed fine after a reboot, but then I tried shutting the computer down and turning off the monitors. Once again, the computer failed to recognize the monitors. If I had any hair left, I would have been pulling it out by that time. Display port monitors must be powered up when the computer starts or they won't be recognized. They were powered on and the port selectors were set to DP. Nonetheless, Windows reported "Didn't detect another display."
More hours of Google searches turned up nothing useful (at least nothing that I hadn't already tried), Older Geek Randy McElveen suggested that I read through a long discussion by people who have had similar problems. In the meantime, I obtained two DP (dock) to HDMI (monitor) cables to see if that arrangement would work any better than the DP->DP cables.
After playing with several combinations of cables, I got one monitor working from the display port socket on the docking station to the display port socket on the monitor and the other working from the second display port socket on the docking station to one of the HDMI sockets on the monitor. That setup still worked following a reboot, but not after a power-off restart. In that case, the display port monitor was once again not detected.
Randy McElveen at Older Geeks had several suggestions, but so far the problem persists.
I've switched back to the original setup: HDMI to HDMI for the primary monitor and DVI to HDMI for the second monitor. The monitors may blank occasionally, but at least they're always detected at boot time. The cables I'm using may need to be upgraded to handle the extra data being sent to the higher-resolution monitors. The new monitors have nearly 78% more pixels than the old monitors and instead of pushing more than 4 million pixels to the monitors 60 times a second, the computer needs to push almost 7½ million pixels 60 times a second.
There are times when I wish that there was more competition in the display adapter business.