New users of Smart Photo Editor Studio from Anthropics could be forgiven for staring at the screen and wondering how to use the program because the interface is unlike any other photo editing application. The underlying application is also an unusual combination of presets and adjustments.
The current version of the British software publisher's photo editor is one of several applications that use the same underlying engine. Smart Photo Editor Studio is the most general of the applications. Landscape Pro is intended for use with outdoor images, Portrait Pro deals mainly with facial features, and Portrait Pro Body can be used to reshape a subject's body.
Some people are vehemently opposed to modifying a subject's body with photo editing tools, but Portrait Pro Body can be used to make subtle changes that are still honest and true to the subject. That's a topic for another day, though.
 One of the most unusual aspects of Smart Photo Editor is the ability to use treatments that have been created by other users. In fact, whenever you close the application, it takes a few moments to check in with the Anthropics site and download new effects that have been contributed by the community.
Let's take a look at a couple of images to see how they can be modified by Smart Photo Editor. Whether you consider the modifications to be improvements is up to you, but I was able to achieve the effect I wanted with each of these images, so that makes them improvements for me.
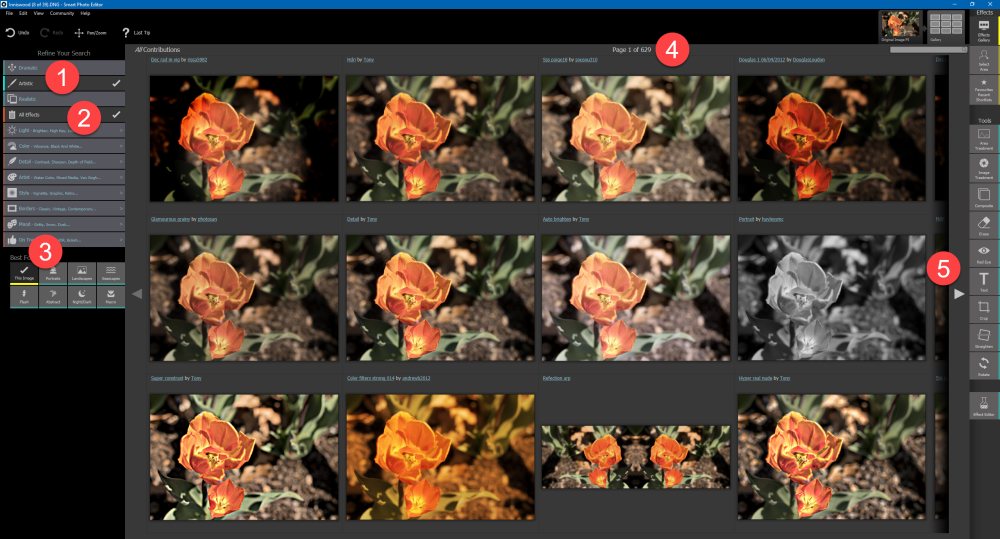 I started with a photograph of a flower from Inniswood Metro Gardens. After opening an image, you'll see a busy screen. In the top left corner (1), you can choose a general category: Dramatic, artistic, or realistic. For this image, I selected artistic.
Next, determine whether you want to see all effects (2) or limit the selection to light, color, detail, artistic, style effects, borders, mood, or trending effects. I chose all effects.
Smart Photo Editor can examine the image and make recommendations (3) or the user can select recommendations intended for portraits, landscapes, seascapes, flash images, abstract images, night time photography, and close-up (macro) images.
After you've made those selections, you'll be able to scroll through several pages of effects. In my case, there were 629 pages, each with 12 effects (4) for a total more than 7500 effects. That's simply overwhelming.
On the right side of the screen (5) you'll find other actions that can be used with the image, such as treatments that apply only to a specific area of the images, red-eye removal, adding text, cropping and straightening the image, and more.
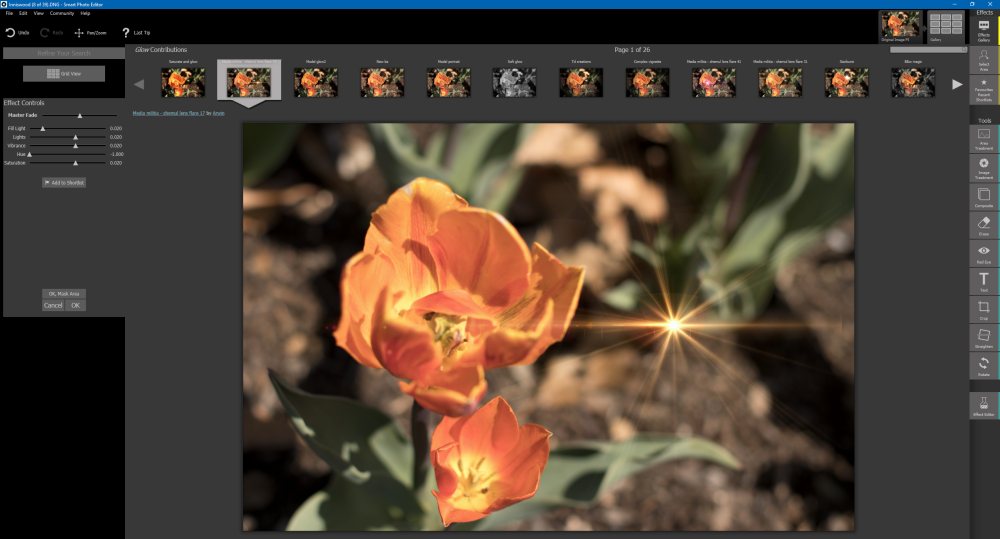 After selecting an star-burst effect to apply to the image, I realized immediately that I would need to reposition the star-burst. That's an easy process: Just click the star-burst with the mouse and drag it to where it should be. Placing the star-burst at the center of the flower seemed to suggest that a drop of water in the flower was catching some direct sunlight.
The next step involves modifying the effect with the controls in the upper left corner of the screen.
 Before working with the controls, I used the mouse to slightly rotate the star-burst effect. To get the look I wanted, I increased the master control slightly, left fill light alone, reduced the lights control, left the vibrance control alone, and changed both hue and saturation to shift the color of the star-burst into the purple range and to make the color more pronounced.
To ensure that the original image isn't modified, Smart Photo Editor will save the modifications as a JPEG, TIFF, or PNG image. If you're finished with the image and have no plans to edit it in any other applications, JPEG is an acceptable choice. If you plan to open the image in Lightroom, Photoshop, OnOne, Exposure, or any other editor, TIFF is a better choice. For images destined for the web, PNG is a good choice.
 The second image we'll consider has several specific problems that I'd like to address.
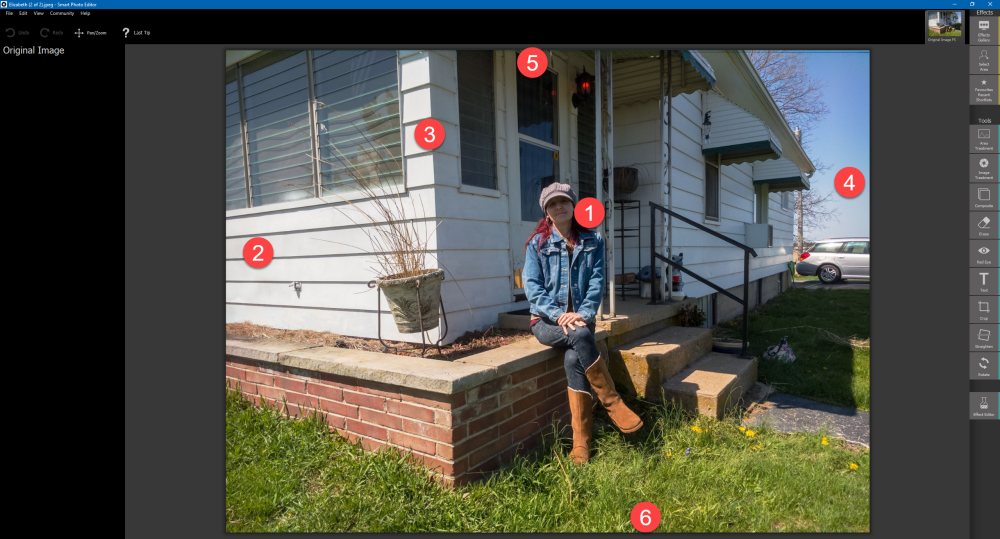
This is Elizabeth, a little more than a year after her emergency liver transplant. I had gone along on a follow-up visit with her surgeon and dropped her off at home. The picture was taken with a smart phone.
The most serious shortcoming is one I should have corrected by having her move (1) is the dark shadow on her face. Even if the original image had been a raw image, it's not something that can be corrected completely. The white siding (2) is in full sun and is too bright. There's some distortion that makes vertical lines (3) lean a bit. There's also too much extraneous information on the right side (4), top (5), and bottom (6) of the image.
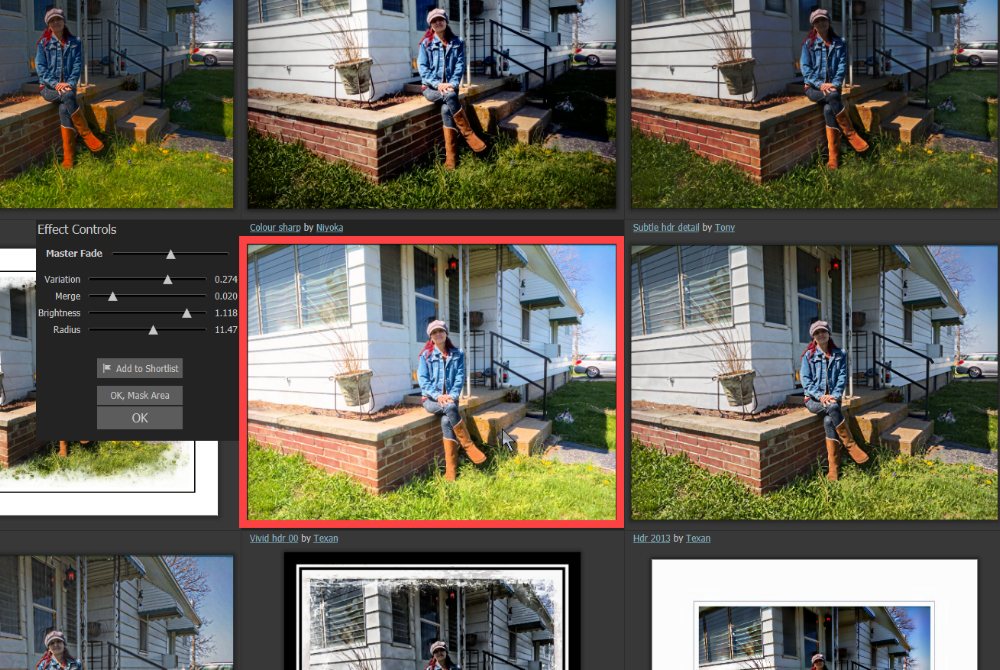 I started with a high dynamic range effect that helped with the shadowed areas.
 I then worked through other processes to straighten and crop the image. The final step involved brushing on a mask that I could use to adjust the exposure and brightness in the areas that were too bright. Additionally, I changed the hue slightly.
 The final result, while far from being a perfect image, is a substantial improvement from the picture that came out of the phone.
There's a lot to learn if you want to use this application effectively and this is made somewhat more difficult by the unusual interface and the huge number of effects that are built in or available from the community. Fortunately, the program contains direct links to a forum area on the Smart Photo Editor website and to tutorials that are built in and some that are available on the website. There's also a gallery and basic instructions for most of the tools.
The Effects Editor is what allows users to create their own effects from scratch by combining various effects. Using this feature requires quite a bit of testing and experimentation and the community forum is helpful. If you create an effect that you like, you can share it with other users by clicking the Publish button.
Any effect that any user submits to the community will be accepted. This may not always be good because it creates a huge number of potential effects, some of which are not the best quality. Fortunately, you can save several effects that you're considering to a short list. Unfortunately, the short list is effective only for one image. Being able to create a list of favorites would be helpful.
It's a challenge to keep up with all of the raw image formats. Manufacturers retain the same extensions for their variety of raw files, but the format can change enough that an application can't open them. Smart Photo Editor supports many raw formats, but there's no list of currently supported formats. The only way to find out for sure is to download the free trial version and try to open a raw file from your camera.
If your camera's raw format isn't supported, other options include converting the file from raw to TIFF using software that came with the camera or using Adobe Camera Raw, which is free, to convert the files to DNG. Both DNG and TIFF formats retain all of the information from the raw file. JPEG files do not. Adobe Camera Raw is available for Windows and the MacOS.
Anthropics sells a bundle that includes Portrait Pro Studio Max, Portrait Pro Body Studio, Landscape Pro Studio Max, and Smart Photo Editor Studio for $240. Smart Photo Studio is available separately in 2 versions: Standard ($30) and Studio ($50). The list prices are $60 and $100, but the list prices seem never to be in effect. The primary difference between Standard and Studio is that Studio will operate as a Plug-In in Photoshop and Photoshop Elements.

 Smart Photo Editor is unusual and worth looking at.
Don't be put off by the unusual interface. Once you understand the basics of how the program works, you'll enjoy the capabilties of this surprisingly low cost application.
Additional details are available on the Anthropics website.
Updates to Apple's mobile operating system, IOS, are often yawn inducing, so I was pleasantly surprised by the update to IOS 12. Several useful features are included in the latest version.
 The download, preparation, and update consumed less than half an hour on the Ipad that I updated. Following the update, there was a message telling me that some virtual private network settings needed to be changed. The message didn't explain how I might obtain information about the settings that would need to be changed, though. Because I use the tablet at home most of the time, skipping the VPN settings was safe.
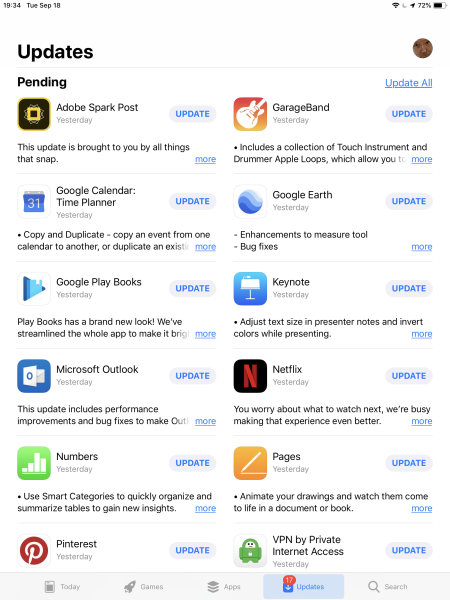 Following the operating system update, 17 applications needed to be updated, so that required another 10 minutes or so. My VPN application was included in the update list and when I ran it following the update, it took care of modifying the settings that needed to be changed.
And finally LastPass is able to fill in user names and passwords. Until IOS 12, trying to use LastPass on an IOS device was mainly an exercise in frustration. Also, most of the worst bugs introduced by a badly flawed IOS 11 have been resolved. But what's really new?
Screen Time is part utility and part big brother. The utility part will show you how much time you've spent with various applications on the device. Once you've done that, you can add some configuration options to block certain applications during specific periods. It's helpful both for regulating your own use of the device and also for limiting how much your children can use their phones or tablets in various applications.
The Voice Memo app has been updated and now has limited editing capabilities. Users can also open voice memo files in GarageBand and, if you haven't bought in 100% to the Apple ecosystem and still use Android and Windows devices, forwarding voice memos is now quite easy.
Possibly the most remarkable new app is Measure. You probably don't have a tape measure in your pocket and end up eyeballing measurements. If you need something more accurate, open Measure, set a start point, set an end point, and read the distance. It's not as accurate as a tape measure and you need to be sure that you're squared up to what you're measuring, but it's a lot better than eyeballing the measurement.
The ability to group announcements reduces clutter on the notifications screen and users can also turn off notifications entirely with Bedtime mode. There's a new built-in thesaurus and the ability to use custom-made emojis in memos. Yeah, Apple calls these "memojis".
So whether you want to try some of the new apps or just get rid of IOS 11 bugs, the IOS 12 update will probably be a welcome addition.
Most Windows users have OneDrive accounts with 5GB of storage. If you have an Office 365 account, that increases to 1 terabyte or up to 5 terabytes for Office 365 Home accounts with 5 users. Access is always present in the Windows file explorer and in the notification area. Except when it isn't.
I don't use OneDrive very much, but it is a handy place to store files that you want to access from multiple Windows devices. I was surprised this week when I tried to save a file to OneDrive and couldn't find it. What I did find is that this happens to enough people that there are several on-line resources offering explanations for how to fix the problem.
As it turns out, the fix is easy.
Make sure that you sign in to the Windows account. Then:
OneDrive will now work as you expect it to.
Those who travel a lot might wonder which airports are the the most hazardous places for Wi-Fi users. The simple, easy answer is all of them, but maybe you'd like a bit more nuanced approach.
The prudent traveler, regardless of the airport in question, will stay away from public USB charging stations, always use a virtual private network application to encrypt connections, and avoid downloading sensitive information to the computer, phone, or tablet. But I promised a nuanced approach and fortunately Coronet, a company that provides a free protective application for personal devices and paid services for organizations, collects threat data as part of the service and has published a report.
The report is based on information from a quarter million users at the 45 busiest airports in the US. The report lists threat statuses from 10 (the worst) to 0 (the best) and Coronet says any score above 6.5 poses an unacceptable risk.
So the 5 worst airports are San Diego International, Orange County's John Wayne Airport in California, Houston's Hobby Airport, Newark Liberty, and Love Field in Dallas. The 5 best airports are Chicago Midway, Raleigh-Durham International, Nashville International, Washington Dulles International, and San Antonio International.
Scores ranged from 4.5 at Chicago Midway to 10 at San Diego. None of the airports listed in the report approached a zero threat level, so it's clear that data safety is a concern at every airport.
The research omits Port Columbus International, Cincinnati Northern Kentucky, Pittsburgh International, Minneapolis-Saint Paul International, Albuquerque International, and several other significant airports.
To view or download the full report that lists all 45 airports and includes additional safety information, visit the Coronet website.