Listen to the Podcast
26 Jan 2024 - Podcast #866 - (22:52)
It's Like NPR on the Web
If you find the information TechByter Worldwide provides useful or interesting, please consider a contribution.

If you find the information TechByter Worldwide provides useful or interesting, please consider a contribution.
Anyone who has been using digital cameras for 15 years or more may have some photos that don’t have the quality needed for large prints. Even the old Sony Mavica that wrote small, highly compressed images to floppy disks had enough pixels for snapshot-size prints. Barely. Individual images were usually around 50KB and just 640 pixels by 480.
Today, smartphone cameras create 20- to 50-Mpxl images, and that is enough pixels to create large wall-size prints. If you have some old images that you’d like to print large and hang on the wall, there’s hope with upsampling processes that are powered by artificial intelligence. Better still, the one I’ll tell you about today is free.
But before we get to that, it’s important to understand some history and some terminology.
Click any small image for a full-size view. To dismiss the larger image, press ESC or tap outside the image.
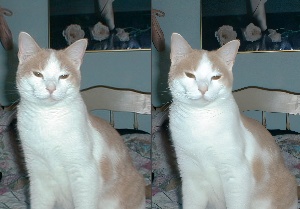 In the early days, we had the choice of saving images in JPEG format or in JPEG format. Only a few “professional” cameras offered anything like raw. There was an option for size. Many cameras offered small, medium, and large. Some also included settings for quality such as standard, medium, and high. An image saved as small standard quality would be fine for sending by email and looked fine on screens of the day. That would be the format that would save the largest number of images to whatever storage media the camera used.
<< Photo from an early digital camera (left) and upsampled (right).
 The primary considerations for JPEG images are that they are processed in the camera using the camera manufacturer’s optimization process for brightness, contrast, color saturation, and sharpness. The process then discards up to 90% of the data that was captured by the camera’s sensor. This size reduction is accomplished without any visible image degradation, at least until the user wants to make changes to brightness, contrast, color saturation, or sharpness. It’s then that it becomes apparent that essential information has been discarded and cannot be recovered. (Original on the top and upsampled on the bottom.)
Raw image files include all of the data that the camera’s sensor captured. The files are much larger than JPEG images and they are usually bland because no processing has been performed. Raw images must be processed before being used, and that is one reason some photographers choose JPEG: They’re willing to sacrifice the ability to improve the images in favor of having bright, vibrant images without having to master a photo editing program.
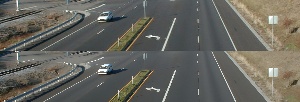 In the late 1990s, Sony released several “Digital Mavica”, “FD Mavica”, and “CD Mavica” cameras. The earliest of these digital models recorded onto 3.5" 1.4MB floppy disks. Sony loaned me one of these camera around 1998 and they were popular in North American. Later Mavica cameras recorded images on Memory Stick and eventually on 3" CD ROM. (Original on the top and upsampled on the bottom.)
The Mavica camera I used for a few weeks created images that measured 640 × 480 pixels and were highly compressed, which means that an enormous amount of data was lost. The camera could also create images that were 1024 × 768 pixels, also highly compressed.
If you have photos from a Mavica camera, upsampling is unlikely to create a file that can be used for a good wall-size print, but it can be improved.
After I returned the Mavica to Sony, I bought an Olympus C2000 that saved images that were astoundingly large, 1600 × 1200 pixels. That was large enough for a 10 × 8-inch print. The files were still JPEGs, though. At that time, digital camera manufacturers were looking for ways to produce affordable cameras that could create 1Mpxl images. Those of us who attended Infotrends in New York City in 2001 cheered that news.
Around 2003, I bought a Nikon D100 camera that could create raw images, but I used JPEG most of the time to save disk space. I did use the largest JPEG images, though, 3008 × 2000 pixels. That seemed enormous at the time. Today, I use a Canon D80 (6000 × 4000), a Sony RX1000 (5472 × 3648), or my Google Pixel smartphone (8160 × 4590 or 4032 × 2268). Yes, these days a smartphone can capture a 50Mpxl image with 8160 × 4590 dimensions. All this with a sensor that’s smaller than my little finger’s fingernail.
That brings us to pixels. How many do you need. You may notice that I haven’t mentioned “dpi”. I haven’t because “dpi” is unimportant. Pixels is pixels. Nothing matters but pixels. Forget about any DPI associated with a digital image. Forget any linear dimensions associated with a digital image. DPI is a factor only for the printer.
Most printers, whether connected to your computer or in a shop where cyan, magenta, yellow, and black inks are used, will probably be fine with 300dpi. It’s certainly sufficient for color laser printers and most inkjet printers. The question is how many dpi you will have to work with.
Let’s assume that we have an image that’s 739 × 416 pixels and needs to be printed 6.5 × 3.64 inches. We’ll take the long side, 739 pixels and 6.5 inches. We don’t have to bother with the short side. 739 pixels/6.5 inches = 114 pixels/inch. If we need 300 pixels per inch, the image needs to be upsampled. Note that we are not changing the resolution; we are just adding interpolated pixels where there aren’t any.
Several online image upscalers exist, but Upscayl offers both a downloadable application that works on Windows, MacOS, and Linux computers but also an online service that works with any operating system.
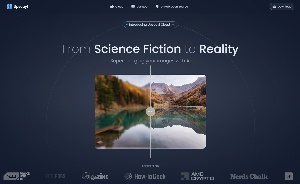 Upscayl checks a lot of boxes I like, free and open source are just two. It also works quite well.
If some of the old photos are of sufficient quality for snapshot-size prints, why might someone want to upsample them? There are several reasons, including the desire to create a wall-size print, to include the photograph in a professionally produced book or magazine, and to create a print from a cropped image.
 So one of the first decisions to make is whether the image can be successfully upsampled. Any image can be upsampled, but not all can be upsampled successfully. The old Sony Mavica images from floppy disks, for example.
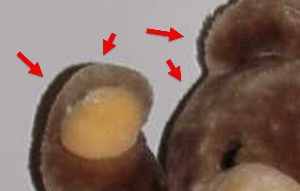 Because the disks held only 1.2MB of data, Sony opted for small images by default, 640 × 480 pixels and to apply extreme compression that eliminated much of the already minimal detail and created visible “artifacts” that make objects in the photo seem to shimmer. Most Mavica images are less than 50KB and not much can be done to create a usable image, but AI improves the situation.
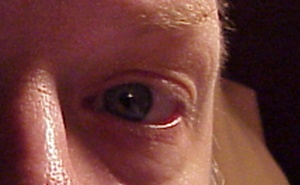
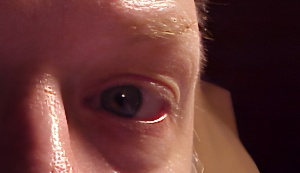 The Mavica had a high quality mode that saved images in bitmap (BMP) format. The images were still just 640 × 480 pixels, but there was no compression. Only one of these photos could be saved on the disk. Upscayl isn’t compatible with BMP files, so you’ll need to save Mavica images in another format. PNG is a good choice because no compression is involved. The result is a 2560 × 1920 pixel image that’s surprisingly good. Good enough to be imported into Lightroom Classic or Photoshop and edited. (Original on the left and upsampled on the right.)
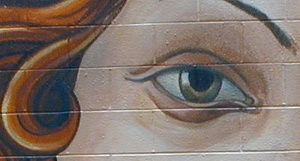
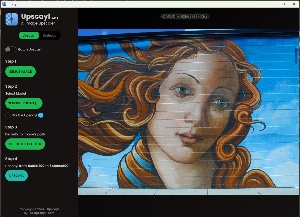
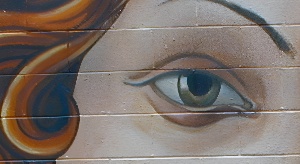 Better results will come from images that are somewhat larger. Those cameras made after 2001 that created JPEG images 1600 × 1200 pixels and were used to capture the highest quality JPEG images will usually create exceptional upsampled images. I found a photo that I’d taken in 2000 using an Olympus camera of a mural near the Columbus College of Art and Design. At 1600 × 1200 pixels, the file would have made an excellent snapshot print, but would have looked a bit soft if enlarged to a 10 × 8 print. (Original on the left and upsampled on the right.)
It would have been even softer for wall size prints, but ...
Yeah, there’s an exception. Because prints on walls are viewed from further away than we view snapshot prints, it’s possible to get away with lower resolution. Earlier I mentioned 300 dots per inch as a good choice for prints. It’s more complicated than that. Maybe you’ve seen a giant billboard with text and images that appear sharp and clear, but if you could get closer, you’d see that your eyes are lying to you. The actual printed resolution of these billboard is often just a few pixels per inch, not 300. Viewing distance allows your eyes to fill in detail that isn’t really there.
But still, for many common purposes, 300 dots per inch is a good target for printed materials and it’s all about the distribution of pixels from the original image, not about any useless “DPI” value stored in the image.
This is an exciting time to be involved in the development of computer software, but it’s also a time when we may reasonably fluctuate from excitement to despair. At least 30 years ago, some pundit said “the rate of change has exceeded the rate of progress.” I don’t know who said that, and I did try to find out, but it was premature.
In less than a year, artificial intelligence has advanced from the Model-T era, left moon landings and near space exploration in the dust, and has reached the equivalent of everyday hyperspace travel. Drink beer, keep a towel handy, and don’t panic.
Consider something mundane: cameras. Cameras used to be big, bulky things and photographers needed to understand film speed (or sensitivity), f/stops and shutter speed, depth of field, reciprocity (maybe, if they were making long exposures), dynamic range, focal length, and a lot of other arcane topics.
Single-lens reflex cameras are still being manufactured and professional photographers still need them, but a simple camera in a smartphone is sufficient for most people, and by “simple” I mean an incredibly complex combination of hardware and software. Today’s cameras are at least as much dependent on software as they are on hardware.
Recently, I took a picture of Holly Cat using my smartphone. She’d had a cold and the corner of her right eye near her nose had some gunk in it. “Gunk” is a technical term, of course. I pulled up edit mode, used my finger on the phone’s screen to draw a circle around the gunk, and the gunk disappeared. If I had used a digital SLR, I would have selected a wide-open aperture (smaller number, larger opening) to throw the background out of focus. I selected an option to blur the background and the result was an image that matched the quality of anything I could have achieved with a “real” camera.
I looked back to 1998 (26 years ago if you’re not counting). Sony had loaned me a Mavica camera that stored tiny, highly compressed images on a 1.2MB floppy disk. I could save about 24 images per disk, but there was also a high-quality mode that saved one image per disk. I have one of those photos and recently I upsampled the image to be more like one that would be captured today. The image was captured in a mixed lighting situation, so the color balance was questionable.
Click any small image for a full-size view. To dismiss the larger image, press ESC or tap outside the image.
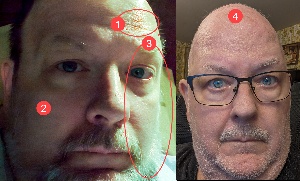 Some pixels on the highlighted side (1) were blown out, and after I got the (2) shadow exposure under control, I added a bit of grain in Lightroom Classic. With the color balance corrected for the shadow area, (3) highlights became green. This image is essentially state of the art for 1998. So I grabbed the smartphone that was lying on the table, switched it to selfie mode, and created an image that, although captured in a mixed lighting situation, still got the colors right. Twenty-six years later, there’s a (4) distinct lack of hair. The rest of the image is equally different from the earlier photo. Today’s cameras, hardware, and software are orders of magnitude better than they were in 1998.
Photoshop’s ability to create parts of a still image that weren’t present when the scene was captured are nothing short of amazing and this technology will be coming to video tools in the near future.
AI is already being used to repair and colorize films. One example from 2022 shows scenes around New York City in the early 1900s, probably around 1910. Note the flickering colors as AI from two years ago tries to keep up with people who are moving and with cameras that are mounted on moving vehicles. The old film includes the Hippodrome, which stood from 1905 until 1939, and scenes from trains on the Brooklyn Bridge.
The process had improved substantially by 2023 as film from 1927 shows.
Fritz Lang’s 1927 silent black and white film, Metropolis, invented groundbreaking film techniques to depict a dystopian society in Weimar Germany. Metropolis originally ran more than two and a half hours, but several edited versions have been released. Moonflix has colorized many old motion pictures and recently released an improved and colorized copy of Metropolis that runs slightly less than two and a half hours.
Moonflix has restored several old motion pictures, some from the 1880s. The restored videos are free to watch, but registration is required and donations are encouraged.
The advances in AI’s capabilities are clear. What’s also clear is that this is just the beginning. The changes that have occurred in just the past two years exceed AI developments in the previous two decades. Work had started on AI for speech and text recognition. Telephone system automated attendants could handle basic functions as early as 2000. But change is accelerating and even the rate of acceleration seems to be accelerating.
Where we’ll be a year from now, or even a month from now, is unclear.
What do you do if space is limited and you need occasionally to use a mouse that’s attached to one computer with another?
There’s the traditional option, a component in Microsoft Power Toys, and Multiplicity from Stardock.
The traditional option is what’s commonly used when someone needs to operate two computers that may or may not be located on the same desk. My office has a Windows 11 notebook computer and, directly behind it, is a nearly antique Macbook Pro. (By “antique”, I mean it’s nine years old.) I use the Windows computer except for those times when I need to test something on the Mac.
The keyboard and mouse are connected to an IOGear USB device that can route the connections to either computer. Each of the two monitors on the desk has four inputs, so switching between the computers involves selecting the proper port on both monitors and tapping a toggle switch to direct the mouse and keyboard to the appropriate computer.
Before monitors offered multiple inputs, people who needed this functionality used KVM switches that had connections for keyboard, video, and mouse.
Click any small image for a full-size view. To dismiss the larger image, press ESC or tap outside the image.
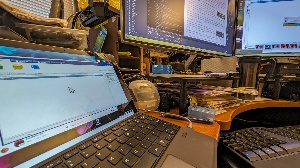 But there’s another situation when it would be nice to be able to use the mouse and keyboard from the desktop system on a Surface Pro tablet computer. Occasionally I need a second computer, so I put the tablet on the desk beside the monitors. This was far from ideal because I had to turn to the computer, use the small attached keyboard, and either the trackpad or a separate mouse.
When Microsoft added Mouse Without Borders to PowerToys, the ability to use the mouse on both computers was helpful. Granted, it was just the mouse, but that’s all I needed most of the time.
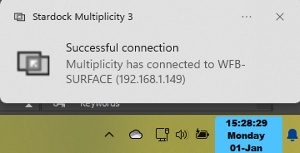 Then I licensed Stardock’s Object Desktop so that I could use several of the components. There’s an extra component, though; one that I hadn’t noticed. Multiplicity lets me use the mouse and the keyboard from the main computer on the Surface Pro tablet without having to push any buttons. In fact, it would allow me to use the mouse and keyboard on the main computer and up to eight other computers. The thought of nine computers arranged around each other is mind boggling.
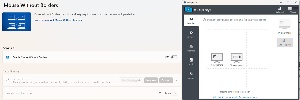 Both Mouse Without Borders and Multiplicity give each computer a security key and both have settings that control when the mouse is operational on each computer. Multiplicity adds the keyboard, and you might expect the need to toggle the active computer with a hotkey, but that’s not the case. When the user moves the mouse off the main computer using what Stardock calls seamless control, the keyboard follows. In other words, the keyboard is operational on whichever screen the mouse cursor is on. And, better still, items placed on the clipboard on one computer can be pasted into a document on the other computer.
The use cases for an application such as Multiplicity are somewhat rare, but when you need this functionality, it’s a great addition to your toolkit.