Listen to the Podcast
11 Aug 2023 - Podcast #844 - (22:06)
It's Like NPR on the Web
If you find the information TechByter Worldwide provides useful or interesting, please consider a contribution.

If you find the information TechByter Worldwide provides useful or interesting, please consider a contribution.
The internet comes in various sizes, from snack size to giant economy family size. Whichever size you have, you’re probably overpaying for it, so it’s important not to buy more than you need. I say that you’re overpaying because prices in the United States are considerably higher than those in most developed countries and the speeds are generally lower.
Click any small image for a full-size view. To dismiss the larger image, press ESC or tap outside the image.
 Considering just wired connections, Singapore and the United Arab Emirates are at the top of the list, but Chile is only a bit lower. Next come Hong Kong, China, Thailand, and (in seventh place) the United States. The figures are from SpeedTest. Denmark, Spain, and Monaco round out the top ten. But when it comes to cost, the United States is in second place, behind only Mexico, according to BroadBand Search, with values based on the cost per megabyte of speed. A Wikipedia article puts the United States in 11th place, but at least we’re ahead of Russia, which is listed in 51st place. If you’d like to consider mobile data speeds, the US is in 25th place, well behind Canada, South Korea, Netherlands, Japan, Norway, and Singapore.
After accepting that you’re probably paying more for slower service than are people in many other countries, it’s wise to ensure that you’re not paying for more than you need and that you’re getting what you pay for.
Let’s start with what you need. This depends on how many people are in the household and what they’re doing while on the internet. A lot of households have dropped cable television service and instead use streaming services. That fundamentally changes internet usage.
So if you’re using the internet only for email, web browsing, social networking, and the occasional YouTube video, your needs are modest. Even the lowest broadband offering will be more than sufficient for a case like that.
At the other end of the spectrum, two adults and three children who connect a variety of computers, telephones, and televisions to the internet and may be streaming five television programs while simultaneously using their computers, some perhaps for computer games, will need more. A lot more. A connection with 300Mbps will probably be adequate, but there still might be some video lags if everyone is watching a different television at the same time and the household’s gamers might experience some objectionable latency.
Perceived speed is actually a function of bandwidth. Adding bandwidth allows you to have more high-data functions active without seeing slowdowns. A 50Mbps data connection is fine for a single high-definition video stream, an audio stream, and a general web browsing. Starting with a mid-range plan allows users to collect enough data to determine how much speed they need. If everything works without a hitch at 300Mbs, consider reducing the speed to save money; if there are objectionable lags, start by confirming that you’re receiving what you’re paying for and, if so, then opt for a plan with more bandwidth.
You could take your internet service provider’s word that they’re providing the speed you’re paying for, but that’s not always the case. If your ISP can’t provide what you’re paying for, they should at least reduce the monthly fee.
Many speed test services exist and it’s important to use more than one when testing. Also choose a time when nobody is using the internet. Email or social media won’t be a problem, but be sure there are no active video streams when you’re testing. And test using a computer that’s hard-wired to the router if you can. If you find that a wired connection is fast but Wi-Fi connections are slow, then you have a problem the internet service provider can’t fix. The ISP is responsible only for the connection to the router; you are responsible for any internal wiring and Wi-Fi coverage.
If you call your ISP and say “My connection is slow,” there’s nothing they can do about it. You need to be able to say something like “I’m paying for a 300Mbps connection and routinely seeing only 100Mbps.” Giving the ISP support person actual number at least improves your chances of having something done about it.
In addition to using more than one testing service, you should run the tests several time throughout the day and on several different days, including weekends. Others who are on your local network node will affect the speed so it’s important to get a comprehensive picture of the service you’re receiving over time.
Most of the tests follow the same procedures. Several files will be downloaded and then discarded. The first file will be small—often 128 KB. Next a larger file will be downloaded. This file is often double the size of the first. The process continues either for a specific number of tests or until one of the individual tests exceeds a timeout value. The “actual” speed reported will usually be based on the downlink speed for the largest file.
The upload test works the same way except that the application creates random data files that are uploaded. No actual data from your computer is used. The uplink process usually consists of fewer tests because home-based internet connections have significantly different speeds for downlink and uplink: 500Mbps down versus 50Mbps up, for example. Home users rarely need faster uplink speeds.
Fast is run by Netflix and provides a single number: The downlink speed. That’s the only number that’s important for streaming video, but users can select an option to show more information. This displays values for latency (lower is better) and the uplink speed.
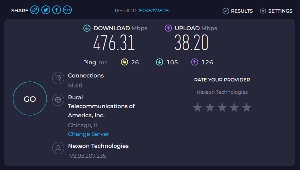 SpeedTest will display a ping response time (lower is better) and average speeds for downlink and uplink connections. Although the service automatically selects the testing server it feels is most appropriate, you can specify another server if you wish.
SpeedOfMe is entirely based on HTML5, so it doesn’t depend on Flash or Java. This is important for IOS and Android devices. It also provides a visual representation that shows downlink and uplink speeds in relation to file sizes. Smaller files have lower throughput because of the time needed to establish and finalize the connection; this is illustrated clearly.
TestMyNet takes a long-term view. Start the process and leave the web browser open, but minimized. It then tests the connection speeds once an hour. TestMyNet suggests waiting for 24 hours and says they believe this is a more accurate representation of your true speed because it depends on responses from servers outside the ISP’s immediate network.
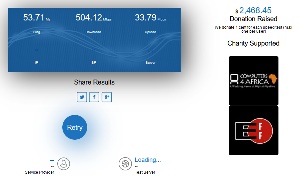 CompariTech has possibly the most unusual approach. Every time the service is used, they donate one cent to Computers 4 Africa or the Electronic Frontier Foundation. That should immediately raise at least one question: How can a free service make contributions when people use it? The top of the screen hints at the answer. There are links for on-line backup, antivirus, virtual private networks, and other service providers. According to the company, “First and foremost we are a pro-consumer website providing information, tools, and comparisons to help consumers in the US, UK, and further afield to research and compare tech services.” So the speed tests serve primarily as bait to get people to come to the site. Those who use the comparison services will see links to the reviewed services. CompariTech earns “referral fees” when someone signs up for the product or service, but the site’s disclosure page notes that they also post links to “services and websites with which we have no advertiser relationship.” Using one of the referral links doesn’t incur any additional cost.
Once you’ve tested and reported a problem if the internet speed is legitimately slow, the ISP will probably try sending a reset signal to the modem and may try a few additional actions. Sometimes this resolves the problem; if it doesn’t the ISP may claim there’s nothing they can do to help. This is a good time to insist on having a technician examine the wire from the utility pole to your house. Squirrels love to chew wires and it’s not uncommon for a technician to find a fault caused by squirrels. This requires that a real technician make a trip to your house and examine the exterior wires. Sometimes mentioning the Better Business Bureau or the state’s public utilities commission will be enough to convince a first-tier tech to schedule the service call or at least to escalate your call to a tier-two tech.
The adage that says any time spent waiting for a computer is wasted is doubly so with the internet, so take a little time to be sure that you need everything you signed up for and that you’re getting what you’re paying for.
Say “package manager” to a Linux user and they’ll know what you’re talking about. Say those words to a Windows user and you might get a blank expression. The Microsoft Store is sort of like a package manager, but there’s a command line package manager called WinGet and there’s a graphical user interface that makes it more accessible.
Click any small image for a full-size view. To dismiss the larger image, press ESC or tap outside the image.
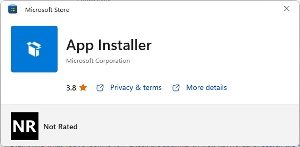 Winget is probably already installed on your Windows 10 or 11 computer. If not, there are two ways to obtain it: From the Microsoft Store or by using a package installer on GitHub. The GitHub option is handy if you already have experience with package installers. You’ll find what you need on the winget-cli page. Otherwise, open the Microsoft Store and search for winget. Click the button to install it. Once WinGet is installed, you can proceed to the process of installing the graphical user interface for it.
Use winget to obtain the graphical user interface. Start with a Command Prompt or with Powershell.
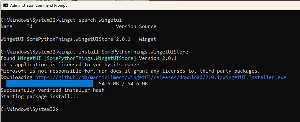 You should confirm the name of the WinGetUI installer by using the command winget search wingetui. The package name is SomePythonThings.WingetUIStore. The version number was 2.0.1 when I installed WinGetUI, but the number you see may be different.
Now you’ll use the command line version of WinGet for the final time to install the graphical user interface. Type winget install SomePythonThings.WingetUIStore. The process takes only a few seconds and is complete when the command prompt returns.

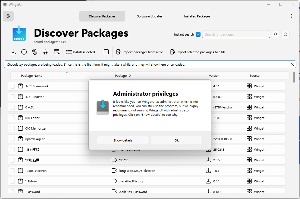 To start WinGetUI, press the Windows key and type winget to display the WinGetUI app icon. Resist any urge to run it as Administrator. If you do, the application will warn you that this would be a security issue. The first screen you see should offer Winget, Scoop, and Chocolatey. Make sure there’s a check mark in the WinGet box. Scoop and Chocolatey are other package managers. Enable as many of them as you want.
The first time you open WinGetUI, the Discover Packages screen will probably be blank. That’s because the app needs to query all of the package managers you selected and this can take a few minutes.
 If there are still no packages displayed after a number appears under the words “Discover Packages”, click (1) the vertical elipses in the upper right corner to open Settings. Open User Interface Preferences and select (2) List packages if the query is empty on the "Discover Packages" tab. Then return to the (3) Discover Packages tab. If the package listing is still blank (it probably won’t be), click the (4) Refresh button.
There are three tabs: Discover Packages, Software Updates, and Installed Packages. To add an app, find it on the Discover Packages tab, either alphabetically or by typing part of the application name in the search box. By default the packages are listed in alphabetical order, but you can change the order to the package ID in the second column, or the source (WinGet, Scoop, or Chocolatey), or even the version number if you can think of a reason to do that.
To install one or more packages, place a check mark in the furthest left column for the apps you want and then click one oif the install options: Normal install, install as Administrator, skip the hash check, or perform an interactive install. There’s also a button that will display information about the selected package.
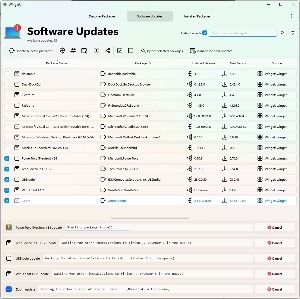 The Software Updates tab lists any installed packages that have new versions. To install an update, click one or more of the check boxes in the left column and then click the update icon.
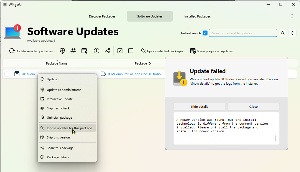 In some cases an update may fail and WinGetUI will display the cause of the failure.
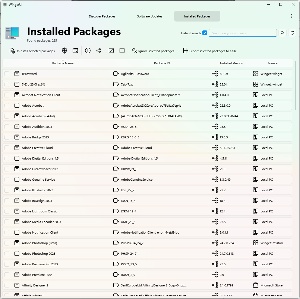 The third tab lists all installed packages on the computer.
You probably noticed that I said it’s unwise to run WinGetUI as Administrator, but WinGetUI has an option to install packages as Administrator. These are two different things: Running WinGetUI as Administrator is dangerous, but some applications must be installed as Administrator or work better when they are. There are two primary reasons to avoid running WingetUI as administrator. The first involves the Scoop package manager if you’ve installed it. The second is that all apps WinGetUI installs will be installed as Administrator if it is running as Administrator.
The Scoop package manager is intended primarily for advanced users. As such, I haven’t installed it, but you’ll find the instructions here if you want to.
Photoshop Beta, which is available to anyone who licenses Photoshop Creative Cloud, continues to sprout new features. I’ve shown Generative Fill, and now there’s a close cousin called Generative Expand.
These features are new. They don’t always perform as you’ll expect them to. In many ways, they’re not exactly ready for prime time. Yet. But they are amazing even in early beta.
Let’s look at how you might use Generative Expand and then examine the current primary shortcoming.
Click any small image for a full-size view. To dismiss the larger image, press ESC or tap outside the image.
 Maybe you have a photo of some delicious baked beans, but the image crops off a bit of the bowl’s back edge, a bit of the left edge, and quite a bit of the bowl’s front edge. You wish you had included the whole bowl. So you open the image in Photoshop Beta, grab the crop tool, and expand the image on the back, left, and front sides. With Generative Expand selected and without any text in the description area, you press Generate.
 The resulting image is surprisingly accurate. Can you see any visible difference between the real bowl or table cloth and what Adobe added? I can’t, but this is a relatively low resolution image and both Generative Fill and Generative Expand currently have significant resolution limits. If you start with a small image, you don’t see the difference.
 Where you will see a difference is with a high resolution image. Perhaps I have a photo of a salad that’s taller than it is wide, but I need a square image. A simple crop would remove too much of the hand or too much of the foreground. So using the crop tool with a 1:1 aspect ratio, I extend the image to the right. This is a high-resolution image; the original is 3712 × 4335 pixels and the final image will be 4335 × 4335 pixels.
 A small version of the expanded image looks perfect, but a high resolution version shows the problem. The spot where the original image ends and the generated part begins is clearly visible because the generated area has much lower resolution.
Adobe’s objective is probably to reduce processing time. Doing this magic in high resolution will take a lot longer. Making it fast but a bit rough will encourage more people to try it and the developers will get more feedback from users. Today both Generative Fill and Generative Expand have limited uses in the real world, but it’s easy to imagine how valuable these tools will be in the not-too-distant future.
Spams, scams, and creeps on the internet are common topics today, but the same was true in 2003 when I wrote about scammers who were trying to fool users who connected to the Internet via Earthlink.
Earthlink user? The creeps are out to get you. Watch out for fake messages that claim your credit card was rejected. If you follow the link, the creeps then ask for your credit card number (don't you think they might already have it if they're legitimate?) and every other piece of information that would allow them to steal your credit card number and your identity.
The people who put together sites like this (this one is housed in Australia) think Internet users are idiots. All too often, they're right. In case you wonder why I'm concerned about Microsoft's use of a company that obscures is mailing address, consider this ... "from" Earthlink.
Considering that there are forgeries such as this on the Internet every single day, does it seem logical or prudent to you for Microsoft to do what it did (see earlier report.) There are words to describe Microsoft's actions and those of the creeps that set up this site, but neither of those terms is something that we can use on the radio on Sunday morning.
Unfortunately, 20 years later I don't remember what Microsoft did and there was no link to ”see earlier report”. Oh well.