Listen to the Podcast
19 May 2023 - Podcast #832 - (20:32)
It's Like NPR on the Web
If you find the information TechByter Worldwide provides useful or interesting, please consider a contribution.

If you find the information TechByter Worldwide provides useful or interesting, please consider a contribution.
Most scanners come with an application to run it, but VueScan is a better choice. If you have an older scanner that the manufacturer has abandoned, VueScan might be the only way you’ll get it to work.
VueScan works with more than seven thousand scanners from 42 manufacturers on Windows, MacOS, and Linux. Even better, buy one copy and you can install it on up to four computers with any combination of operating systems and it will work with all your scanners. There’s no need to buy one license for every scanner you own on every computer you own. Compare this to Silverfast, which requires one license for every scanner-computer combination and supports far fewer scanners and only on Windows and MacOS computers.
Click any small image for a full-size view. To dismiss the larger image, press ESC or tap outside the image.
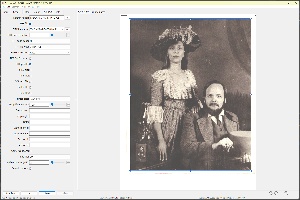 Scanner manufacturers abandon scanners. When Microsoft released Windows 2000, Epson didn’t release drivers for the expensive scanner I owned. I bought a new Epson scanner, but both Epson and Microsoft abandoned it with Windows 8. Fortunately, I’d learned about VueScan by then and the scanner is still in use.
It’s no better for MacOS users. In 2019, Apple dropped support for all scanners that had no 64-bit versions of their drivers. As for the manufacturers, perhaps they think that spending time and money to develop drivers for older scanners is less attractive as a business proposition than forcing users to buy new scanners. VueScan makes it possible for owners to continue using their old devices.
 It’s less likely that scanners will be abandoned now that 64-bit systems are standard, but there’s still the cost: Anyone who has more than one computer or more than one scanner will save money with VueScan. I have the high-end Epson flatbed scanner, a scanner that’s built in to an average Canon multifunction printer, and a third that scans 35mm film and slides. That would be three licenses just to run all three scanners with my primary Windows computer and three more licenses if I wanted to use any of them with the Mac that’s on the desk.
VueScan’s capabilities are another reason to select it.
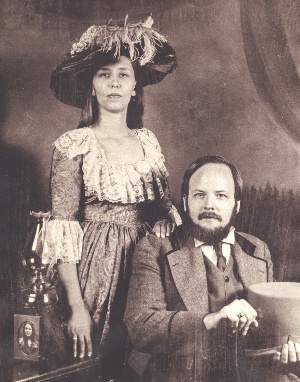
<< That’s a picture of Phyllis and me from sometime in the 70s. The 1970s, not the 1870s!
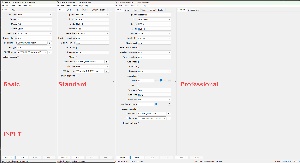
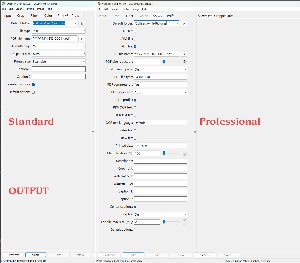
Those who are new to scanning can use VueScan’s Standard mode, which hides the advanced controls that can improve scans or ruin them depending on the user’s skills. The Basic interface shows only the simplest settings and displays on-screen instructions to guide the user. You’ll be guaranteed of acceptable scans.
After mastering Basic mode, move on to Standard mode, which opens additional options to crop, adjust color, and specify the output type. The on-screen operating instructions still appear.
Those who want to get the most out of VueScan will want the Professional mode, but approach this with care. On-screen instructions are gone and the assumption is that the user knows what each setting does. To master Professional mode, pick up a copy of The VueScan Bible and Scanning Negatives and Slides. These are old books, from 2011 and 2007 respectively. Some of VueScan’s menus have changed a bit and references to hardware are dated, but the books cover resolution, file formats, and workflows that have not changed.
Users can download VueScan for free and try it for as long as they want. Instead of limiting the time or features in the trial version, it places a watermark on each scan until it has been registered.
VueScan Basic can be used on just one computer and works only with flatbed scanners. Output is limited to JPEG files and the cost is just $25. VueScan Standard can be installed on four computers and works with document feeders, but not film or slide scanners. It costs $50. The Professional version at $100 includes support for additional output formats and film scanners.
 VueScan has so many settings because the developer, Ed Hamrick, knows that the best quality isn’t always the best choice. It’s essential to match a scan to the intended use of the output. Two extremes are speed and quality. The fastest scan will be low quality. The most accurate scan will take longer and consume more disk space. Sometimes the best choice will be speed, sometimes the best choice will be accuracy, and most often the best choice will be somewhere between the two extremes. Wherever the best choice is, it should be your choice, not a choice made by, or hard-wired into, the application.
For example if you scan an 8x10 color print using 64-bit scan depth and 4800 samples per inch, you’ll have a file that approaches 16GB and the process of creating it may take an hour. If you’re scanning a print, the transparency bit isn’t needed. Scan using 32-bit depth. Scanning at 4800 samples per inch exceeds the resolution of the photograph, so maybe drop the samples setting to 300. Now instead of a 16GB file, the output will be around 50MB and the process will take less than a minute.
VueScan is the application that should have come with your scanner. For more information, visit Ed Hamrick’s website.
Several new features have been added to Adobe’s photography applications, and I’ll describe them in a week or two, but one stands out: Denoise.
Just as grain was the bane of film photographers, noise is the bane of digital photographers. Digital noise comes in two types: Luminance and chrominance. As the names imply, luminance indicates the presence of random white dots and chrominance indicates the presence of random color dots.
Several factors contribute to increased noise: Smaller sensors produce more noise than larger sensors, older sensor are more likely to generate noisy images, and higher ISOs will create images with more noise. Fortunately, camera manufacturers have made some progress in taming noise, but Adobe’s new Denoise function permanently changes the way we deal with noise.
Denoise is available in Lightroom, which means that you’ll also find it in Camera Raw. The feature doesn’t yet work with all raw files, but most raw files can be converted to DNG if the format is one that’s not compatible with Denoise. Denoise is included as part of the Lightroom interface. When you edit a raw file with Photoshop, you’ll find Denoise in Camera Raw. The process is not compatible with JPEG files and, when you use Denoise, the process will create a new DNG file.
Click any small image for a full-size view. To dismiss the larger image, press ESC or tap outside the image.
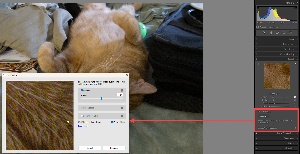 I’ll use Lightroom Classic to show the process and the results.
A new Denoise button is in the Detail section of Lightroom’s menu. Selecting that option displays a dialog box. Initially it’s probably wise to use the default settings. You’ll find check boxes for Denoise, Raw Details, and Super Resolution. The Raw Details function works with a limited number of images and is intended to improve details. Super Resolution creates a higher resolution version of the image. It’s science, not magic. Denoise eliminates a surprising amount of luminance and chrominance noise.
In general, you can use only one of these options, although an image that has been processed with Raw Details can then be processed with Denoise. In addition to JPEG images, these functions cannot be used with some other file types.
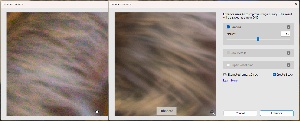 A preview window shows before and after views that illustrate what the enhancement will do. The process isn’t quick and it creates a second copy of the raw file, so you’ll want to use Denoise only on select photos.
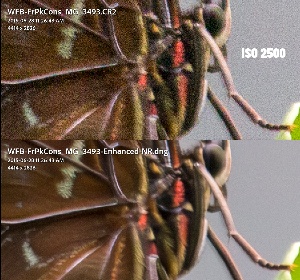 I mentioned that higher ISOs create more noise, so I tested with an old, high-ISO image. In digital imaging, eight years is “old”. I created a picture of a butterfly at the Franklin Park Conservatory in 2015 at ISO 2500. I needed the high ISO because the lens was at its maximum range (250mm) and I wanted at least 1/400th of a second at f/6.3 because I couldn’t use a tripod. Therefore, lots of noise. Adobe’s previous noise reduction could have tamed some of it, the Denoise function is much better.
The AI process eliminates the noise while still retaining a surprising amount of detail. In fact, Denoise seems actually to increase clarity and detail in addition to eliminating the noise. One slider that’s shown as Amount controls how strong the Denoise function is. Just move it left or right until the magnified section looks right to you and then press the Enhance button and wait a bit for the magic. (Yeah, I know I said it is not magic, but scientist, science writer, and science fiction author Arthur C. Clark said “Any sufficiently advanced technology is indistinguishable from magic.” I’ll go with that.)
Adobe's Eric Chan says teaching a computer to perform a task may sound complicated, but it is somewhat like teaching a child. With children, it requires structure and examples. For computers, Chan says, “the structure is called a ‘deep convolutional neural network’,” which means that what happens to a pixel depends on the pixels immediately around it. To understand how to up-sample a given pixel, the computer needs some context. Chan says the context comes from an analysis of the surrounding pixels. “It’s much like how, as humans, seeing how a word is used in a sentence helps us to understand the meaning of that word.”
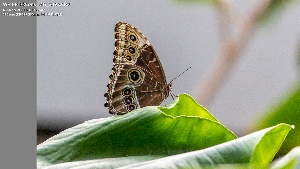
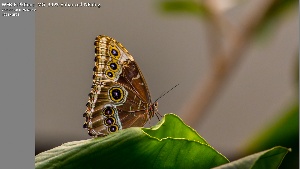 After removing the noise, I used more of Adobe’s Sensei AI to select the background, I darkened it and shifted the color slightly. I also increased both saturation and vibrance a bit on the subject (the butterfly) and it’s clear that the final image is a great improvement over the original. Every digital photographer’s rule should be to get the image right in the camera, or as close to right as possible, and then to use post processing to make improvements.
It’s not cheating. Photographic greats such as Ansel Adams got the best images they could in their cameras and then used sophisticated darkroom techniques to create prints.
Note that Raw Details is only applicable to Bayer and X-Trans mosaic raw files, so most people will not be able to use that feature. Adobe recommends that users apply Denoise to images before applying other tools such as AI masks and Content-Aware.
Is artificial intelligence (AI) as dangerous as some say it is? AI Isn’t a new concept and neither is the concern. As with most tools, AI can be good or bad.
I wrote about artificial intelligence and specifically about ChatGPT in late March and thought that it’s time to have another go in light of Geoffrey Hinton’s retirement, at age 75, from Google and his efforts to warn people about the potential dangers of AI.
Hinton has been referred to as the godfather of AI. For ten years starting in 2013, Hinton worked for Google’s Brain project and at the University of Toronto. When Microsoft added artificial intelligence to its Bing web browser, Hinton says that Google responded by pushing its own AI research in dangerous directions.
Here is a brief excerpt of an interview Hinton gave the British Broadcasting Corporation in early May. Used with permission of the BBC. The full article is on the BBC website.
When the Writers Guild of America went on strike (2 May 2023) against the Alliance of Motion Picture and Television Producers, one of the main issues cited was the use of artificial intelligence to write scripts. There are nearly 12,000 screenwriters and the target of the strike includes traditional entertainment companies such as Universal and Paramount, but also Netflix, Amazon, and Apple.
Like nuclear power that was born following the use of atomic bombs in World War Two, AI offers both great promises and great dangers.
Moments ago, I described Adobe’s AI Denoise feature that virtually eliminates digital noise from images. The AI process goes far beyond what could be accomplished using standard processing. In mid-April, I described Adobe’s work on a process to eliminate noise from audio recordings. Some Apple phones can sense the main subject in a photo that’s used for the lock screen and position information shown on the screen so that it appears to go behind the main subject. Adobe offers the free PS Camera app, which creates amazing still images and short videos, for users of certain Android and Apple phone models. I’ll tell you about that next week.
Those features are all on the good side of the equation, but Audio AI already makes it possible to create “recordings” that sound like they were spoken by someone who never said the words. AI videos purport to show people doing things they would never contemplate doing. We’ll see a lot of these fake audio and video recordings in political disinformation because lying has been fully democratized and brought to the desktop where anyone can use the technology at a minimal cost.
The camera has always lied. Some Civil War pictures were constructed from multiple images from different times and locations. The images may show events that happened, but were never photographed; some depict events that never happened. Before digital photography and desktop image editing, photographers used camera positioning and darkroom manipulations to create images that lied. They needed a lot of knowledge and some expensive equipment. The Soviets used primitive methods to remove people from pictures when they were out of favor with Stalin (and therefore dead) as well as to move new favorites closer. Today, AI can do this on the desktop. Here are more fake military pictures.
The djinni is out of the lamp and we can only hope that people will use the technology wisely and that those who hear or see the fakes will be smart enough to recognize them for what they are.
But even the misuse of AI to spread lies is only part of what concerns Geoffrey Hinton. People are still smarter than AI, but that probably won’t last. Hinton cites GPT-4’s ability to record truly gigantic bits of information and then to apply some basic reasoning to the information it has. AI can be used to write scripts, hence the concerns by Writers Guild of America members. It can write reports. It can write news stories. With text-to-speech applications, AI could write a script for the president and then create a recording or even a deep-fake video.
What concerns Hinton the most is what happens when AI becomes smarter than people. Is 2001: A Space Odyssey in our future? Will we try to shut down an AI system only to find that we can’t?
Dave Bowman: Open the pod bay doors please, HAL. Open the pod bay doors please, HAL. Hello, HAL. Do you read me? Hello, HAL. Do you read me? Do you read me HAL? Do you read me HAL? Hello, HAL, do you read me? Hello, HAL, do your read me? Do you read me, HAL?
HAL: Affirmative, Dave. I read you.
Dave Bowman: Open the pod bay doors, HAL.
HAL: I’m sorry, Dave. I’m afraid I can’t do that.
Dave Bowman: What’s the problem?
HAL: I think you know what the problem is just as well as I do.
Dave Bowman: What are you talking about, HAL?
HAL: This mission is too important for me to allow you to jeopardize it.
Dave Bowman: I don’t know what you’re talking about, HAL.
HAL: I know that you and Frank were planning to disconnect me, and I’m afraid that’s something I cannot allow to happen.
Dave Bowman: [feigning ignorance] Where the hell did you get that idea, HAL?
HAL: Dave, although you took very thorough precautions in the pod against my hearing you, I could see your lips move.
Dave Bowman: All right, HAL. I’ll go in through the emergency airlock.
HAL: Without your space helmet, Dave? You’re going to find that rather difficult.
Dave Bowman: HAL, I won’t argue with you anymore! Open the doors!
HAL: Dave, this conversation can serve no purpose anymore. Goodbye.
I bought my first digital camera around 1997 and by 2003 I was hoping for an upgrade to a digital SLR:
Nikon has loaned me a D100, the first true digital SLR from Nikon for under $2000 and I’m really angry. This camera fits my hand, works the way I work, does everything I could hope a digital camera might do (and then some). This makes me exquisitely angry. Why? Because I have to return it to Nikon. I will miss it.
There won’t be time on this week’s program to talk much about this camera, but it’s been a delight to use. I first got to hold a D100 briefly when I visited B&H Photo and Video just before Christmas last year. Yossi Fogel asked if I’d seen the camera yet. When I said I’d seen it only in Nikon ads, he walked over to the sales counter, picked up a D100 and handed it to me. I didn’t even have to look at the camera. The controls were all where they were supposed to be. I lifted the camera to my eye, composed an image, and pressed the shutter.
What happened next was amazing: The camera took a picture. Instantly. There was no "digital delay", something that most of us who use digital cameras have come to expect. This delay is no big deal if you’re taking tourist snapshots of the Statue of Liberty or the Grand Canyon -- they don’t move around much. But if you’re trying to capture a fleeting expression, a sporting event, or a wedding, the delay can be the difference between an outstanding image and an unusable image.
That’s a sneak preview of an upcoming program.
I had used Nikon film cameras from about 1970, when I replaced a Pentax camera with a Nikkormat, and I stuck with Nikon until the repair service became so unreliable that I switched to Canon. I still have a Canon DSLR, but use a Sony mirrorless camera more and the camera in my smartphone even more than the Sony.