Listen to the Podcast
2 Feb 2024 - Podcast #867 - (20:54)
It's Like NPR on the Web
If you find the information TechByter Worldwide provides useful or interesting, please consider a contribution.

If you find the information TechByter Worldwide provides useful or interesting, please consider a contribution.
Anyone who’s still running a Windows 10 computer will have a decision to make in the somewhat distant future. Support will end for Windows 10 in October 2025, so it’s still more than 18 months in the future. Between now and then you need to decide how you want to proceed.
But there’s something you can do before late 2025 rolls around, if you’ve put off updating to Windows 11 simply because Microsoft says your Windows 10 computer isn’t eligible. That is, you’re someone who would prefer to be running Windows 11, but the Windows 11 installer refuses to comply.
If that’s the case, there’s a good chance that your computer can be upgraded to Windows 11. It’s not guaranteed because a small subset of Windows 10 computers really can’t be upgraded. And that’s the topic for today.
Before going there, consider the options you’ll have in October 2025 if you’ve resisted Windows 11 because you don’t want to upgrade: You could continue running Windows 10. After all, some people are still running Windows 7 or even XP. That’s not a good choice in my estimation, but it’s possible. The second option would be to use the process I’ll be describing today to upgrade to Windows 11. And option number three involves buying a new computer. After all, if you’ll still be running an early Windows 10 computer in 2025, it will be at least 10 years old.
But for those who would like to force Windows 11 onto a computer that’s technically “not able” to run it, the process I’ll describe may be easier than you expect. It’s the one of the easiest options I’ve seen. Even so, make sure you have a full, verified, and tested backup of the boot drive before proceeding. There’s not a lot that can go wrong in this process, but any operating system update can fail in exceptionally ugly ways.
So prepare for the worst.
It is important to acknowledge again that this will not work for every Windows 10 computer. Although this process relaxes or removes some Windows 11 requirements, there are some that cannot be eliminated. If this turns out to be the case for your computer, the Windows 11 installer will refuse to proceed. The process can eliminate the requirement for Secure Boot, 8GB of RAM, and many older CPUs.
Click any small image for a full-size view. To dismiss the larger image, press ESC or tap outside the image.
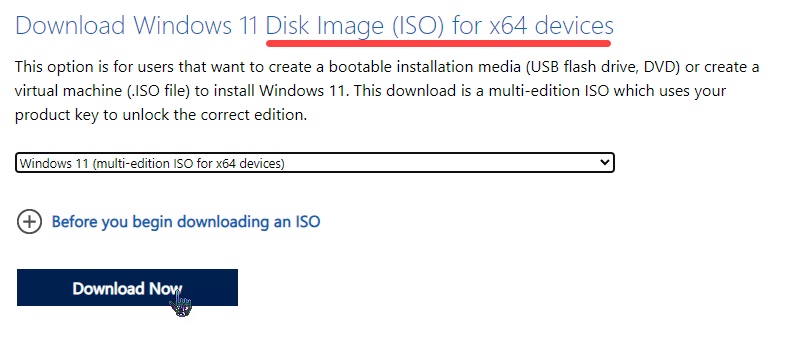 Download the Windows 11 ISO disk image file from Microsoft’s website. The page offers several options, so make sure you select the ISO download option. then specify your preferred language, and verify it. The website will create a link that will work for 24 hours. The ISO file is about 7GB in size.
The installation process involves creating a bootable disc or thumb drive and then using that to install Windows 11. Few computers have CD or DVD players these days, so the better choice is a bootable USB drive. You’ll need a thumb drive that’s empty or that has no important files on it because one of the earliest steps will format the drive.
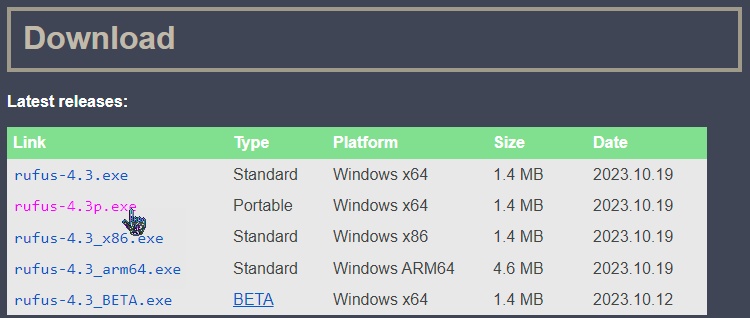 Download Rufus and save it to any location on the computer. Rufus is a free open-source utility. I use the portable version, but the installable version is also fine. It’s a small file, around 2MB.
Now we’re ready for your thumb drive, which has to be at least an 8GB device. Long ago, 8GB would have been an enormous thumb drive. Today, it’s hard to find one that small. Larger drives are fine.
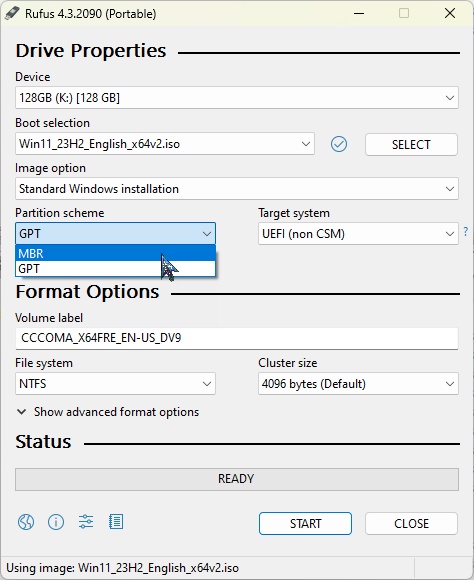 Insert the thumb drive and launch Rufus. If there’s only one thumb drive, it will be selected. If there’s more than one, check carefully under Device to ensure that the correct one is selected. Click the SELECT button and choose the Windows 11 ISO file. Under partition scheme, your choices are GPT and MBR. Because you’re planning to install to an older computer, it’s probably a master boot record (MBR) scheme. If the target computer uses a globally unique identifier (GUID) partition table (GPT) scheme, choose that.
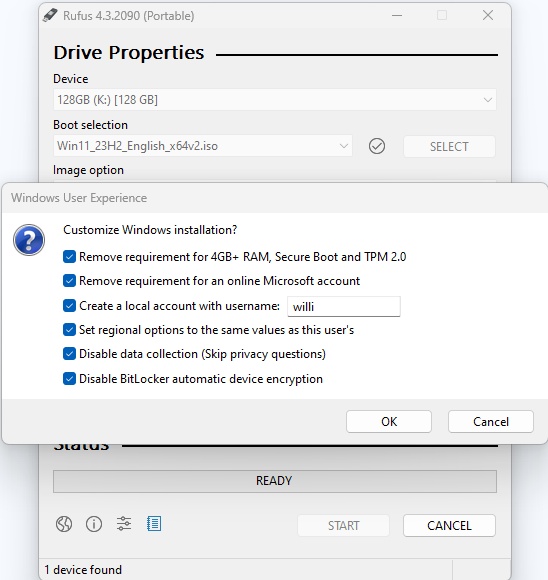 Click START to open the Windows User Experience dialog.
Depending on the deficiencies of the target computer and your preferences, you can disable specific options:
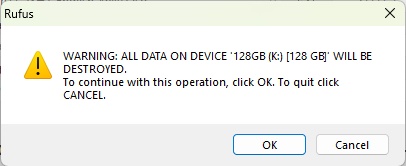 Click OK and you’ll see one more message. Read this warning carefully and confirm that it has identified the appropriate thumb drive because all data on the thumb drive will be deleted when you proceed.
When Rufus is done, boot from the thumb drive and install Windows 11 normally. If your computer isn’t set up to look first to a USB drive, you may need to modify the BIOS settings. One way to get there is via the Windows Recovery Menu, and Windows Intelligence has a good explanation of how to do that.
Is $60 per year too much to pay for an email client? You might think so because both Apple and Microsoft include basic email applications with their operating systems, Outlook is included with Microsoft 365, Thunderbird is free to use on most platforms, and free apps exist for Android and Apple portable devices. But think again.
I use Thunderbird on the desktop computer, but I also spend a lot of time away from the desktop with an Android phone or an IPad tablet. Until now, I’ve had to use separate applications on the mobile devices. Email app Spark +AI runs on Android and Apple portable devices, MacOS computers, and Windows computers. There’s an annual fee, but paying it once enables the app on all of your devices and most of the settings synchronize across the installations.
Spark is still relatively new, so I won’t be replacing Thunderbird on my primary computer, but I’ve installed it on Apple and Android portable devices as well as on my MacOS computer. I plan to install it on the Windows-based Surface Pro tablet. So $60 per year seems reasonable for four devices. I do still send occasional contributions to Mozilla for Thunderbird.
There is a free version of Spark, and that may be sufficient if you simply want to standardize the email application on several devices, but it omits the AI functions. Depending on whether you like the idea of AI composing your messages or not, this might or might not be a big deal. But the free version also omits some powerful tools to organize and prioritize messages. Those features are worth the cost for use on mobile devices, especially if you have multiple email accounts.
Not all features are available for all versions. Smart folders, for example, are not available yet on Android phones, but the developers say that they’re working to create parity between all of the versions. Smart Folders is a feature that can examine incoming messages and place them in specific folders depending on sender, presence of attachments, words in the message, and other comparisons.
Click any small image for a full-size view. To dismiss the larger image, press ESC or tap outside the image.
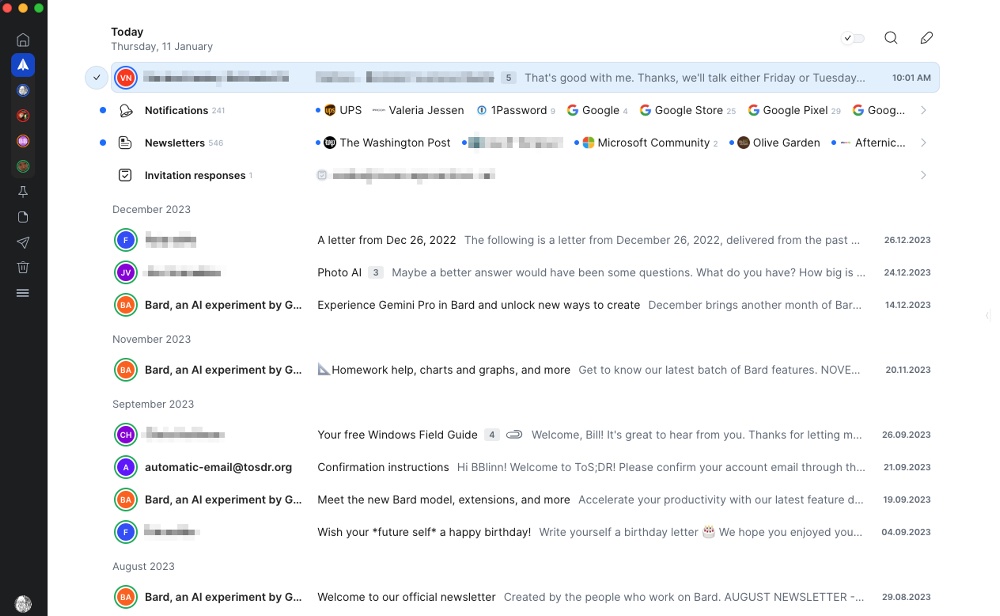
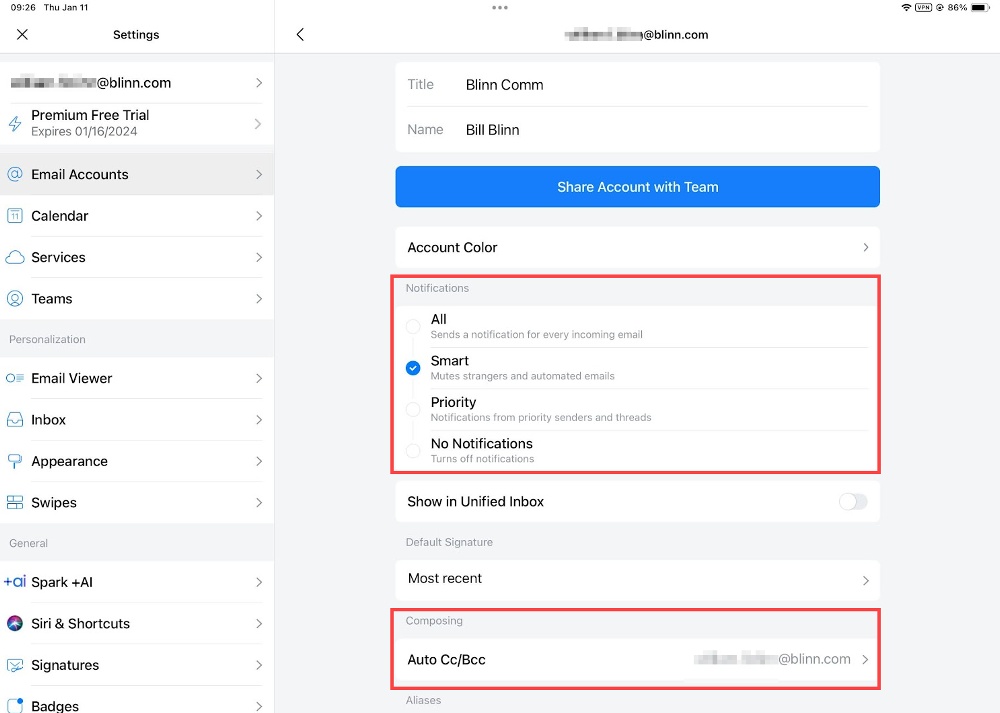 I have Spark set up to check mail from four accounts: my primary account, the TechByter account, an Outlook account, and a GMail account. All of the messages could be shown in a single unified inbox, and that’s what I do with messages to the primary and TechByter accounts. These are set to Smart display, meaning the messages from people I know will be shown immediately and messages from people I don’t know, general announcements, lists, and such will be hidden until I want to see them.
The screen shot is from an IPad. Each account can be included in or excluded from the unified view. The Outlook and GMail accounts are excluded because neither of those accounts is likely to receive messages that I need to see immediately.
When I send messages from the primary account or the TechByter account on a mobile device, it is automatically forwarded to the appropriate account on my desktop computer. As a result, a full record of all messages is saved on the main computer.
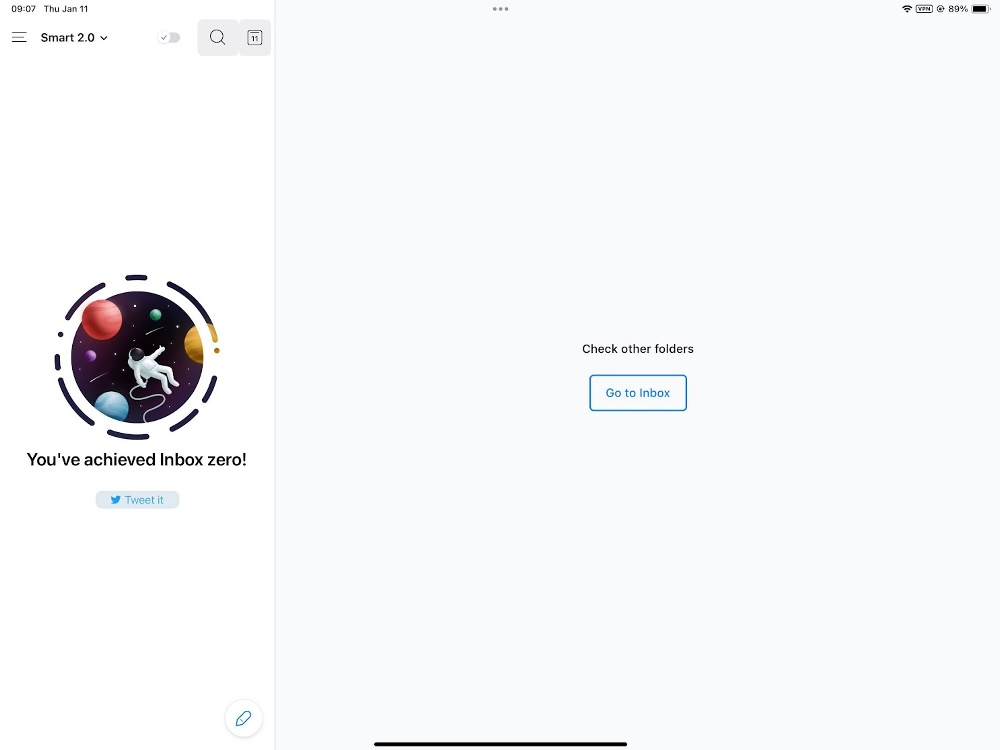 When there are no new important messages in any of the email accounts, Spark displays an “Inbox Zero” message. This is the view on the IPad.
The display on a phone is more narrow as these three images from the Android phone show. (1) The unified inbox is shown, but I can choose to see only messages in any one of the accounts. The folder list can be shuffled and the user can add folders.
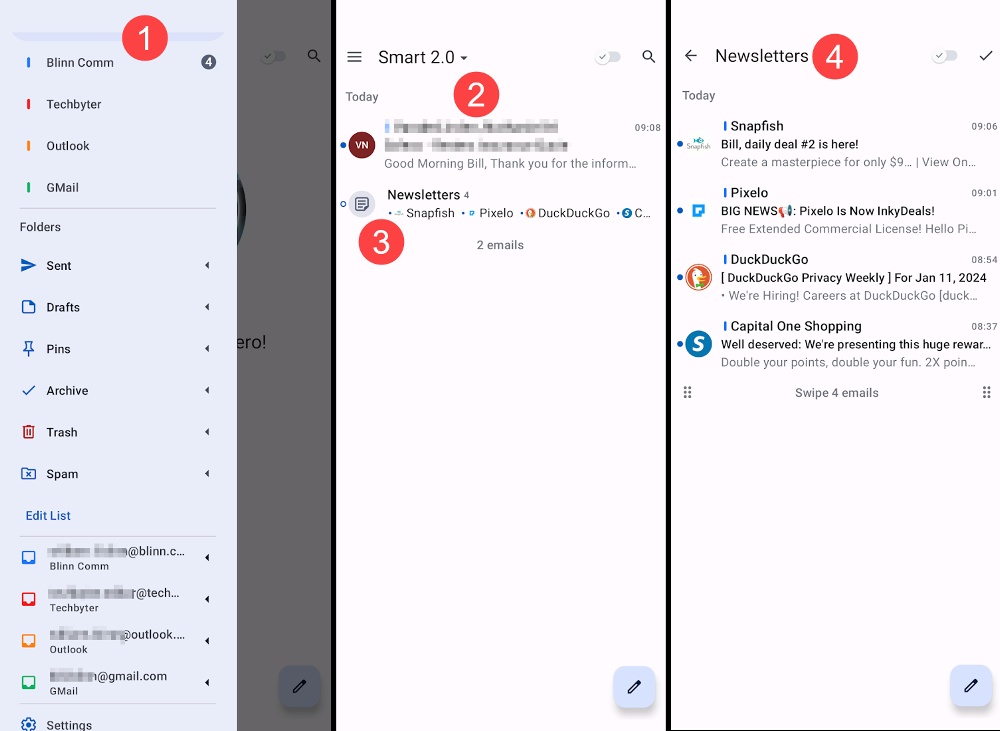 Important messages are (2) shown individually at the top of the list and less important messages appear in (3) categories such as “Newsletters” below the important messages.
Selecting one of the groups open (4) a list of individual messages in the group.
 The display on a MacOS computer rearranges the display so that it’s appropriate for the screen real estate, but all of the information is there.
Spark sets up all accounts as IMAP, meaning that messages are retained on the server. I use POP3 accounts on the primary computer so that all messages will be downloaded for local storage. Because Spark synchronizes settings on all of the user’s devices, adding an email account on one device adds it on all devices. This was a most welcome surprise and saved a lot of time by eliminating the need to set up four accounts on each of four devices.
There are missing features. You can’t request a reading confirmation. I don’t see a way to specify importance for outbound messages, either. But there are unexpected features such as Gatekeeper. Any message from an unfamiliar address is flagged and Spark asks you whether you would like to accept messages from this address in your inbox or block it.
Not particularly uncommon now are features to have AI compose a response. You explain what you want to say and Spark will write the message. I’m not likely to trust that for a while because I can probably type a response faster than I can tell Spark what to say, read the suggested response, and edit it. But if you receive a long message, the AI system can summarize it for you. That could be helpful, but (as Ronald Reagan said) trust, but verify.
For more information or to download Spark, visit the Android, Apple, IOS, or Microsoft store or the Spark website.
Let’s talk about customization. Do you use Windows the way Microsoft says you should or do you change things so that Windows works the way you want it to? This is somewhat like choosing the sport and appearance package on a car, but I don’t care much about cars. Cars are intended to get me from where I am to where I want to be. As long as there’s a decent sound system and a thumb drive with music I like, I don’t care what the car looks like.
That is definitely not the case for computers. Much of what Microsoft does with Windows is fine with me. The operating system seems more logical to me than the MacOS (sorry, Mac fans) and overall much easier to work with than Linux (sorry, Linux fans). Operating systems have more in common than the rabid fans of Microsoft, MacOS, or Linux will admit. I use them all and there’s really no point in arguing superiority. I prefer Windows, so that’s what I use. Fine. You prefer one of the others and that’s what you use. Also fine. Change things or don’t. It’s all up to you and I don’t care.
But if you like to modify the appearance of the operating system, Stardock is for you. I’ve been describing some of Stardock’s applications for the past several weeks. This is a company that I thought had faded away after making it possible for Windows users, in the early days, to make their computers look like Macs or NeXT computers. It was only around the end of 2023 that I found Stardock is still in business and making utilities that change the look and feel of Windows.
Applications such as Sound Packager, Cursor FX, Start 11, and Icon Packager, which is today’s topic.
Icons may be important to you, or maybe they’re meaningless. Either way, you’re surrounded by them in any operating system. They may simply indicate the type of file they’re attached to or they may reveal some of the file’s contents.
Click any small image for a full-size view. To dismiss the larger image, press ESC or tap outside the image.
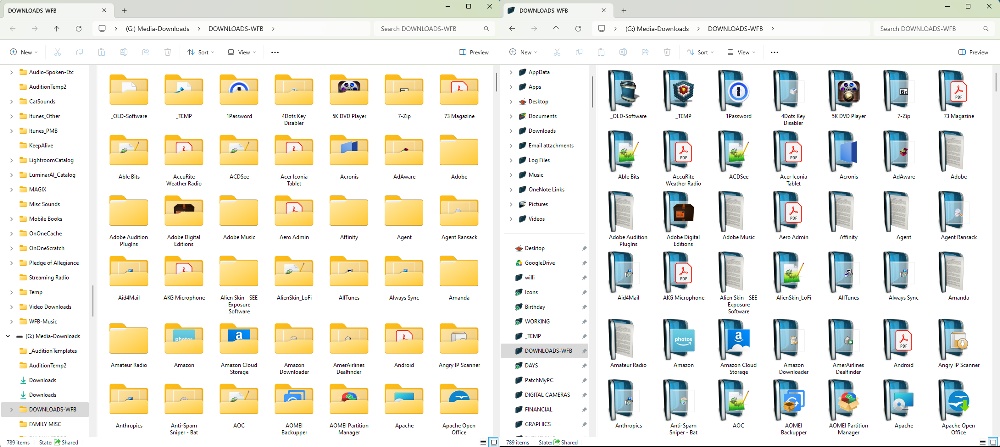 By default, Windows shows an image that looks like a file folder for folders (or, as we old folks refer to them, directories). This graphic can be modified. You can change the graphics even without Icon Packager, but it would require a lot of fiddling with the Registry. Icon Packager makes it easy to change from the default view (left) to one that’s more appealing to you (right).
Icon Packager comes with several suggested sets of icons, others are available for download, and those with sufficient artistic talent can create their own.
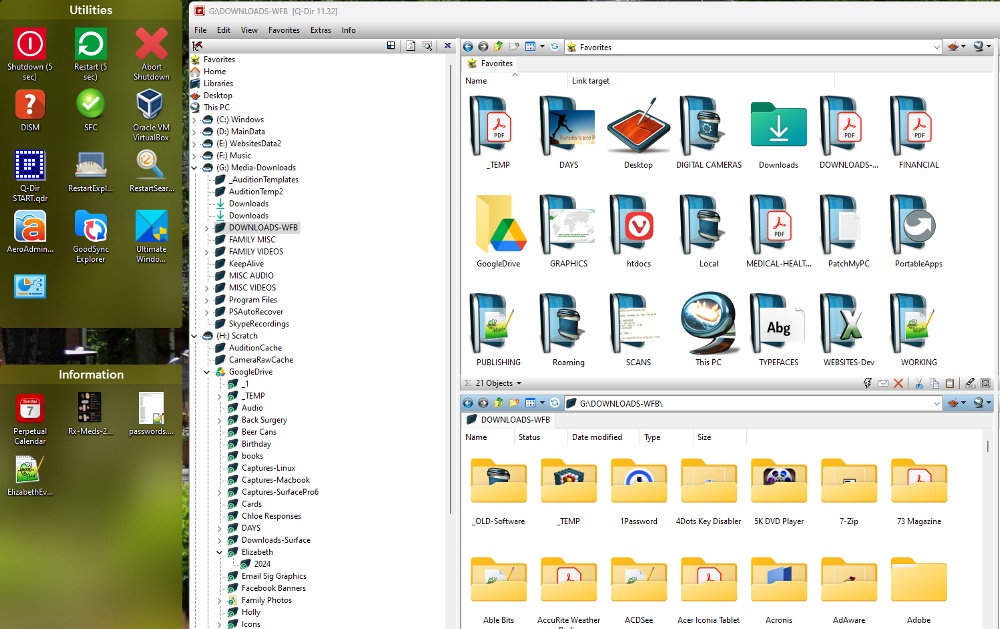 In addition to changing the icons that appear in the Windows File Explorer or explorers such as QDir, Icon Packager modifies icons on the Desktop. Without the utility, it’s possible to apply new icons to shortcuts, which is something I’ve done with some of the shortcuts on my primary computer.
Changing the default icons is a technique that’s been around for years and is one of the most popular ways to customize the look and feel of Windows. Changing the Windows icons has been a key part of desktop customization a long time, but Microsoft has never included the ability within the operating system.
Much like other applications from Stardock, Icon Packager offers extensive configuration options.
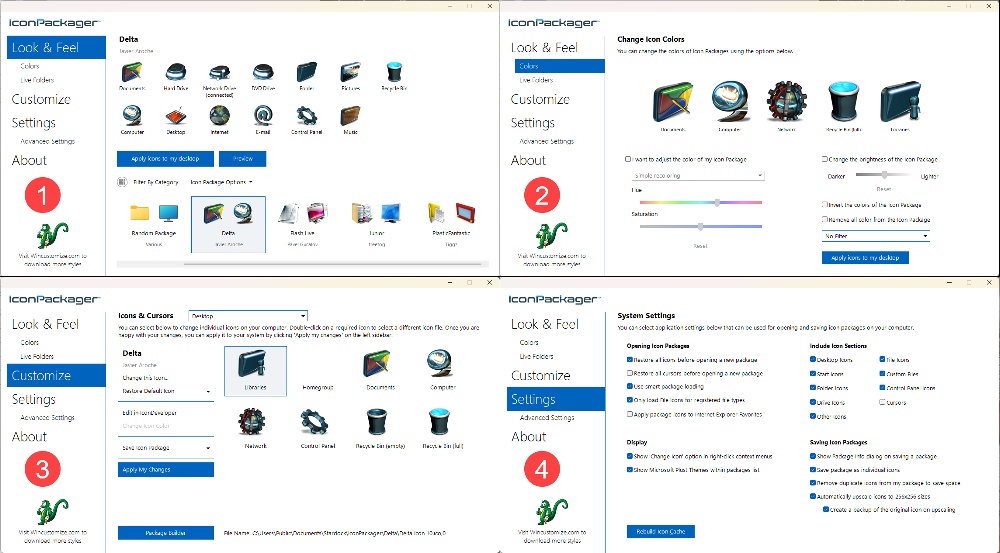 The general Look and Feel tab is where the user chooses which set of icons to use. If none of the included icon sets is suitable, hundreds more are available for free on WinCustomize.
Icon Packager is exactly what’s needed when you aren’t satisfied with the look and feel of Windows as Microsoft builds it. For more information, visit the Stardock website.
TechByter Worldwide is no longer in production, but TechByter Notes is a series of brief, occasional, unscheduled, technology notes published via Substack. All TechByter Worldwide subscribers have been transferred to TechByter Notes. If you’re new here and you’d like to view the new service or subscribe to it, you can do that here: TechByter Notes.