Listen to the Podcast
18 Mar 2022 - Podcast #784 - (21:14)
It's Like NPR on the Web
If you find the information TechByter Worldwide provides useful or interesting, please consider a contribution.

If you find the information TechByter Worldwide provides useful or interesting, please consider a contribution.
Anyone who owns a mobile phone that can send SMS text messages can send Russians the truth about their country's invasion of and war on Ukraine. Russians are almost entirely shielded from the truth. You can make a difference. Learn how you can join the Ukrainian Resistance.
Scanning old film can be challenging, but the process becomes much more difficult when the film is some size other than the 35mm film that was used in dozens of brands of cameras from as early as 1913. Leica introduced its rangefinder 35mm cameras in 1925 and the size became a standard by the 1930s. Scanning larger or smaller negatives can be simplified if you have a digital camera. I've been digitizing old film images for more than a year, but I hadn't had any successes with 120 roll film. Until now.
Even if you have no medium-format film around the house, stick with me for a bit because the process will work for 35mm film, too.
In early February, I wrote about digitizing and sharing old photos, videos, home movies, and other media you may have around the house. I had paid to have slides digitized, but have been scanning 35mm film negatives with a scanner that's built to scan 35mm negatives and slides. The slide scanning operation was sufficiently difficult that having that process done commercially made sense.
There were only a few thousand slides, but I have many thousands of negatives, and a lot of them are medium-format film. Medium-format film is also known as 120- and 220-roll film. A 120 roll has a capacity of 12 6cm square images and the film has a backing paper. A 220 roll doubles the number of images and there's no backing paper. Depending on the camera, the images can be 6×4.5cm, 6×6cm, 6×7cm, or 6×9cm.
The problem with larger film is that few digitizing services work with it. I sent some test strips to a digitizing service, but the cost was high and the results were beyond disappointing. What was more frustrating was that I already had most of what's needed to digitize film with a digital SLR camera, but the process was elusive.
Some flatbed scanners can be used with film. Scanners such as the Epson Perfection Photo series have a back-light unit that shines light through the film instead of using the reflective light that's intended for scans of paper objects. One problem is that the film holders made by Epson seem to be designed to be exercises in frustration. But that's only the starting point. Flatbed scanners really aren't intended to be used as film scanners. But I persisted.
Click any small image for a full-size view. To dismiss the larger image, press ESC or tap outside the image.
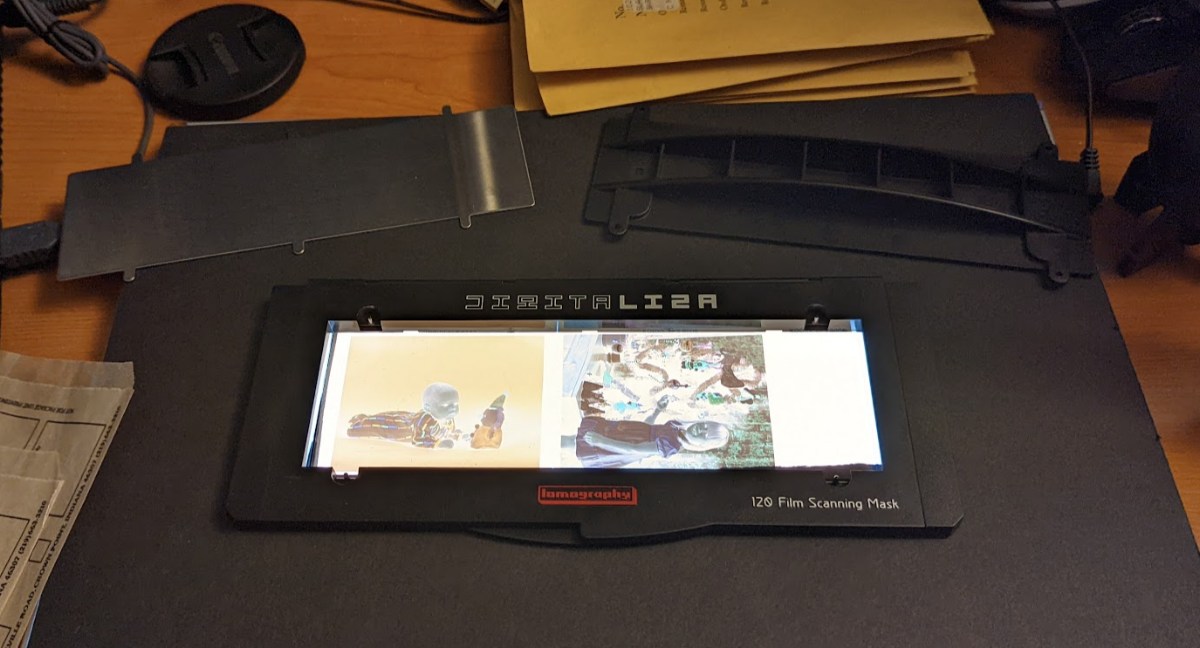
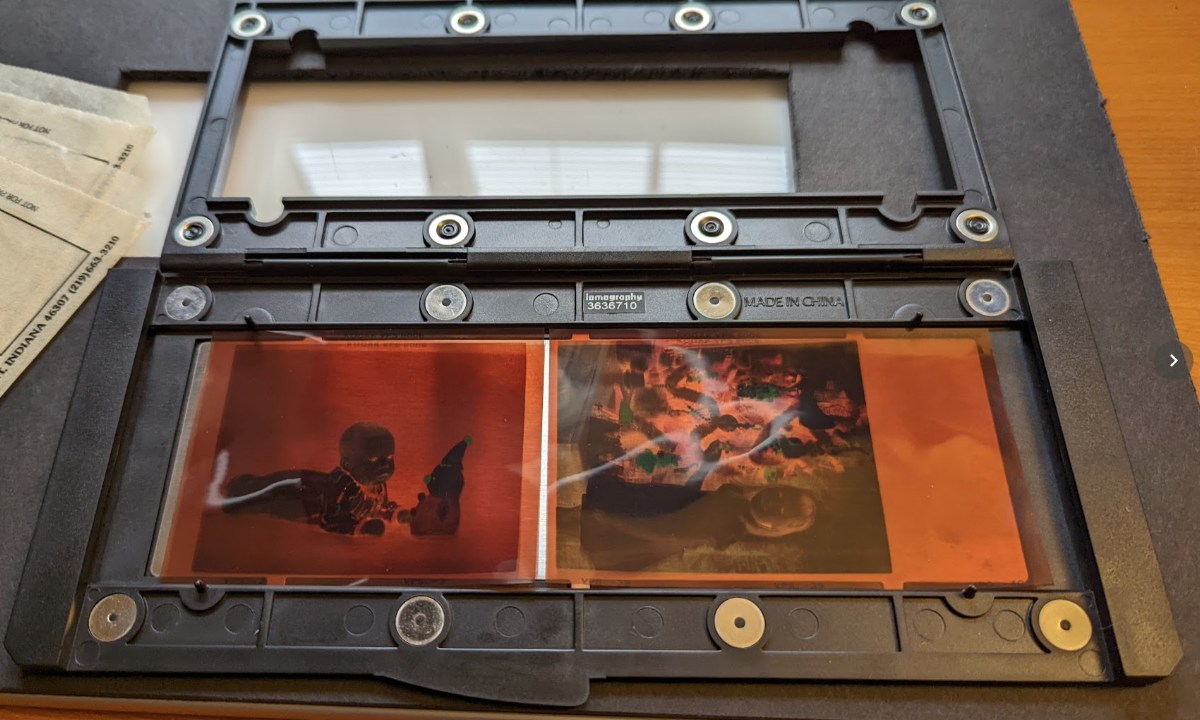 A Lomography Film Scanning Mask seemed to be the ideal solution. The design makes loading film relatively easy and then the device holds the film in place using magnets. The problem was that it doesn't work with my Epson Perfection 3200 Photo scanner despite the claim that it works with all modern flatbed scanners with a back-light unit. However, if you plan to scan film using a digital SLR camera, buy one of these. There's also a model for 35mm film. The Lomography frame might have worked in my scanner if I'd been willing to use Epson's scanning software, but I prefer VueScan.
Any film scan from a flatbed scanner will be mediocre at best, so maybe I should be grateful that it didn't work. The Lomography Film Scanning Mask sells for about $50.
I already had a light box that produces daylight-quality light, a digital SLR camera that can save images in raw mode, a 100mm macro lens, and a sturdy tripod. Attempts to create a frame to hold the film had been unsuccessful. Film curls a bit and it needs to be held flat. Using two sheets of glass would hold the film flat, but often creates what are called Newton's Rings — the result of reflections between two surfaces.
The Lomography frame eliminated the Newton's Rings effect, but taking a picture of a negative still creates a negative image in which all of the colors are reversed and the image has a strong orange cast. Fixing this seemed like it should be easy, but it wasn't easy in practice.
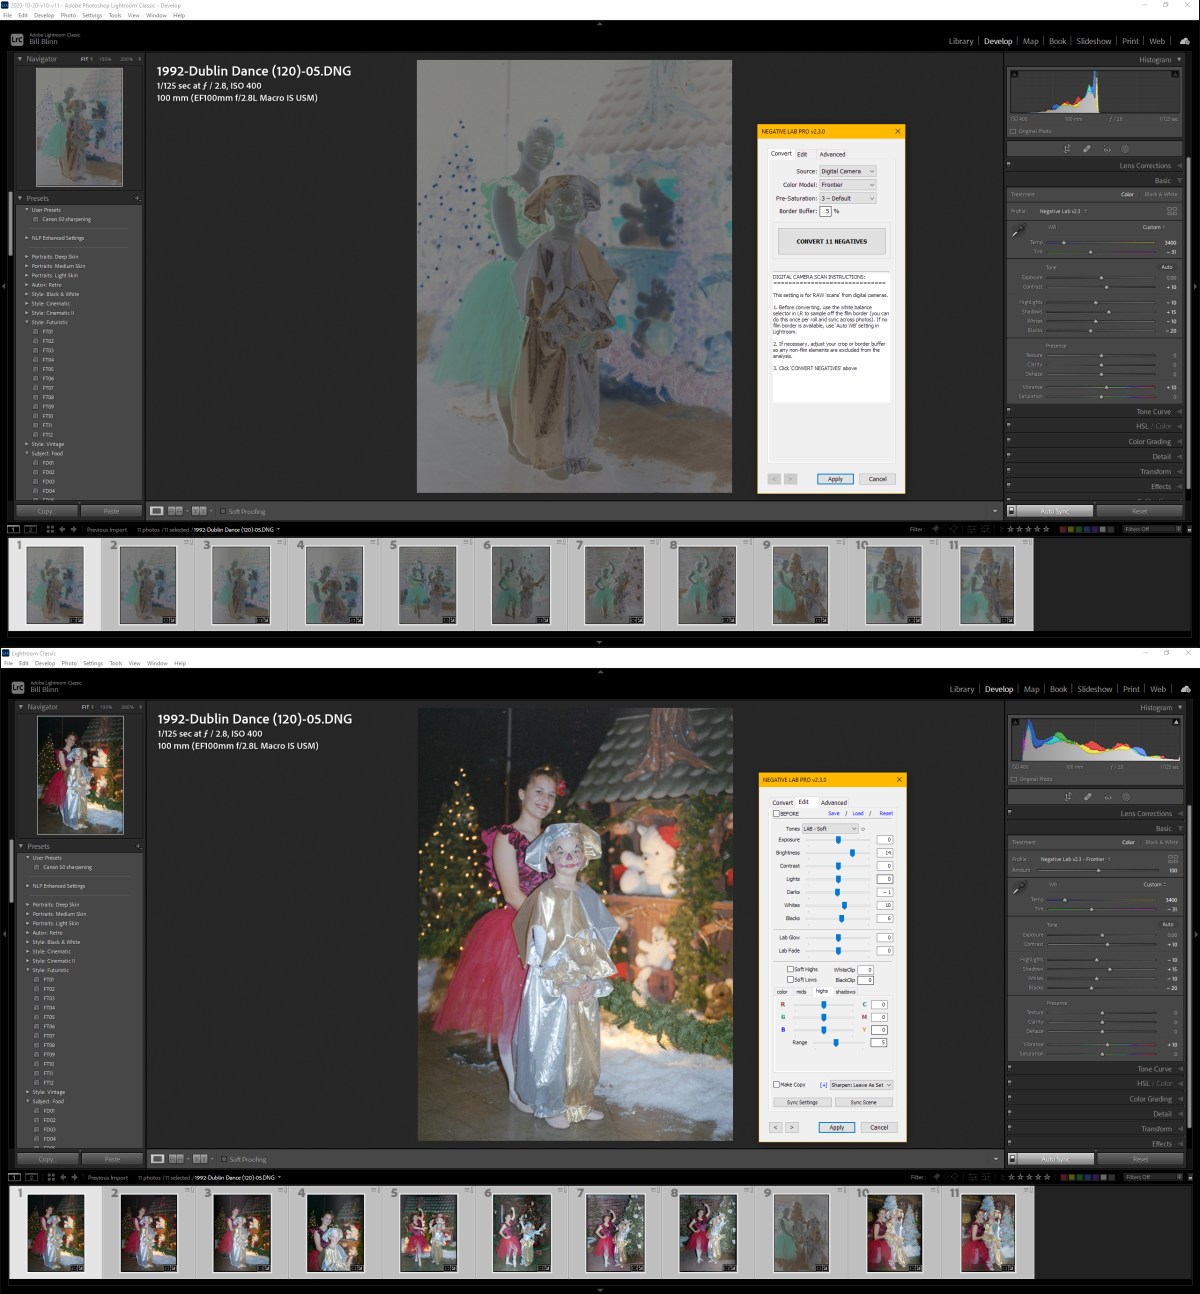
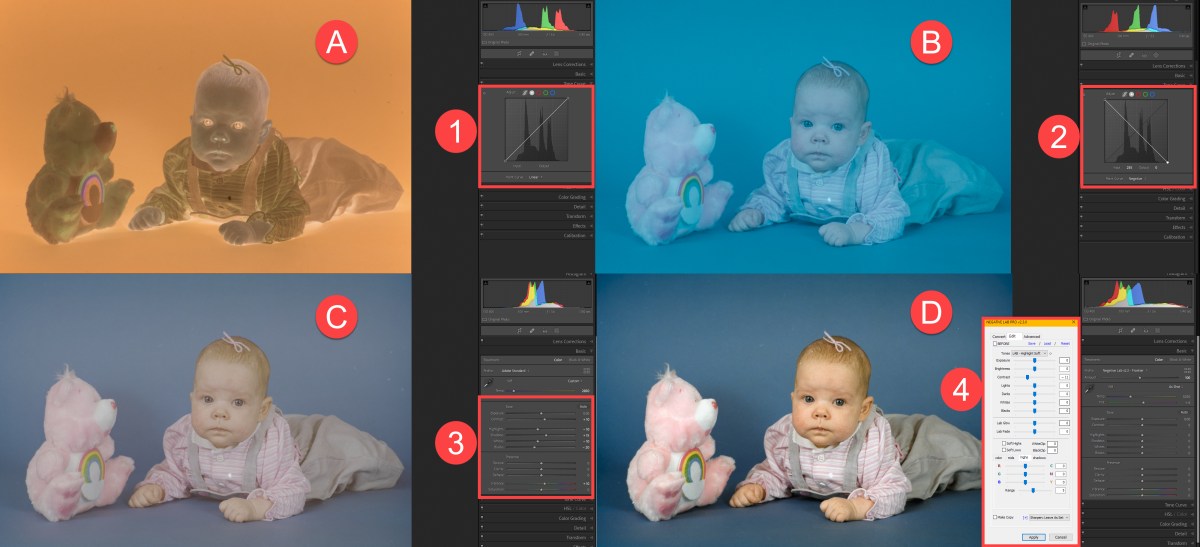 The process begins by being deceptively easy. The (A) imported photo of the negative shows reversed colors and the typical orange cast associated with color negatives. The (1) tone curve is standard, rising from left to right. Changing the image to a (B) positive simply involves reversing the (2) tone curve so that it rises from right to left. That still leaves a blue cast, which is the result of reversing the orange cast from the negative. The process continues to appear easy after (C) setting a white point for the image to drop out the orange cast, but the resulting image's contrast is low. Normally this would be corrected by using Lightroom's (3) basic editing tools. And that's where the process breaks down.
Because the underlying raw image is a negative, all of the controls work in reverse or in other unexpected ways. Increasing exposure darkens the image, increasing contrast decreases contrast, increasing highlights or whites makes them darker, and decreasing shadows or blacks makes them lighter. Most people could learn to deal with those oddities, but the controls for texture, clarity, dehazing, vibrance, and saturation are simply confusing. And the controls for temperature and tint are all but impossible.
And that's where a $100 plug-in for Lightroom Classic saves the day. Negative Lab Pro eliminates the frustrations and creates (D) clear, sharp images from negatives. The plug-in's controls (4) can be used to further adjust the resulting images.
You'll need a camera, of course. It doesn't matter whether it's a digital SLR or a mirrorless camera, but it does need the ability to store images in raw mode and it should have an option for interchangeable lenses.
Speaking of lenses, avoid zoom lenses for this kind of work. You want a lens that will focus sharply, corner to corner, on a flat subject. My preference is a 100mm Canon macro lens, but that's an expensive lens. Fortunately, I had bought one a few decades ago. Some third-party lenses will work, and a 50mm macro lens will cost less. The third alternate would be a non-macro prime lens that can focus close. Zoom lenses should be avoided. It's possible to find excellent used older macro lenses that can be fitted to modern cameras, but they can be used only in fully manual mode, which is just fine. I'll explain why in a moment.
This is not a task that can be done with a hand-held camera, so you'll need a sturdy tripod or a copy stand. I already had an antique Bogen 3021 tripod that can be set up with the camera head on the bottom. Bogen is now owned by an Italian company. If you don't have a tripod and expect never to use one, a copy stand would be the better choice, but check the weight of your camera and make sure the stand is rated for the appropriate weight.
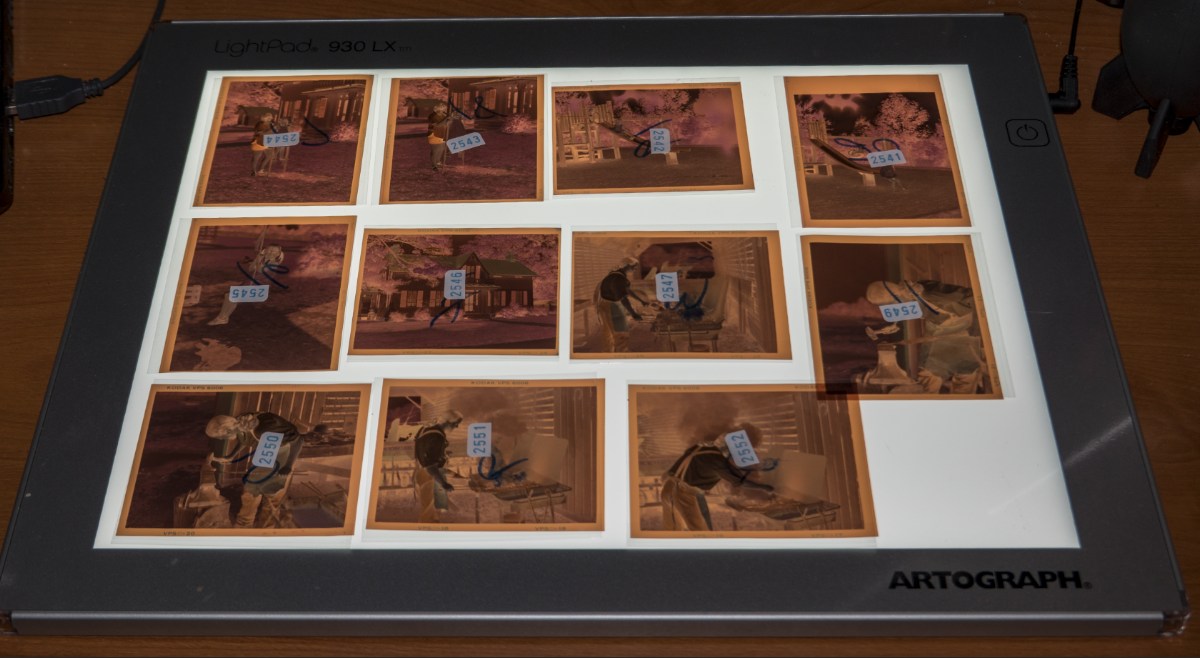 You'll need a light source that provides daylight-balanced light. The 12×9-inch Artograph LightPad 930 LX sells for around $170, but the 9×6-inch model is less than $120 and is adequate unless you want to view film that's stored in transparent binder pages or place individual negatives in sleeves on it.
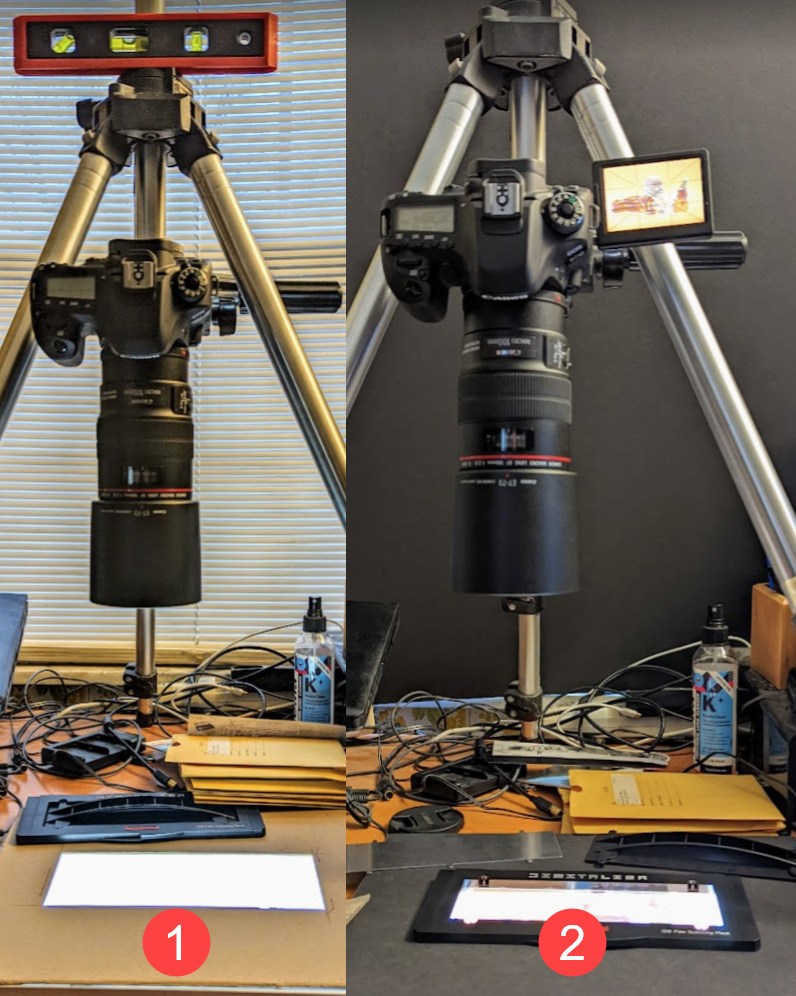
To avoid problems caused by light leaking around the film frame, you could use a piece of black foam core board with an opening cut so that it covers everything except the part of the frame where the negative is. I started with a piece of plain cardboard, but moved up to black foam core board.
The left image (1) shows the initial test setup without any attempt to block light from the window and a plain cardboard termplate. The right image (2) illustrates the black foam core board that blocks outside light and a second piece of black foam core board that eliminates spill from the lightpad.
 If you're working near a window, as I am, either work at night or find a way to block light from the window. A 32×40-inch piece of foam core board will cost about $20, and that's what I'm using. You'll want to work in a dimly lighted room, too.
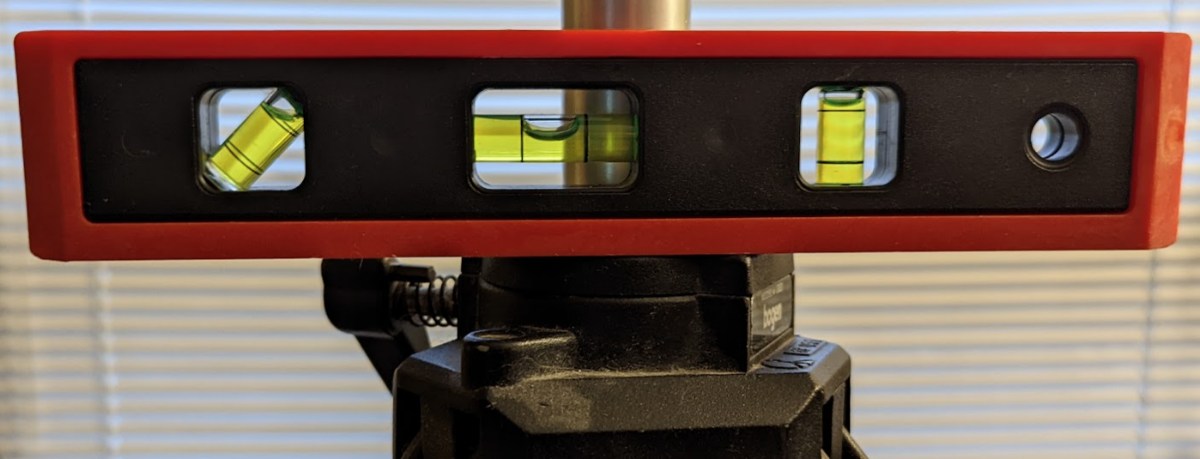
Have a small level so that you can confirm that the camera is level front-to-back and side-to-side because the depth of field is limited.
Camera settings are critical to the process, so I'll run through the settings I use and explain why I've selected them. Some of the settings are based on the light table. Mine produces up to 5000 lux at 6500°K and I run the light at full brightness. Your situation may differ.
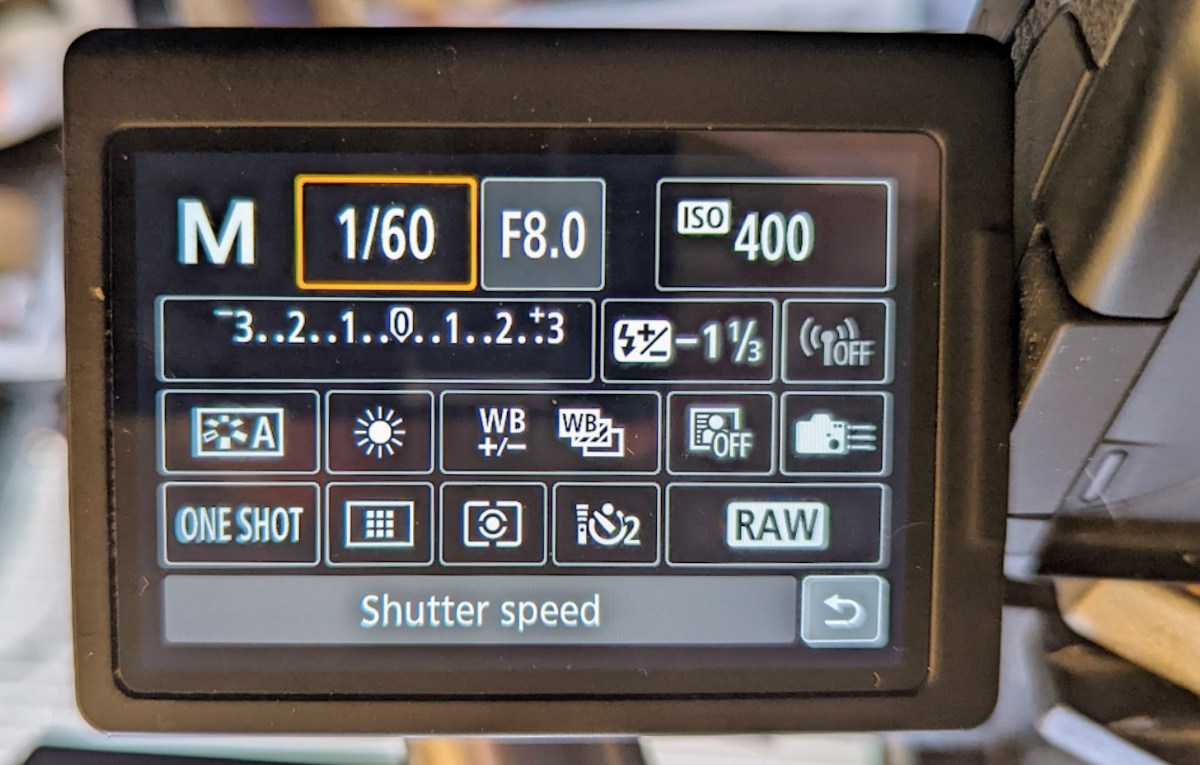 Manual mode. I want full control over the aperture, shutter speed, and ISO. Given the light's output of 5000 lux, I've determined that a 1/60th of a second shutter speed at f/8 and ISO 400 works well. The settings that work for you will depend on tests you perform to determine the best compromise.
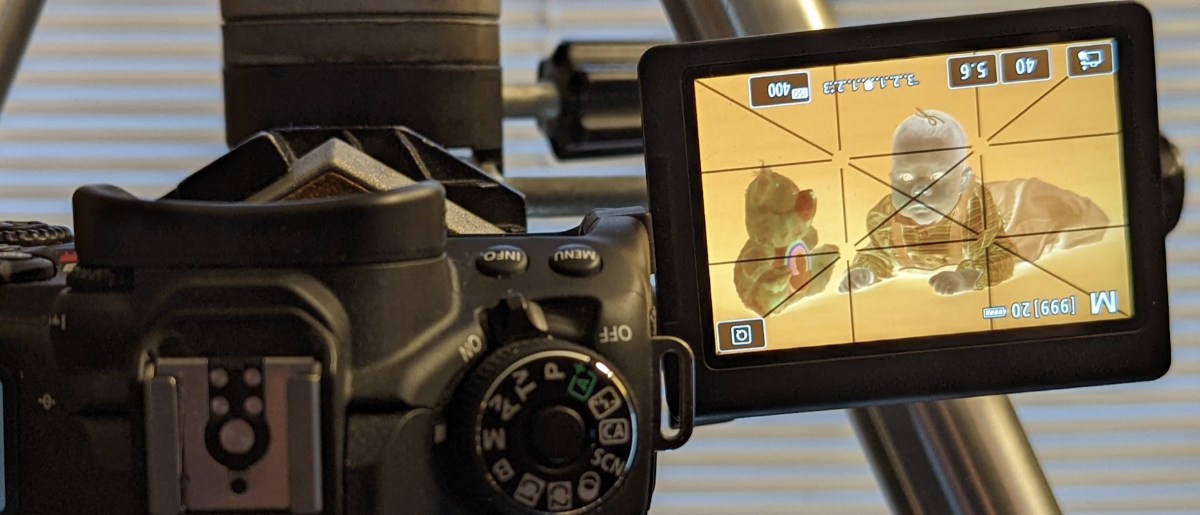 Daylight color balance. The light source is daylight, so setting daylight manually eliminates any errors that might be introduced by automatic white balance.
Once you've collected the negatives to be digitized, load them into the scanning mask and photograph each with the camera. Make at least one exposure that shows a significant bit of the orange area between frames. You'll need this for setting a white point later.
 I usually digitize one or two rolls of film at a time so that I can catch anything that has gone wrong and correct it before spending several hours on work that will need to be repeated. Checking camera settings and being careful will usually eliminate errors, though, and I've so far not had to re-do any work.
Import the images into Lightroom Classic (or Lightroom 6), rotate them as needed, select all of the images and switch to Develop mode, and use the white-balance eyedropper to sample the blank orange area that you captured earlier. This will apply the correct white point to each image.
Before opening Negative Lab Pro, crop and straighten the images in Lightroom.
With all of the images still selected and Lightroom Classic in Develop mode, start Negative Lab Pro, choose the appropriate conversion settings (source, color mode, pre-saturation, and border buffer), and then click the Convert button.
 Negative Lab Pro analyzes each image and replaces the negative images in the film strip with positive images. At this point, you have a choice: Continue editing the photo in Negative Lab Pro or create a positive copy for editing in Lightroom. Creating a positive copy for Lightroom makes tools such as masking available, but there's a significant downside. A raw image that's less than 30MB will be converted to a TIFF image that's six times that size. So unless you need access to features that aren't present in Negative Lab Pro, it's better not to create a positive copy.
 When the brightness, contrast, and color are the way you want them, apply the changes and then return to Lightroom to fix blemishes, dust spots, and other imperfections. There's no need to create a positive copy for these tasks; you can fix blemishes and dust spots on the modified raw file. Just don't touch any of the other controls.
 The final step, if you want to share the images, involves exporting files in whatever size and format the recipients need.
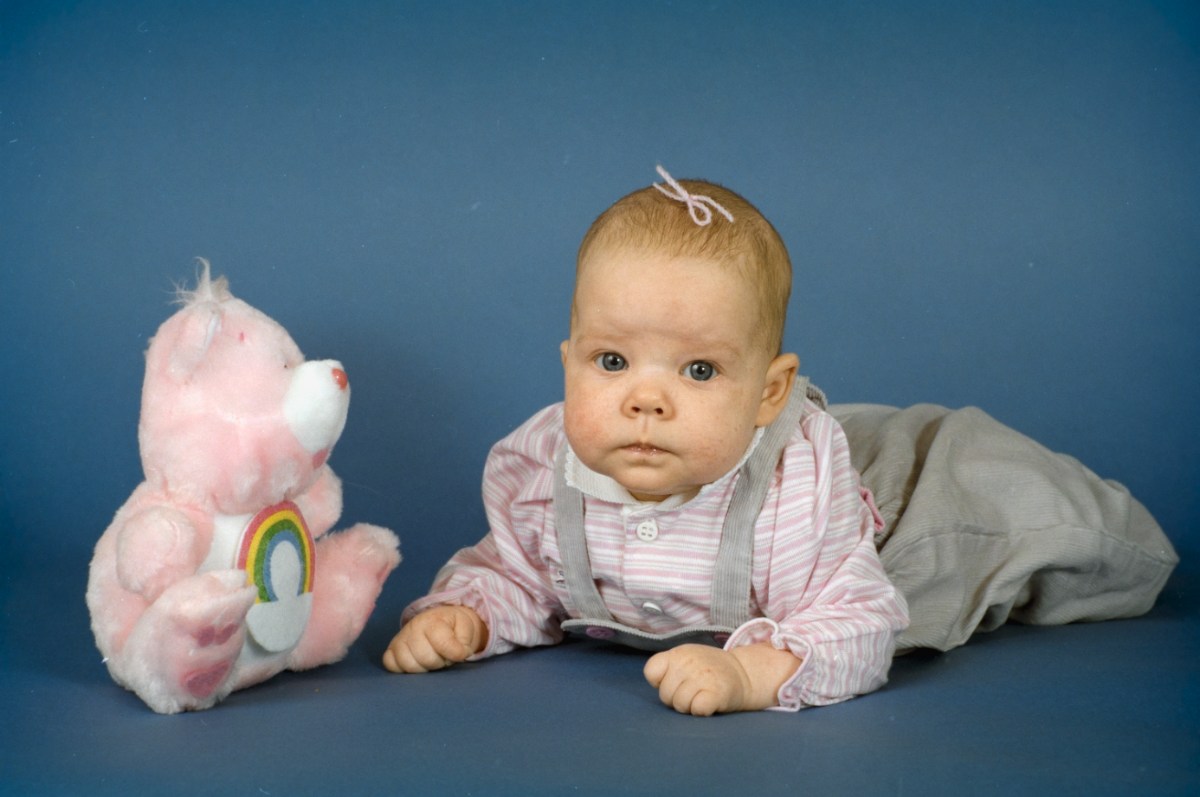
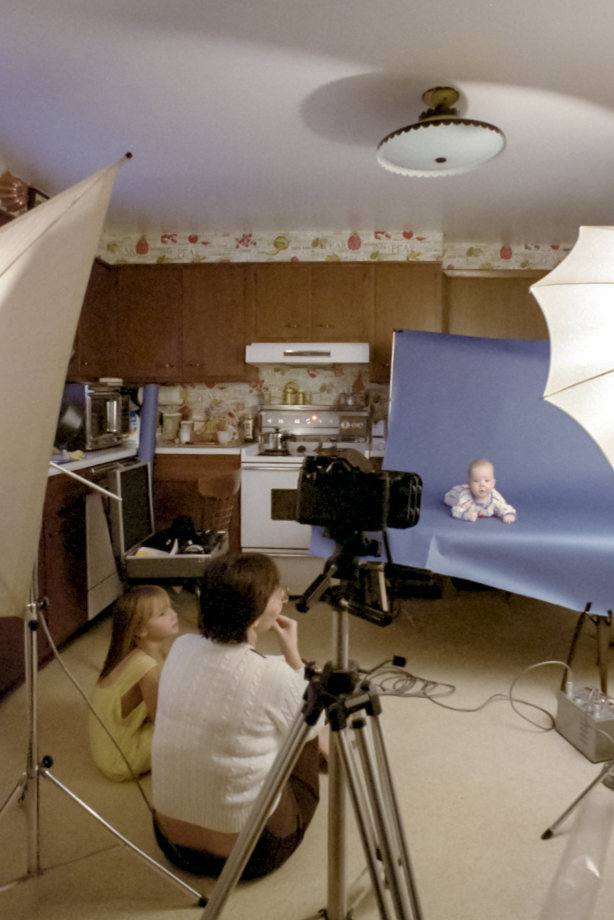
<<< If you're wondering about the photos on the blue background, they were taken in our kitchen a few months after our younger daughter was born in the mid 1980s. The blue seamless paper extended from a holder down onto the kitchen table. (I still have the tripod I used in this image, but it's not the one I've set up for negative scanning. We also still have the kitchen table.)
For more information about Negative Lab Pro, visit the company's website. You can download a fully functional version of the application. It will process only one dozen negatives. After that, you'll need to pay $99 to unlock it permanently. Versions are available for Windows and the MacOS and you'll need either the current version of Lightroom Classic or Lightroom 6. Note that some functions work only in Lightroom Classic CC, not the older Lightroom 6. Negative Lab Pro can be installed on up to two computers.
Count me as one of the people who would really like Microsoft to fix the Windows 11 Task Bar. The new Task Bar looks like it's been stolen from Apple. This isn't necessarily bad, but it's also not exactly good.
Windows 10 allowed me to use small icons and set up more than a single row. That's helpful because I like to have access to a lot of applications. The computer is used for email, web browsing, website design, audio development, word processing, spreadsheet, plain text editing, photo and video editing, scanning, ebook management, access to OneDrive and Google Drive, PDF creation and manipulation, streaming video management, podcast creation and other audio editing, Skype and Zoom conferences, and document preparation for publishing. I also keep a dozen or so utility programs on the Task Bar.
Click any small image for a full-size view. To dismiss the larger image, press ESC or tap outside the image.
 This image shows the two-deck Task Bar from Windows 10 (top), the default Windows 11 Task Bar without the day (middle), and the improved Windows 11 Task bar that includes the day (bottom).
 That's not possible with Windows 11, but the Start Menu has been improved, so I can with with that. But I do miss having the day name in the Notification Area. In Windows 10, the two-deck Task bar allows three lines of text: Time, Day, and Date. In Windows 11, there are just two lines: Time and Date. It's unlikely that I'll forget what day it is, but I liked having the information there. Fortunately, there's a quick and easy fix that also works with Windows 10.
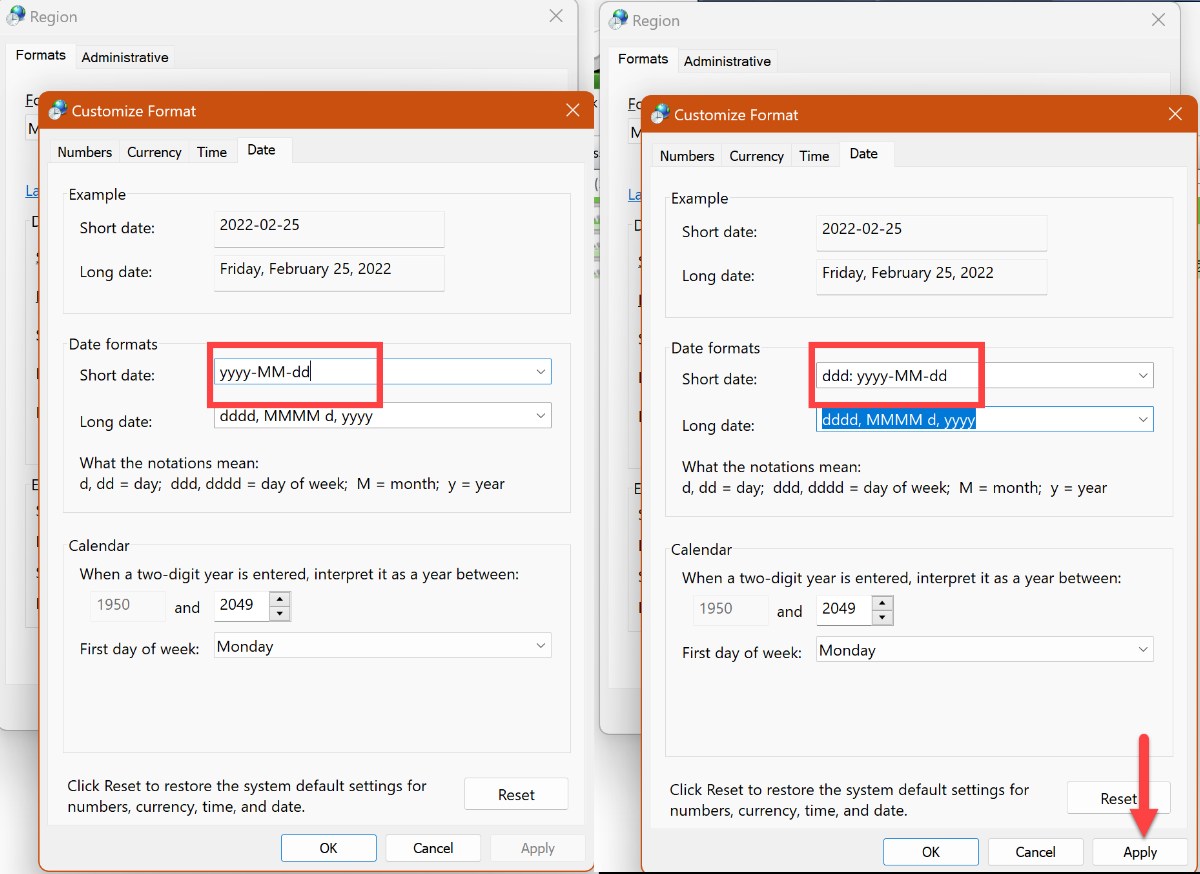
Adding the three-letter abbreviation for the day requires that you edit your computer's Region settings.
Press the Windows key and R to launch the Run window, then type intl.cpl and press Enter to launch the Regional Settings Control. Click Addititonal Settings at the bottom of the window, then add ddd: in front of the Short Date format. Add a space following the colon if you want a bit of space between the day abbreviation and the date. Click the Apply or OK button to apply the new setting and then you'll see the day abbreviation on the line with the date.
Memo to Microsoft: Many of the Windows 11 changes are good, but must you remove popular capabilities from Windows 10?
Nearly everyone has a mobile phone. A SIM card inside the phone links the device to you, but what if somebody could associate your phone with their SIM card?
The card itself may be a fingernail-size piece of plastic or it may be part of the phone's internal circuitry. SIM is shorthand for subscriber identification module, and if your phone becomes associated with another SIM, your bank account could be drained. Between January 2018 and December 2020, $12 million dollars were lost this way. Crooks target the carriers and mobile phone owners with a variety of techniques to accomplish the SIM switch, which doesn't require physical access to the phone.
The FBI says that mobile phone users should avoid talking about their assets, investments, or cryptocurrency on social media. That should be obvious. If someone asks for your mobile phone number, password, or PIN via online chat or by phone call, refuse to provide it. Instead, contact the company that supposedly needs to verify your identity. Watch for changes in SMS connections. Use multi-factor authentication whenever possible.
And if you think a crook has taken control of your phone, start by contacting the cellular service provider to regain control of the phone, change all passwords associated with sensitive data, contact financial institutions to alert them, and then contact law enforcement.