Listen to the Podcast
29 Jan 2021 - Podcast #728 - (21:49)
It's Like NPR on the Web
If you find the information TechByter Worldwide provides useful or interesting, please consider a contribution.

If you find the information TechByter Worldwide provides useful or interesting, please consider a contribution.
The first thing you may notice about Luminar AI's user interface is that there doesn't seem to be very much of it. That's because the application uses automation and machine learning to modify images. But it's also a bit misleading because a complex interface does exist under the hood.
When Skylum provided a review copy, it came with some images that can be used to display the program's many useful features. You can see these images in reviews that are published elsewhere, but I wanted to give Luminar AI some truly challenging images to chew on, so let's look at those first.
I've been scanning some old family photos. When the negatives are available, I used a Plustek film scanner to create highly detailed TIFF images that approach the quality of today's raw digital images. A modern raw digital image gives the user the greatest amount of latitude for improvements, but a high quality scan from a negative is close. In some cases, though, the negatives have been stored where I haven't always been able to locate them. As a result, some of the scans are from standard 6x4-inch photos.
Scans of photos are third generation images. Film stocks have a lower dynamic range than raw digital images, and prints made from film reduce the dynamic range even more. If the color balance of the print is off, it's difficult to correct even if the scan is a high-resolution TIFF image. I scan these photos on an Epson Perfection 3200 Photo scanner using VueScan set to 800 samples-per-inch resolution and the Adobe RGB color space. That provides the best possible starting point.
There are three images I'd like to share, two that are scanned from photos and one that's a digital raw file.
Click any small image for a full-size view. To dismiss the larger image, press ESC or tap outside the image.
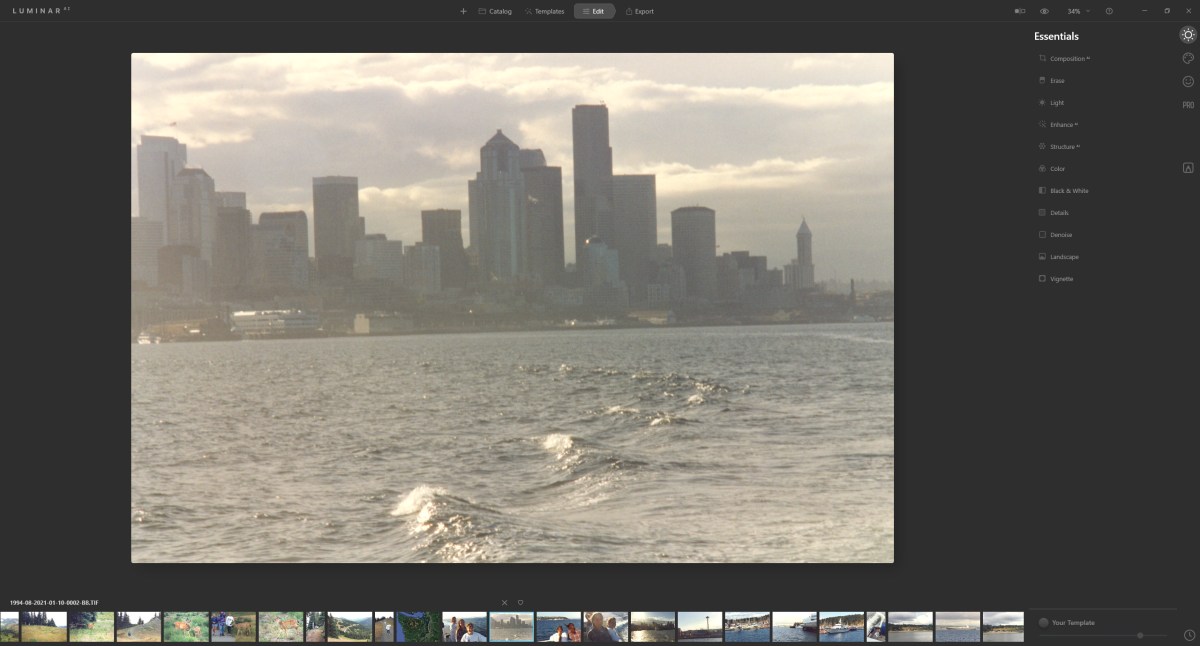 Let's start with the worst image. It's a scan of downtown Seattle from a boat on a gray, misty early morning in August 1994. The colors are uniformly gray and much of the detail is lost in the mist. The horizon isn't straight — after all, I was on a boat at the time. This will never be a good image, but it can be substantially improved.
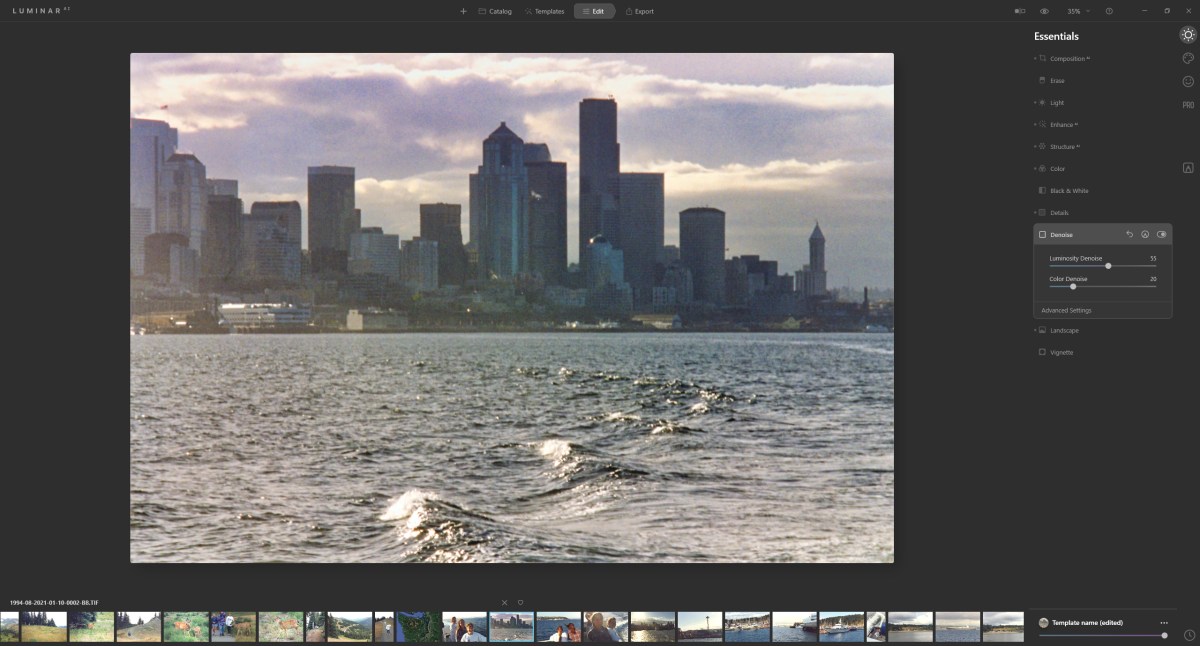 Following a few minutes worth of effort in Luminar AI, the image is considerably better. Some apparent detail has been pulled out of the mist. The colors have been enhanced. The horizon line is straight. These changes have also enhanced the noise in the image, but overall it's a big improvement over what I started with.
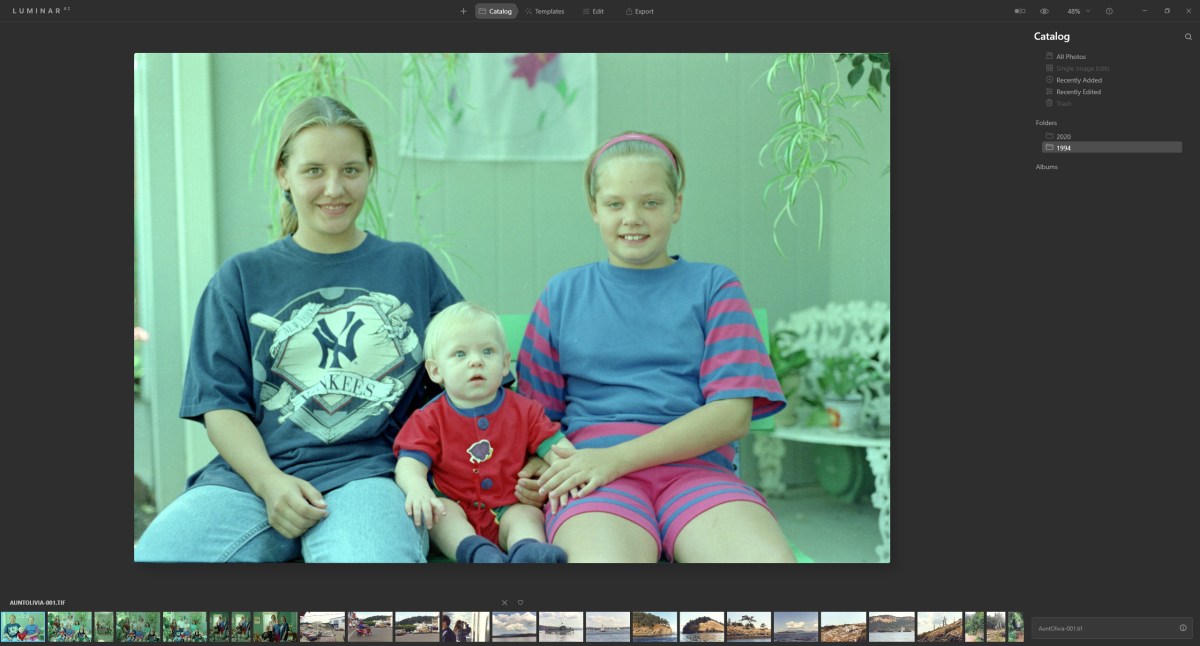 The second image, also from 1994, is a photo of my daughters and a cousin's child on a bench at my aunt's home in New Philadelphia. The photo has a strong green color cast. There are several possible causes, but it's pointless to think about those 27 years later. Instead, what can be done to improve the image -- again, knowing in advance that the result will never approach perfection.
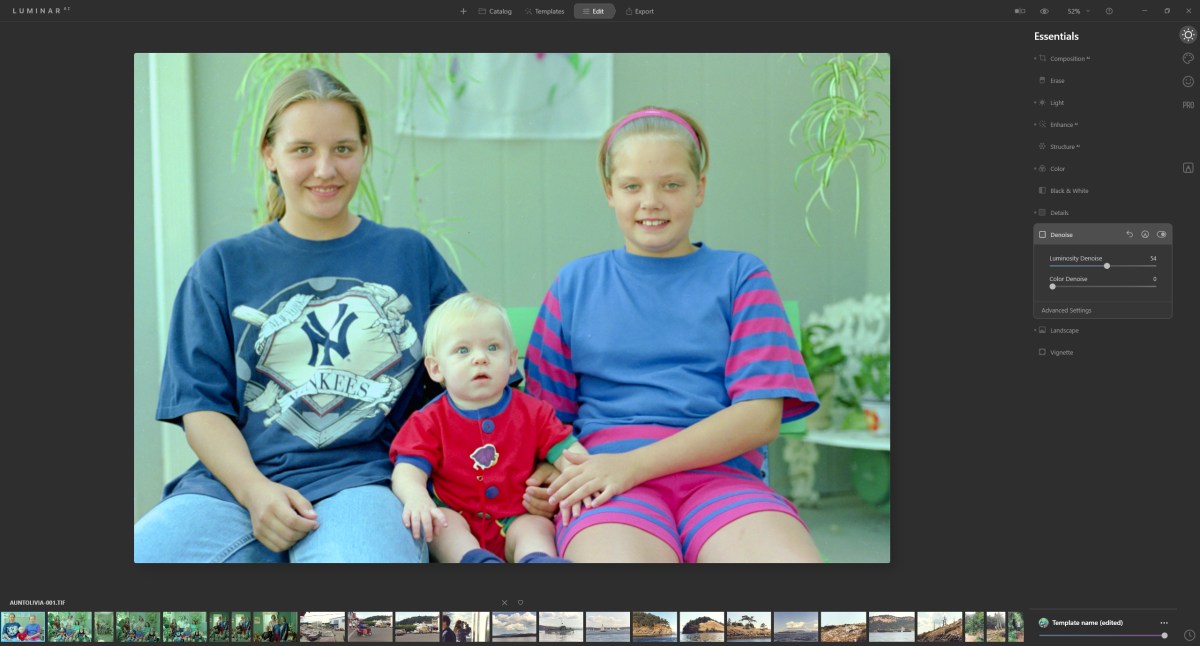 Usually color correction begins with identifying something in the photo with a neutral color. Sidewalks and asphalt roads are often good choices, but this picture doesn't have either of those. A bench in the background looked promising, but failed. One of the color settings in Luminar AI is called Remove Color Cast. Activating this did exactly what I hoped it would. I performed a few other manual modifications and cropped the image slightly and the result, while not perfect, is a big improvement.
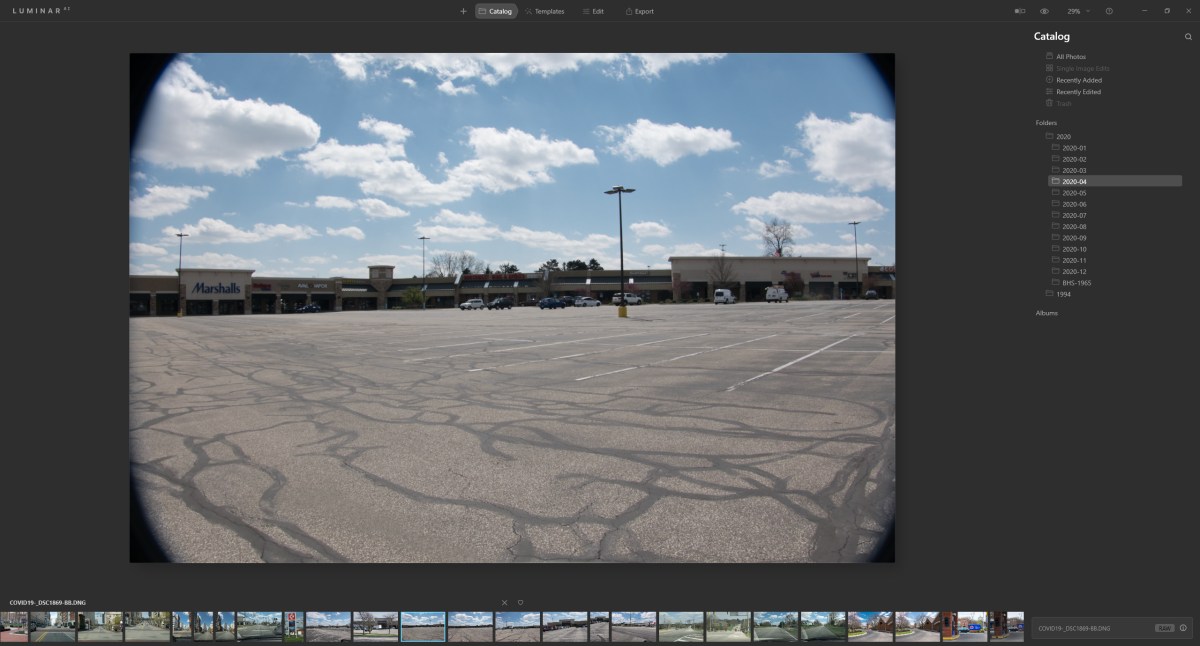 The third image is from a digital raw file created with a Sony RX100 Mark 6 point-and-shoot camera on 15 April 2020, at the height of Ohio's initial response to Covid 19. I drove around my neighborhood, Ohio State University, and downtown Columbus to gather images to show conditions at that time. I took one photo at a shopping center that was all but deserted. The image was slightly angled and the light severely reduced the amount of details in the store fronts. The camera also has a substantial vignetting problem at the widest focal lengths.
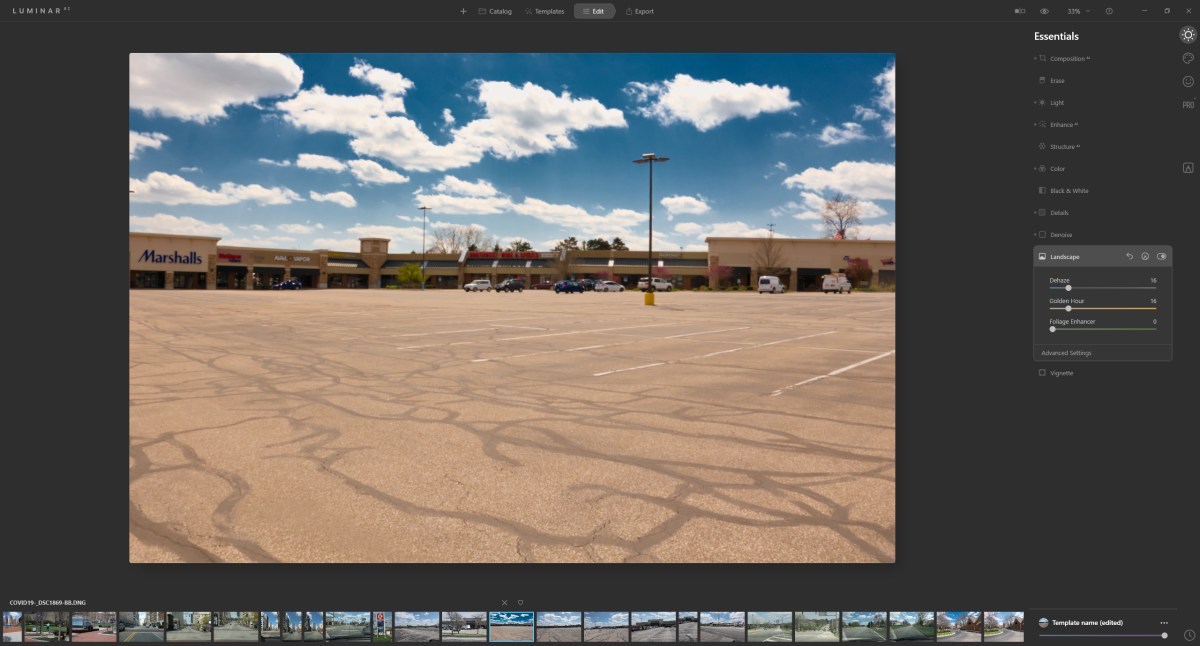 The resulting image has straightened the horizon, added emphasis to the sky, slightly cropped the image to place more emphasis on the foreground, and greatly improved detail around the store fronts; it is what my eyes saw on that Wednesday morning in April — a bright blue sky, closed stores, and what seemed like a huge empty parking lot. Is the color of the pavement wrong? Maybe, but it also serves to call attention to the emptiness.
Skylum notes that the photo editor includes many artificial intelligence technologies: Atmosphere, Sky, Structure, Sunrays, Augmented Sky, Landscape, Mood, Color Harmony, Iris, Face, Body, and Skin. Some are intended for use with portraits (Iris, Face, Body, and Skin), others for outdoor images (Atmosphere, Sky, and Landscape), and some that work for any image.
Luminar AI can work as an independent application or as a plug-in for Lightroom Classic or Photoshop.
 The objective developers were given, according to Skylum CEO, Alex Tsepko, was to use artificial intelligence "so people can focus on the outcomes and photos, and not worry so much about the editing process." Much of that depends on Luminar AI's Templates. Templates are what other photo editing programs call "filters" or "looks". This example will show Luminar AI being used as a plug-in for Lightroom Classic.
The Lightroom Classic user right-clicks an image and (1) chooses Edit In from the menu, then (2) Luminar AI. This opens Lightroom's external editor dialog box that gives the user the choice of (3) sending a copy of the image with Lightroom's adjustments to Luminar AI, to edit a copy of the original image, or the original image. The user then selects some file options and (4) clicks Edit to open the image in Luminar. The image is from 1994 and it's a scan of a photographic print.
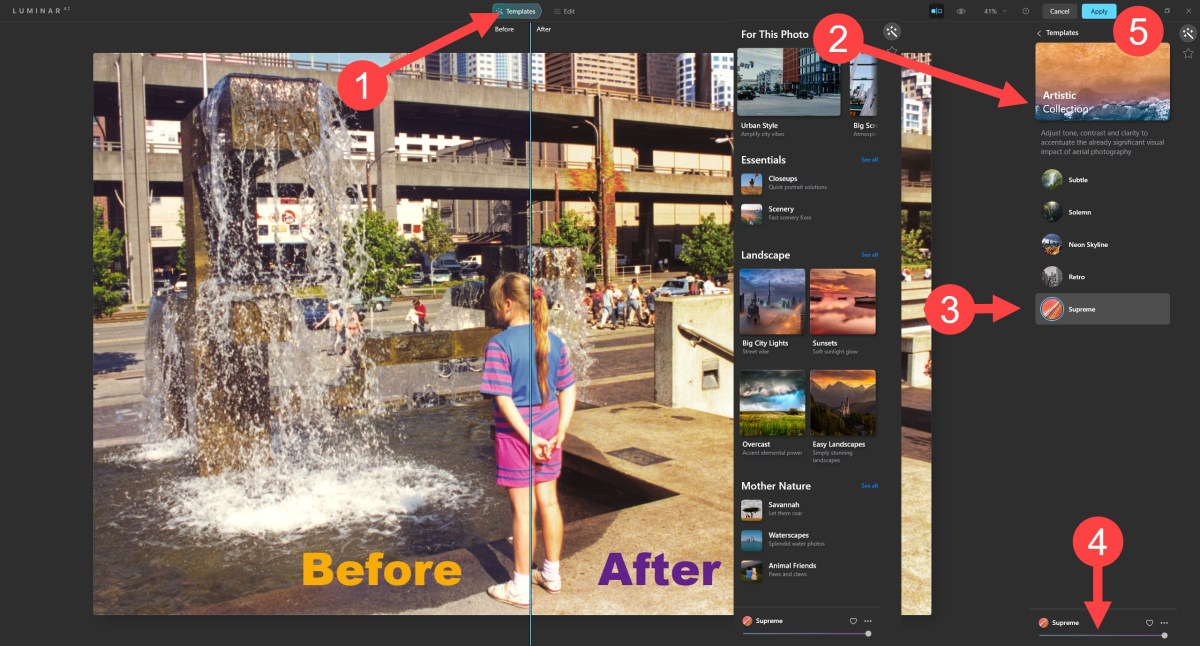 When the user (1) clicks the Template button, Luminar opens a (2) panel on the right side of the image to show recommended templates for the image as well as all of the templates that have been loaded. Selecting one template displays a group of related templates for the user to (3) select. Once the template is selected, the user can move a (4) strength indicator at the bottom of the panel to modify how much of the effect should be applied. During the process, two options are available for before and after views — one that shows the entire image, before and after, and another that creates a vertical slider that can be moved across the image to compare the two views. When the image looks the way the user wants it to, (5) clicking Apply returns the image to Lightroom.
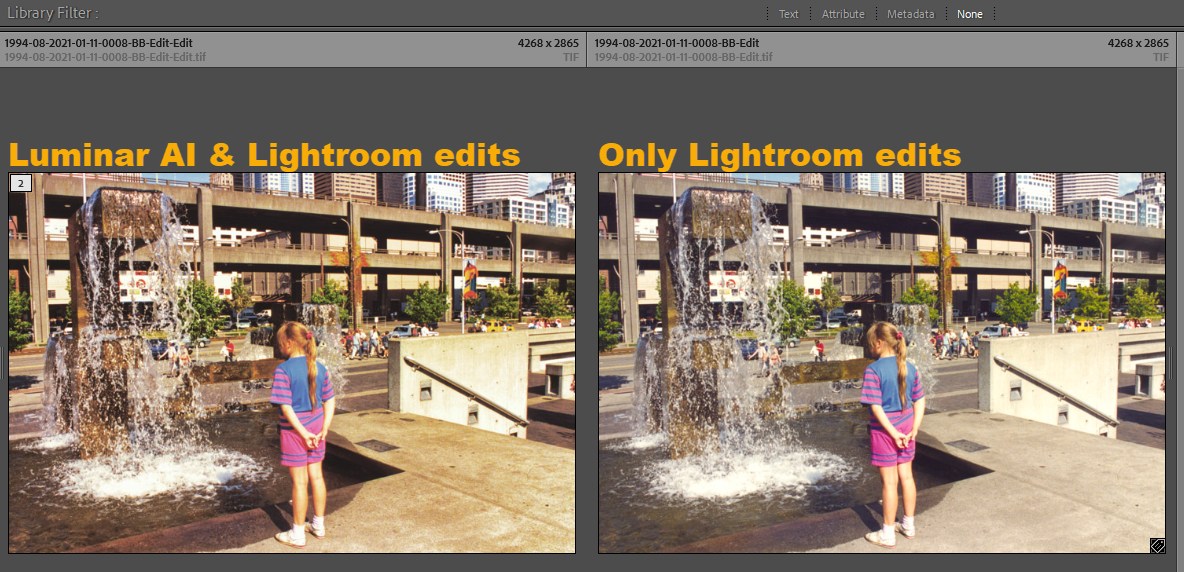 When the image is returned to Lightroom Classic, it is placed beside the original image: One copy has the Lightroom edits and the other is the modified version with Luminar's edits.
Templates include modifications that include settings based on what Luminar AI believes the image contains. If it's a photo of a person, tools that enhance skin, body, eye color, and such will be selected. It's it's a landscape view, tools for color harmony, mood, sunlight, detail, and sky will be selected. After applying a template, the user can open the edit panel to change settings for each of the effects and, if desired, save the modified template for use with other images.

 Skylum's New Approach In Luminar AI May Be Just What You're Looking For
Luminar has been around for a while, but this is the first version of Luminar AI. It's a strong contender for use as a standalone application or as a plug-in for Adobe's applications. Luminar AI is is a one hundred dollar ($99) application that can be installed on two computers, or eighty ($79) for a one-computer license. The company offers, but does not require, "Luminar X Membership", a subscription program that includes 12 months of regularly delivered creative assets, 8 professional photography courses per year, 1 bonus course, 10 new templates each month, 10 new sky textures each month, and a 15% discount on all items in the Luminar Marketplace.
Additional details are available on the Skylum website.
The cat rating scale ranges from 0 cats (worst) to
5 cats (best).
Manufacturers of hardware reviewed on TechByter Worldwide typically loan the hardware and it must be returned at the end of the review period. Developers of software reviewed on TechByter Worldwide generally provide a free not-for-resale (NFR) license so that all features of the application will be unlocked.
Normally shutting down or restarting Windows is done from the Power option in the Start menu, but there are times when having those options as icons on the Desktop can be helpful.
Click any small image for a full-size view. To dismiss the larger image, press ESC or tap outside the image.
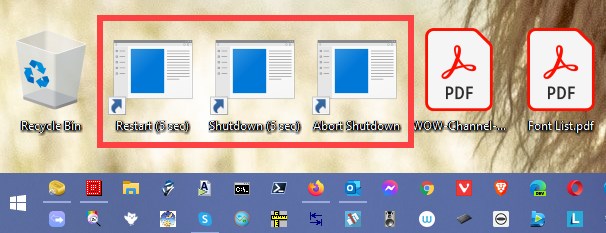 I have three icons on the Desktop: Restart in Five Seconds, Shutdown in Five Seconds, and Abort. Depending on your needs, the restart and shutdown options can be set to take effect immediately or be delayed for the number of seconds you specify.
Before getting to how this is done, let's consider why. There's actually no really convincing reason to do this, but it's a good starting point for other shutdown/restart options that you might need. It's possible to create icons on the Desktop to perform any of these functions, but you can also just open a command prompt and issue a command.
But why? The Start menu's Power functions offer both shutdown and restart options, and those options will first ask you to save the data from any open application before shutting down or restarting. Maybe an application is not responding and cannot be closed. The usual method will eventually close such an application, but the command line option is faster.
So let's look at how to create these icons.
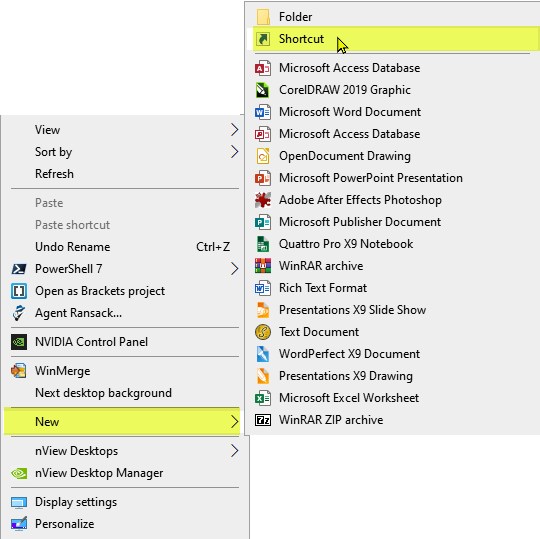 Start by right-clicking an empty space on the Desktop, then choose New > Shortcut. When you're asked for the location of the item, navigate to C:\Windows\System32\ and select shutdown.exe. There are DLL files with the same and similar names, so be sure you choose shutdown.exe. Click OK and "C:\Windows\System32\shutdown.exe" will appear in the item dialog.
 Before clicking the Next button, decide what you want the shortcut to do. To shut the computer down, type a space after "exe" and add "/r /t 5". The "/r" tells Windows you want to restart the computer. To shut the computer down, use "/s" instead. The "/t" switch delays the action for the number of seconds you specify, so "/t 5" pauses for five seconds.
Then click the Next button and fill in the text that will appear with the icon. When you press the Finish button, the new icon will appear on the desktop.
In addition to the restart (/r) and shutdown (/s) icons, I have added on that uses the "/a" switch. This is handy if I accidentally start the shutdown or restart process and realize that one or more applications with unsaved data are open. Clicking the Abort icon before the end of the timeout period halts the process.
The shutdown process has nearly 20 switches. To see the full list, open a command prompt and type shutdown /?. The "/?" switch tells the process to display the help file. Be sure to add the slash and the question mark. Otherwise, Windows will shut down in 60 seconds unless you issue the abort command.
The primary switches:
This is a command that can be used by system administrators to reboot or shut down remote computers, and several of the switches apply to those uses.
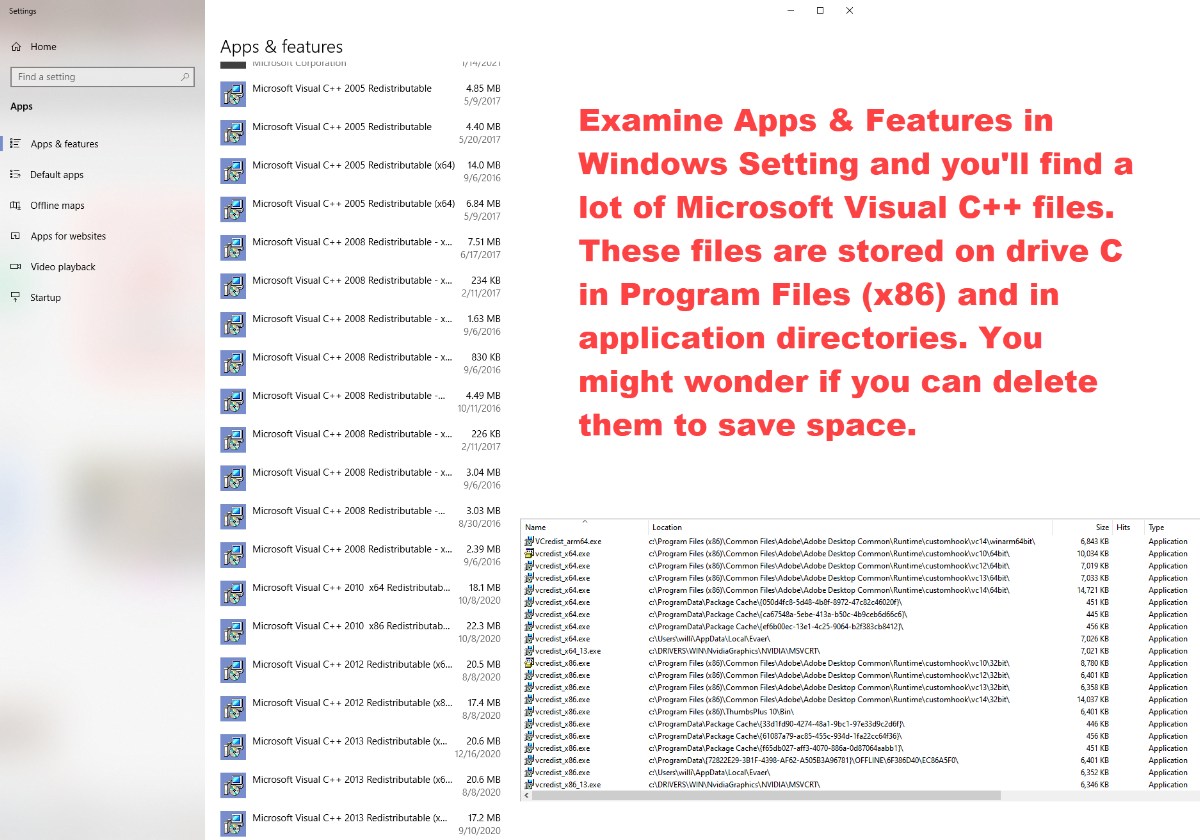
That's a question that may have occurred to you if you've ever scrolled through the Apps & Features section of Windows 10 Settings, looking for an application to delete. You may know that Visual C++ is a programming language and, if you're not a programmer, possibly you've wondered what these applications are doing on your computer.
 If you've wondered about deleting all those files to save space, though, think again.
Also note the word "redistributable" is part of the file names. You'll find these files in the Program Files (x86) directory on drive C, but you may also find others in directories occupied by applications you've installed. So what about deleting the duplicates? That's not a good idea, either. One of my computers has eight copies of vcredist_x64.exe. These range in size from 451KB to nearly 15MB, so obviously they're not exactly duplicates.
Deleting one of these files can cause a program that depends on it to stop working.
If a software publisher includes its own version of a Visual C++ redistributable file, that file will be placed in the application's directory structure and will be used instead of the default files. So just leave the files alone.
If you're the kind of person who occasionally scrolls through the Windows, Program Files, and Program Files (x86) directories on drive C, you may find 32-bit and 64-bit Microsoft .NET Framework files in versions ranging from 2.0 though 4.0. In some cases, you might even find version 1.0 files. If 4.0 is installed, wouldn't it be wise to remove the earlier versions?
NO, it would not be wise. Microsoft still updates earlier versions and those earlier versions are required by applications that haven't been updated to be compatible with newer versions of the framework files. Just leave them alone.
The overarching rule of file deletion is this: Never delete a file unless you know with certainty what the file does and that deleting it will cause no problems. Even then, it's better to rename the file first, reboot the computer to confirm that everything still works, and then wait a week or two before actually deleting the file. This approach makes recovery quick and easy if you discover that the file you knew you could delete without causing a problem couldn't actually be deleted without causing a problem.