Listen to the Podcast
9 Oct 2020 - Podcast #714 - (24:12)
It's Like NPR on the Web
If you find the information TechByter Worldwide provides useful or interesting, please consider a contribution.

If you find the information TechByter Worldwide provides useful or interesting, please consider a contribution.
Have you ever wished you had a magic wand in your pocket? Maybe your computer isn't working right, or maybe you're in the office and need access to your personal email account, or maybe you need to use a computer that isn't yours and you don't want to leave any traces. That's where the magic wand comes in.
Click any small image for a full-size view. To dismiss the larger image, press ESC or tap outside the image.
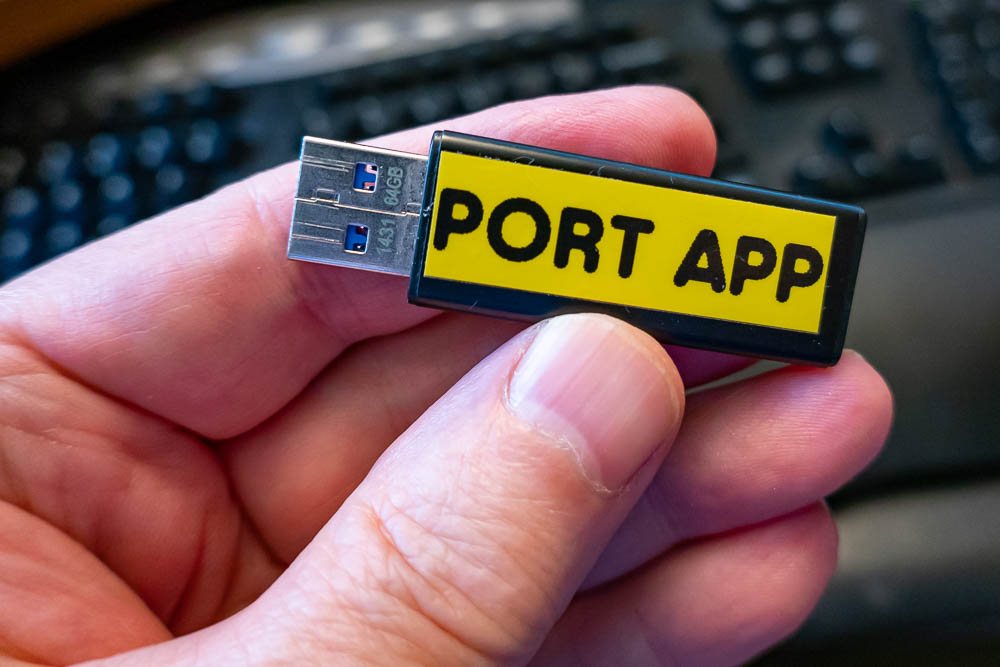 But unlike the kind of device Harry Potter carried around, you don't have to visit Ollivanders in Diagon Alley. It won't even cost seven galleons. You can make a magic wand from an old thumb drive that's lying around and a variety of portable applications that can be downloaded and installed for free.
If there's no thumb drive lying around, you may have to buy one. So maybe you'll have to spend $10 or so for a small thumb drive. It's a good investment.
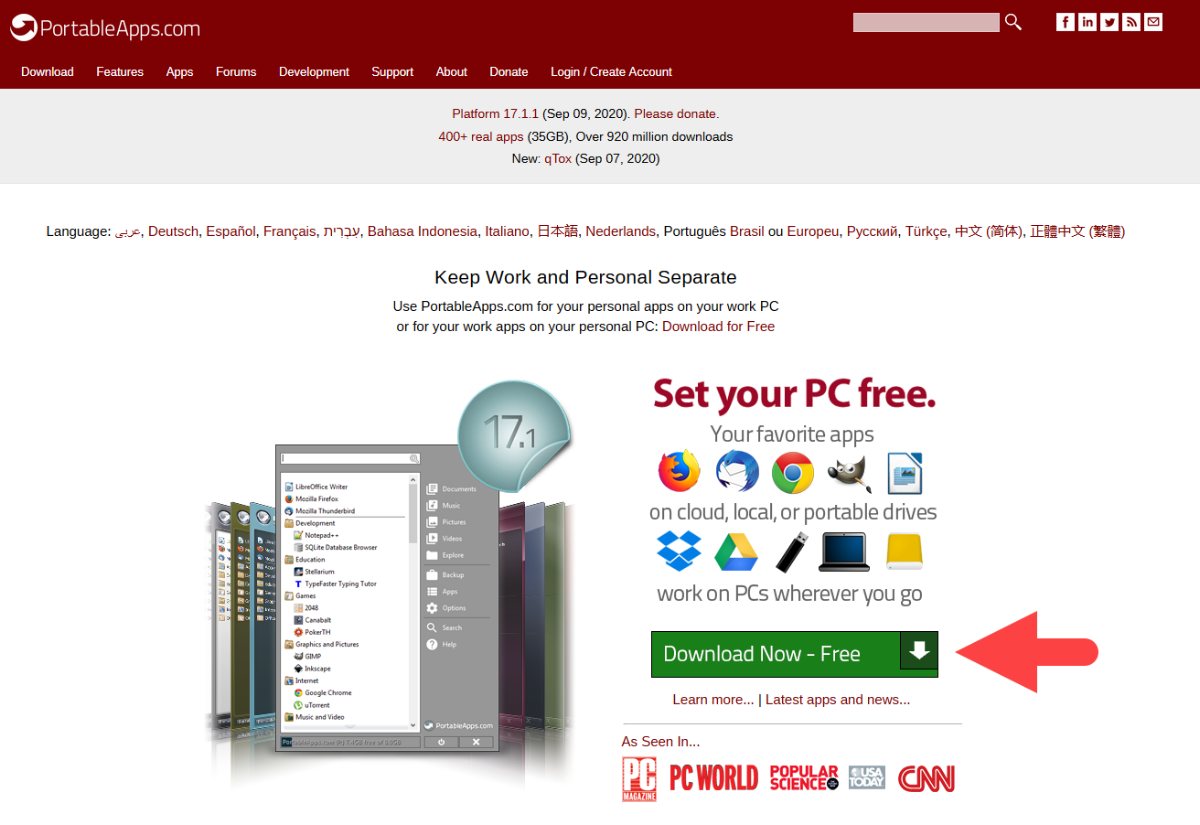
You can do it the easy way or the slightly less easy way. To find a hard way, you'd really have to work at it. There are several options, but today I'll look at PortableApps because it's free, it's easy to use, and it offers a comprehensive batch of tools.
The tag line PortableApps uses is "your computer, without the computer". Even if you download all of the more than 400 apps, they consume only 35GB of disk space and 64GB thumb drives can be found for less than $10. Some stores even give them away as promotional items.
 Because these are portable apps, they run directly from the thumb drive without the need for installation. You won't find applications here such as Microsoft Word or Adobe Illustrator because all of the apps are free and open source. Some of them may request a donation, as does PortableApps, but you can use them all without paying anything. You'll just have to deal with your conscience. To see the full list of apps, visit the apps page.
Download the PortableApps installer and save it wherever you normally store downloaded applications.
Portable apps differ from standard versions of the various applications in that they don't need to be installed, but the PortableApps application does need to be installed on the portable device where you want to use it. The apps can be placed on a thumb drive or stored in your cloud-based directory and they'll run from either location. When you unplug the thumb drive or disconnect from the remote directory, none of your information will be left behind on the computer.
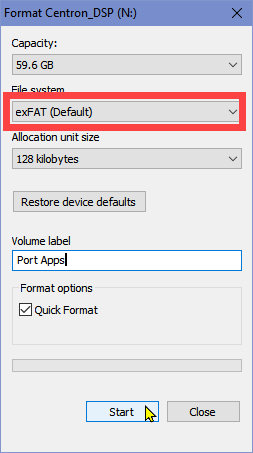 Start by formatting the thumb drive. Windows will probably suggest formatting it as eFAT (extended file allocation table), but you might think it would be good to change that to NTFS. After all, Windows uses the NT file system for its internal drives. Because you're making a utility disk that will run only on Windows, it doesn't make a lot of difference.
Sometimes, though, USB drives are used to share files between Windows computers and MacOS computers. Macs can read files from an NTFS volume, but can't edit or write files to an NTFS volume unless you've installed a special extension on a Mac. The better choice is to use eFAT instead of NTFS. Just avoid using FAT32 if it's offered. There's only one situation in which using FAT32 forrmat is right, and that a topic for a few minutes from now.
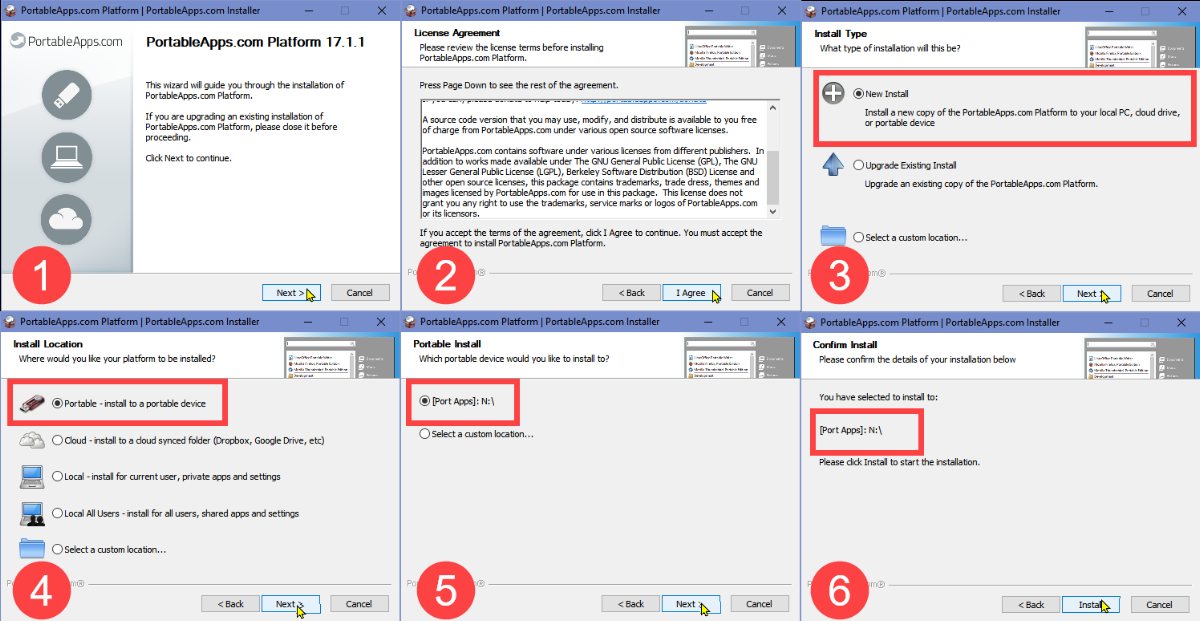 When the thumb drive is formatted, prepare PortableApps by running the installer.
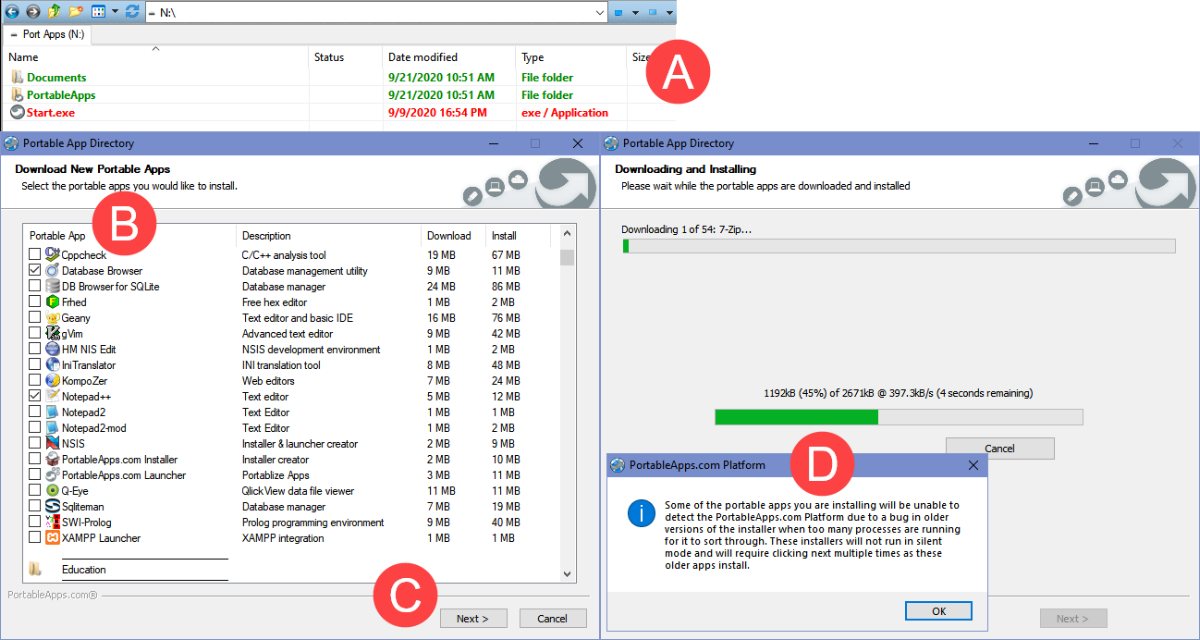 When the installation is complete, (A) navigate to the thumb drive with a file explorer and double-click Start.exe. Then (B) select the portable applications you want to add to the thumb drive and (C) click Next to start the process. You will probably see (D) a warning that some of the portable apps will need input from you as they're being installed. Click OK and proceed. Depending on the number of apps you've selected and how many of them need you to click installation dialog boxes, the process may take a while.
It's important to note here that the portable applications are not being installed on your computer. They are simply being installed in the PortableApps application on the thumb drive.
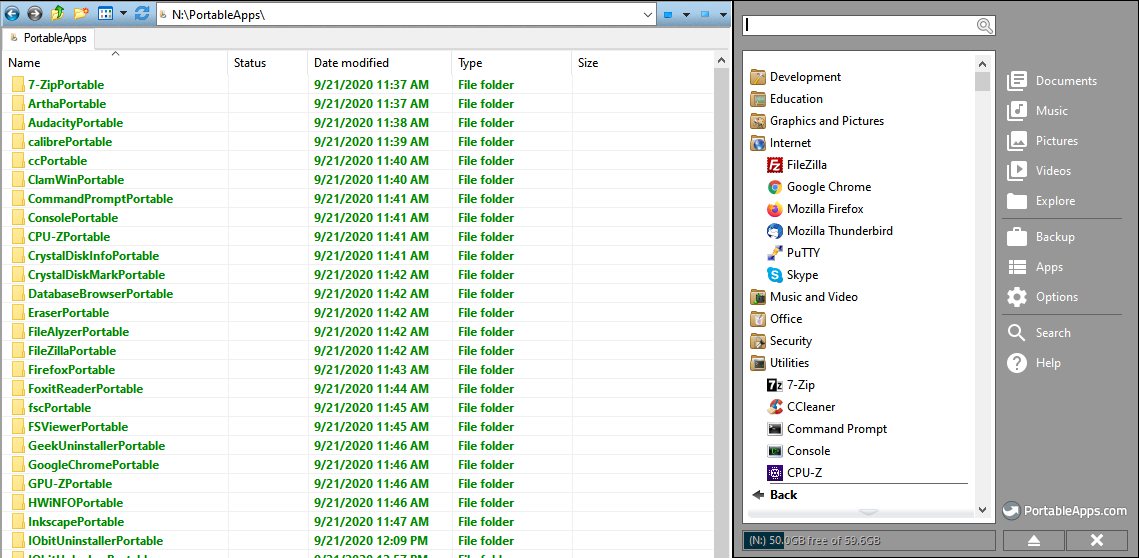 If you examine the PortableApps directory on the thumb drive when the process is complete, you'll see that a new directory exists for each application you installed.
When you need one of the portable applications, plug the thumb drive in and run Start.exe. PortableApps will open in the lower right corner of the screen and will list the installed application. For an organized view of apps by type, click All Portable Apps at the bottom of the list.
To use one of the applications, select the app category and click to open the list, then click the name of the application. Some applications will open immediately and others will display User Access Control warnings.
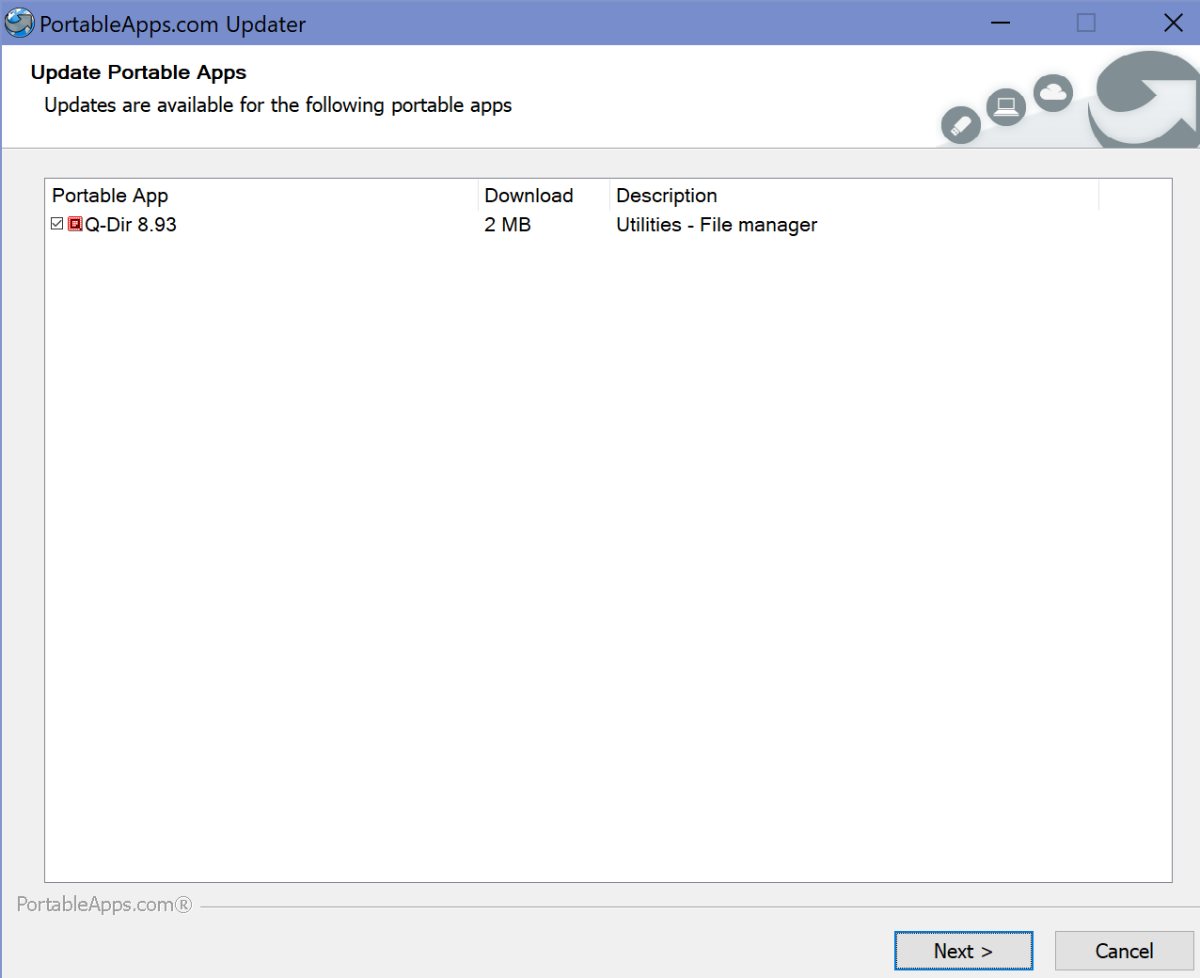 When PortableApps opens, it will check the installed apps to see if any of them have been updated since you last used the thumb drive. If updates are available, you can have PortableApps download and add the new versions to the thumb drive or wait for a better time.
In the old days, if something went wrong with your Windows 95 computer, you just booted the machine from the first of thirteen floppy disks and either fixed the problem or reinstalled Windows. Windows 98 was primarily distributed on CDs, but the floppy disk version spanned 39 discs. The number for Windows 95 is correct because it's from Microsoft's Raymond Chen. The disc count for Windows 98 is from a non-Microsoft source.
The CDs were bootable, too, and eventually Microsoft added repair and recovery features. Maybe you remember The Ultimate Boot CD (UBCD). It was what was needed when things went wrong, but floppy disks are gone and few computers have optical drives. Now you need a bootable thumb drive when you run into a problem.
Maybe you'd like to have The Ultimate Boot CD on a thumb drive. The current version (5.3.9) includes more than 100 PC hardware diagnostic tools.
You'll need to start by downloading the ISO file. The ISO file is an image of the UBCD.
Next you'll need a USB installer. You'll find a good one on the PenDriveLinux website.
You'll need a USB thumb drive that's at least 512MB. Good luck finding a thumb drive that small! But you'll also need a thumb drive that's no larger than 32GB, and disks larger than 32GB must be formatted as eFAT or NTFS. Thumb drives used to boot the computer must be formatted FAT32. (Truth in technology: It is possible to format larger drives as FAT32, but it's a complicated process.) Use either an empty thumb drive or one with no important data on it because the drive will be formatted.
 The Universal USB Installer makes creation of the boot drive easy. Insert the USB thumb drive and run the application to start.
When you've created the Ultimate Boot CD thumb drive, you should test it.
If your computer has been set up to look for a USB boot device before it looks for a hard drive, you won't need to make any changes. This probably isn't the case, so you'll need to modify some BIOS settings. Each computer manufacturer has a specific way for users to access the BIOS settings, and sometimes these vary from one model to another. Check the manual that came with your computer (WHAT MANUAL?) or visit the manufacturer's website to find out how to get there.
Before booting the computer, insert the USB drive.
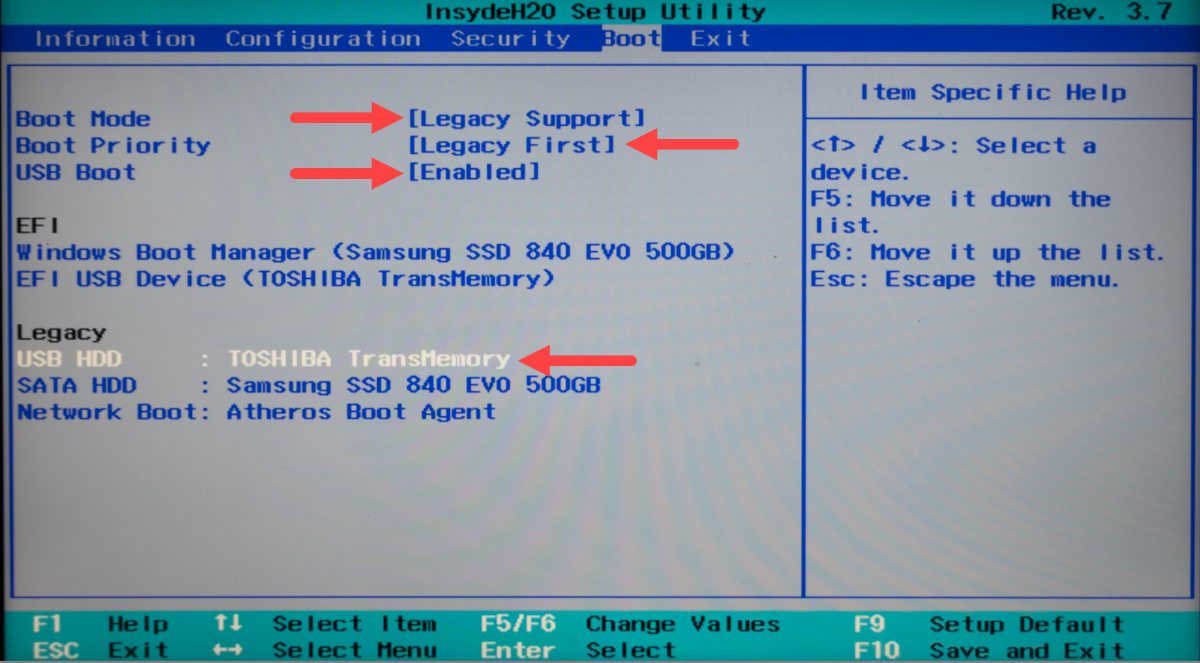
Be careful in the BIOS settings because some changes may keep the computer from booting at all or may cause it to malfunction. One or two changes will be needed in the Boot section of the BIOS settings. Relatively new computers will use Unified Extensible Firmware Interface (UEFI) boot mode. If this is enabled, change it to Legacy mode. If there's an option for boot system priority, set Legacy first. If there's an option for USB boot, make sure that is enabled. Then change the computer's boot device order so that the USB device is at the top of the list in the Legacy section.
You may need to change the boot mode and priority and then reboot the computer to see the Legacy items.
After you've changed the settings, choose the Save and Exit option.
 The computer will boot to the Ultimate Boot CD. After you've confirmed the operation, reboot the computer to the BIOS settings and restore the original settings if the default boot mode was UEFI. The computer will operate normally if you leave it in Legacy mode, but security is compromised.
So for a UEFI system, you'll need to visit the BIOS settings before you use the Ultimate Boot CD. For information about the utilities on the disc and how to use them, start at the UBCD website and follow links to the utilities that you want to use.
Ideally, when one computer has a problem, you can use an alternate computer, tablet, or phone to obtain information about how to use the emergency thumb drive.
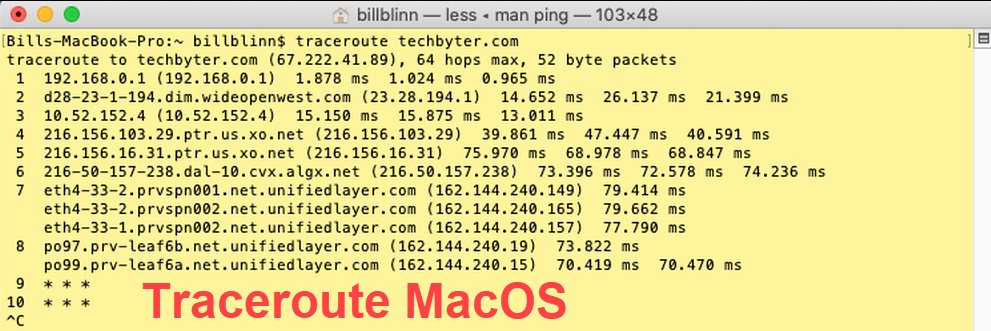
Two of the most useful applications on any computer are ping and traceroute. Individually and together they can help you find out why a website is slow.
Traceroute has two alternate spellings. On MacOS computers and Linux computers, it's "traceroute". On Windows computers, it's "tracert". Regardless of the spelling, the information returned is the same.
Both ping and traceroute provide some of same basic information -- whether a local or remote IP address is reachable. Ping is faster and easier to understand, and traceroute returns more information. In addition to telling you whether an IP address is reachable, traceroute also specifies the exact path between your computer and the other IP address.
Internet connections aren't like plain old telephone service (POTS) connections. With wired telephones, connections are made via a series of central offices and essentially you have a connection between two points and the data flow is continuous. (In reality, it's a lot more complicated than that, but bear with me here.)
Internet connections send data in packets that can be broken up and may be sent using varying routes. The packets are reassembled when they are received. This is the case for email, audio, video, and all other data.
Click any small image for a full-size view. To dismiss the larger image, press ESC or tap outside the image.
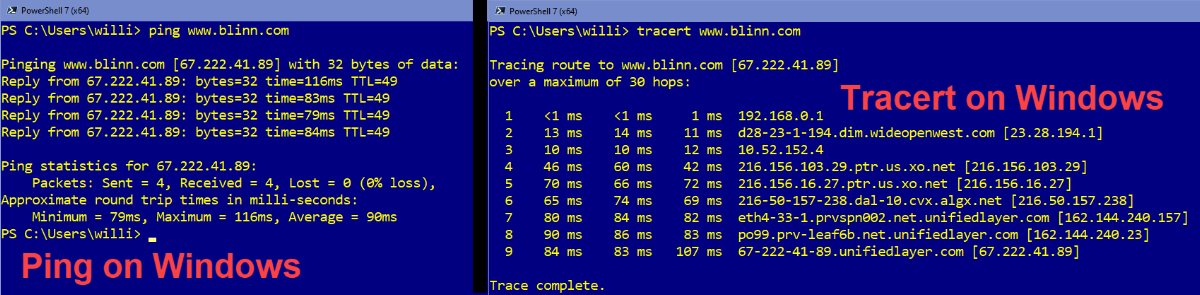 So when you encounter a problem with a website, an email or FTP server, or any other internet service, the first tool to grab is usually ping. Ping will tell you whether the destination IP address is reachable and how good the connection is.
On a Windows computer, you can open a Command window or a PowerShell window. On MacOS and Linux systems, you'll use a terminal window.
PS C:\Users\willi> ping ftp.techbyter.com
Pinging techbyter.com [67.222.41.89] with 32 bytes of data:
Reply from 67.222.41.89: bytes=32 time=84ms TTL=49
Reply from 67.222.41.89: bytes=32 time=80ms TTL=49
Reply from 67.222.41.89: bytes=32 time=75ms TTL=49
Reply from 67.222.41.89: bytes=32 time=75ms TTL=49
Ping statistics for 67.222.41.89:
Packets: Sent = 4, Received = 4, Lost = 0 (0% loss),
Approximate round trip times in milli-seconds:
Minimum = 75ms, Maximum = 84ms, Average = 78ms
Windows computers will return four test results. MacOS and Linux computers will continue pinging the target until you stop the process unless the user specifies the number of packets to be sent by adding a -c value to the end of the command:
ping ftp.techbyter.com -c 10
If you want a Windows computer to ping continuously, add -t to the end of the command.
You should see several lines that look like this:
Reply from 67.222.41.89: bytes=32 time=84ms TTL=49
If one or more of the lines looks like this, there is a problem reaching the target:
Request timed out.
Even if there are four successful returns, examine the other numbers on the lines.
The first series of numbers [67.222.41.89] illustrates the IP address of the target.
The byte count [bytes=32] shows the number of bytes in the packet. The default is 32 bytes, but this can be changed using -l [number] at the end of the command. [ping ftp.blinn.com -l 64]
The time value is important. [time=75ms] It reflects the amount of time that it took for a packet to reach the target computer and to be returned to your computer. The time is measured in milliseconds and shorter is better. Any number lower than 100 millisecond (one tenth of a second) is acceptable. A return of 200 milliseconds is bad, 1000 milliseconds would be horrible.
The final value is time to live [TTL=49]. The destination device will set a value and the number will be decreased by one each time the packet passes through a server. If the count reaches zero, ping will report "TTL expired in transit." This is used to avoid having a packet bounce infinitely between two devices. This value is often set at 255, so a value of 49 might indicate that the packet traversed 206 servers. "Might" because we don't know what value the target system assigned.
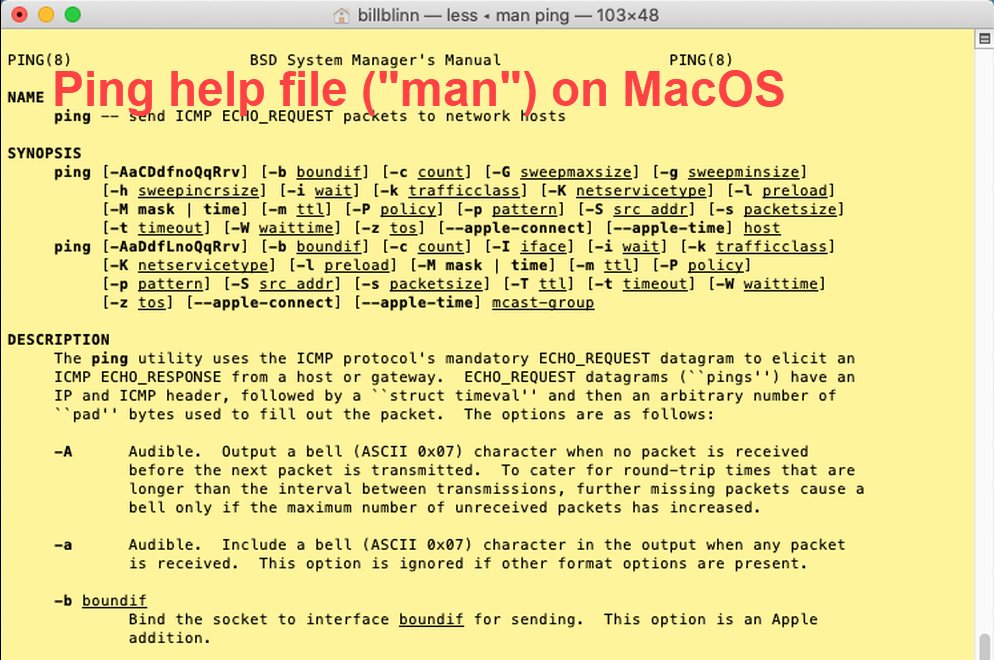
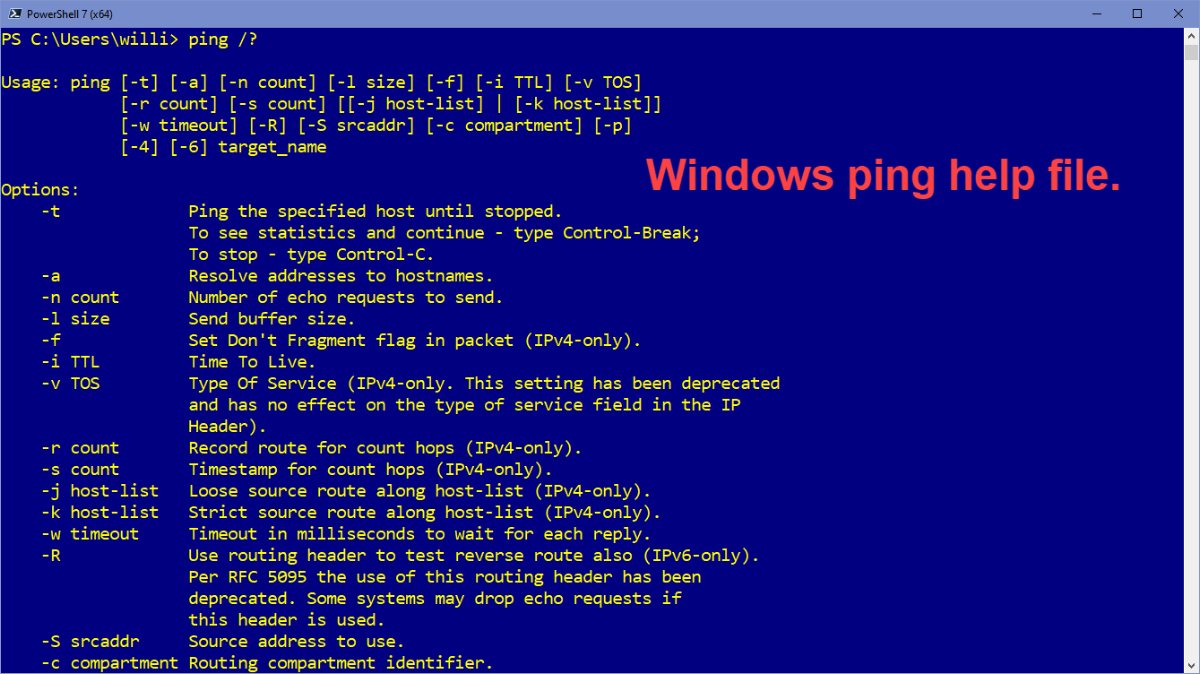 Ping has several other switches. If you'd like to see what they are, type ping /? on a Windows computer or man ping on a MacOS or Linux machine. Information provided on a MacOS computer and a Linux computer will look similar. Windows will provide the same information, but formatted differently.
At its most basic, traceroute also tells you whether a target address is reachable. That's like saying at it's most basic, your high school football team does the same thing the Kansas City Chiefs do: play football.
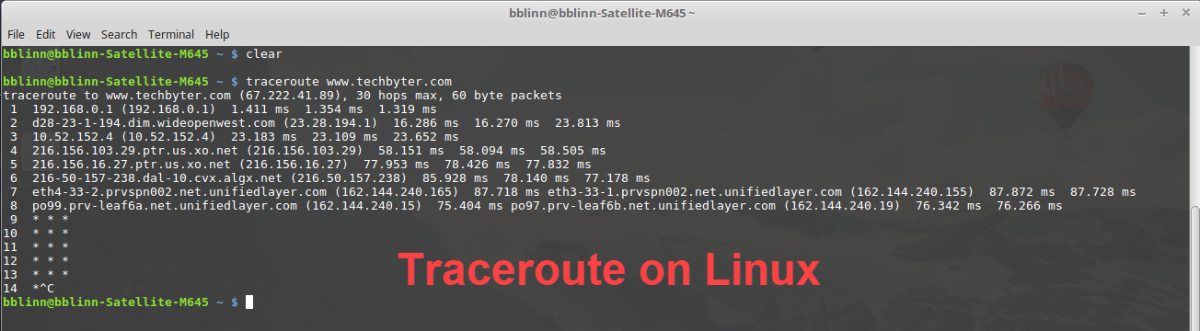 Traceroute's display varies among operating systems, and I'll be demonstrating it using Windows (where it's called "tracert"). Presumably this goes back to the earliest days of Microsoft operating systems, but that's only a guess.
If ping showed poor results, traceroute may help to identify where the problem is. On a Windows machine, the results will look something like this:
PS C:\Users\willi> tracert www.techbyter.com
Tracing route to www.techbyter.com [67.222.41.89]
over a maximum of 30 hops:
1 <1 ms <1 ms <1 ms 192.168.0.1
2 156 ms 16 ms 13 ms d28-23-1-194.dim.wideopenwest.com [23.28.194.1]
3 12 ms 13 ms 14 ms 10.52.152.4
4 41 ms 41 ms 41 ms 216.156.103.29.ptr.us.xo.net [216.156.103.29]
5 78 ms 73 ms 69 ms 216.156.16.27.ptr.us.xo.net [216.156.16.27]
6 79 ms 72 ms 70 ms 216-50-157-238.dal-10.cvx.algx.net [216.50.157.238]
7 82 ms 79 ms 81 ms eth4-33-1.prvspn002.net.unifiedlayer.com [162.144.240.157]
8 94 ms 78 ms 80 ms po99.prv-leaf6b.net.unifiedlayer.com [162.144.240.23]
9 98 ms 79 ms 88 ms 67-222-41-89.unifiedlayer.com [67.222.41.89]
Trace complete.
The first line will confirm the target:
Tracing route to www.techbyter.com [67.222.41.89]
If you see something like "Unable to resolve target system name www.techbyter.coz," confirm that you've spelled the target right or that the IP address is right if you used an address instead of a name. In this case, I typed "coz" instead of "com".
If you're certain that the name or IP address is correct and you still see an "unable to resolve" message, there's a problem with the nameserver your computer or router uses. I've described how to change the nameserver (Don't Trust Your ISP's Domain Name Service) so see if this corrects the problem.
 When you're able to establish a connection and traceroute returns information, you'll need to interpret it. What looks like gibberish is actually useful information. Each numbered line represents one "hop" in the journey between your computer and the target. Each hop signifies a different server.
The first hops are on your network, the middle hops show your internet service provider and public internet routing, and the final few should be at the target location.
The first hop will be to your router and should be nearly instantaneous, less than 1 millisecond.
Three RTT (round trip time) values will be shown on each line. Essentially these are pings that are sent to each computer along the route. Watch for consistency here. The numbers need not be identical, but they should be close. The Wide Open West line, for example
2 156 ms 16 ms 13 ms d28-23-1-194.dim.wideopenwest.com [23.28.194.1]
has two values that are similar, but one that is ten times larger than the others. Any number over about 150 is unacceptable for connections within the continental United States.
If you see an asterisk in place of any of the RTT numbers, the packet was not returned to your computer. A combination of high and missing numbers for a given hop suggests that this is the location of the problem.
Depending on the target system and the version of traceroute that you're using, you may see a series of hops at the end with nothing but asterisks. This usually indicates that a firewall rule at the target is blocking return packets, and it can usually be ignored.
If you identify a problem, the next step involves using a WhoIs service (https://www.whois.com is a good choice) to identify the owner of the server. If the problem is with your internet service provider, filing a complaint with the ISP may help. If it's a problem with your website, contacting the hosting service would be appropriate. If the problem is somewhere in the middle, there's not much you can do other than wait, but at least you'll have the satisfaction of knowing that it's not your problem.