Listen to the Podcast
08 Sep 2019 - Podcast #659 - (27:27)
It's Like NPR on the Web
If you find the information TechByter Worldwide provides useful or interesting, please consider a contribution.

If you find the information TechByter Worldwide provides useful or interesting, please consider a contribution.
Despite a lot of competition, Corel Draw continues to be a design application with an interface that appeals to a lot of people. The developers created what the company called a "sparse tool set" in the 1980s and the philosophy responsible for it still survives even though the company is now owned by venture capital firm KKR (Kohlberg Kravis Roberts).
Hundreds of features have been added over the years and the recently released 2019 edition includes enough new features and improvements to ensure that it should be on any designer's short list.
This is an application with which I have a long history. Thirty years ago I wrote, edited, and published small newspaper for parts managers at auto dealerships, so I attended the annual "Folio: Show" in October 1989 at the 6th Avenue Hilton in Manhattan. I had been struggling with Adobe Illustrator to create graphics for the publication, but Illustrator had been ported from the Mac and it seemed cumbersome. A trade show exhibit by small Canadian firm called Corel enticed me. The product on display was called "Draw" and it appeared to be much easier to use. It was and still is.
I haven't looked at the Corel Graphics Suite for a few years, though. Although Draw is the premier application, the suite includes Photo-Paint, Capture, and the Corel Font Manager. For Windows users, Corel Font Manager is a huge advantage unless you have a standalone font management application such as Font Expert, Extensis Suitcase, or FontBase.
And for Mac users .... Wait!? Mac users? Yes. Corel Draw Graphics Suite 2019 now runs on the MacOS. Corel says it's been designed from the ground up to give MacOS users native experience with Dark Mode, Mojave support, Touch Bar integration, and more.
I reviewed the 2019 version on a Windows machine, but Mac owners should see the same functionality. There's also a most basic vector graphics application on the web where designers can share their work with clients. In other words, a lot has changed this year.
Of course there's more to the suite than Corel Draw, but Draw is still the star of the show. It's a vector drawing application, but thanks to the incorporation of features from Corel WordPerfect and the long-discontinued Ventura Publisher, it has some page layout capabilities. The other applications include Corel Photo-Paint for editing photos, a font manager, a screen-capture tool, and AfterShot 3 HDR, which is intended to improve raw and JPEG photos.
Probably the most surprising new feature is that on-line component. It's a handy place to create some preliminary thoughts for a design when you're not in the office and it's also a good way to share work in progress with clients. Because it's an app, there's nothing to install. Just sign in to CorelDraw.app on any browser. Any work done in the app will be added to the stored image, but on a new editable layer. Corel has a short video that shows the app in operation.
For corporate users, an optional add-on provides access to Corel Draw files through Microsoft SharePoint or corporate Google Drive. CorelDraw.app Enterprise gives everyone in the organization the ability to review or create designs in a web browser through their Microsoft Office 365 or Google Suite user accounts.
 And this is a good time to mention videos. Corel has a lot of them on YouTube. Most are short and cover a single topic. You'll find them linked from the Help menu.
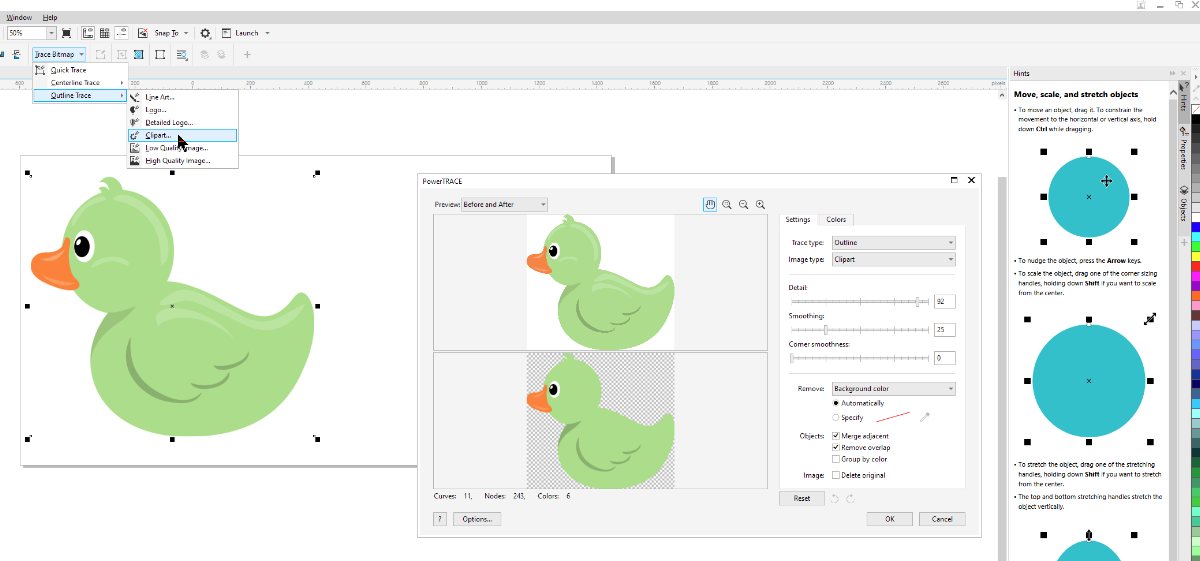 Sometimes you might have an image that you need to convert to vector art. Powertrace is a Corel Draw utility that performs the task. It's not a new feature but it does seem to work better than I remember. This is a handy tool to have if someone hands you a relatively small copy of a logo. The problem with small bitmap images is that they can't be scaled. Make it larger and it begins to be fuzzy or pixelated. I found a small clip-art image of a duck to demonstrate this. There's even a Clipart option in the Trace Bitmap dialog box. The resulting vector image has been placed on a transparent background, which makes it more versatile and the various parts of the image are now individual vector shapes.
 Here's an extreme example of why the vector image is better. I've enlarged both the bitmap image and the vector image to about the same size. The bitmap is unusable at this scale, but the vector image is sharp.
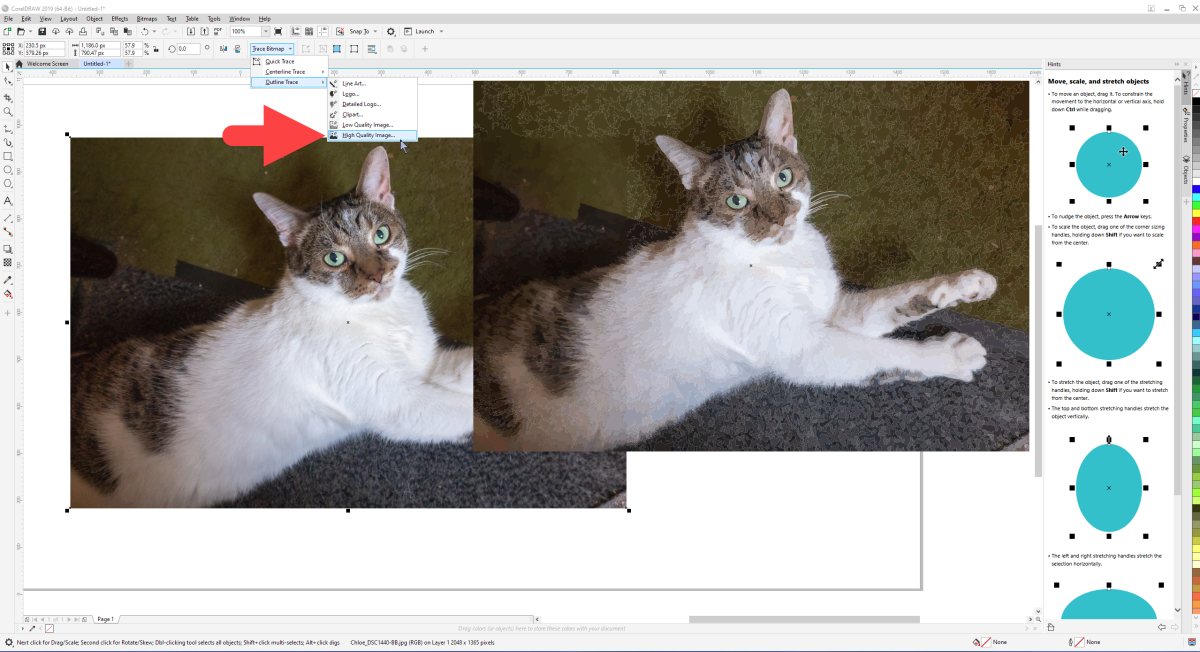 Powertrace is absolutely not intended for use with photographs, but sometimes it can be used to create an effect that might be useful. Setting the High Quality Image option allowed me to create a vector image of a cat.
In real life, this feature is used most often to rescue bitmap images of logos because logos are typically simple images with only a few colors and basic shapes. Fewer color variations allow the trace function to do a better job.
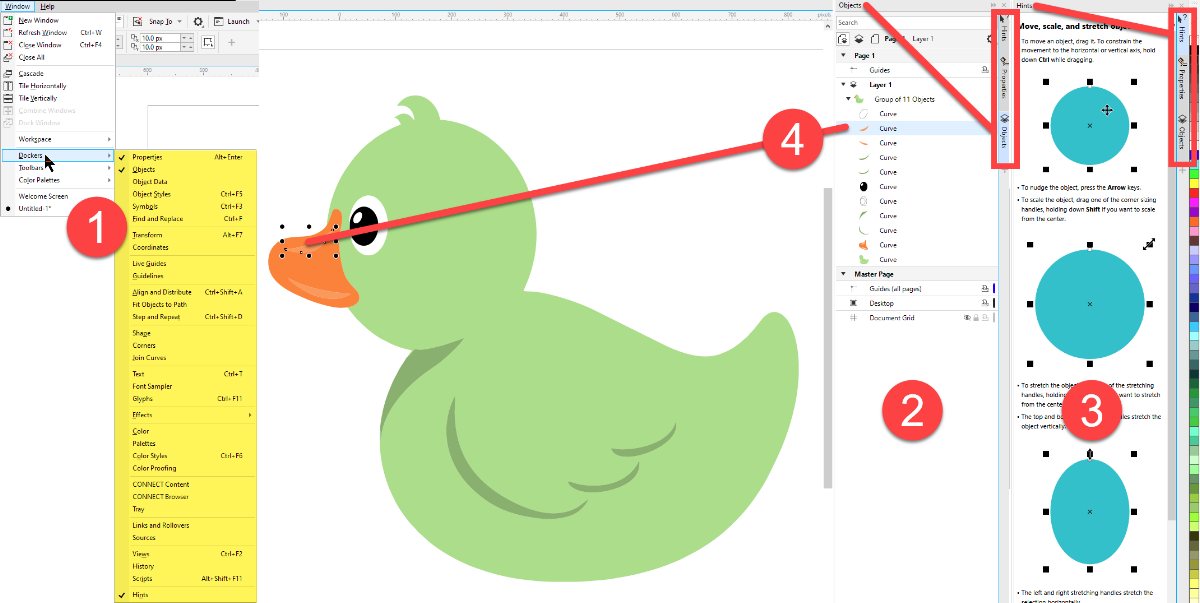 Corel Draw includes a huge variety of (1) dockers that provide additional information. The user can enable or disable any of the dockers but (2) Hints, Properties, and (3) Objects are turned on by default. When the Hints docker is open, you'll see information about how to modify whatever is selected. In this example, I have a curve selected so the information describes how the shape can be made larger or smaller, warped, rotated, or skewed.
The duck is made up of a group of 11 objects and whichever object is selected (4) is highlighted in the object list and with markers on the drawing.
Earlier I mentioned that the web-based component was the most surprising new feature. The ability to perform non-destructive edits is doubtless the most useful and compelling new feature. When developing an idea, a designer may go through dozens of variant ideas. After 77 iterations, the designer decides that version 31 is the one to use and discards the rest. Then the client wants variant 53. So that part about "discarding the rest" doesn't happen. Designers know better, but keeping track of 77 files is challenging.
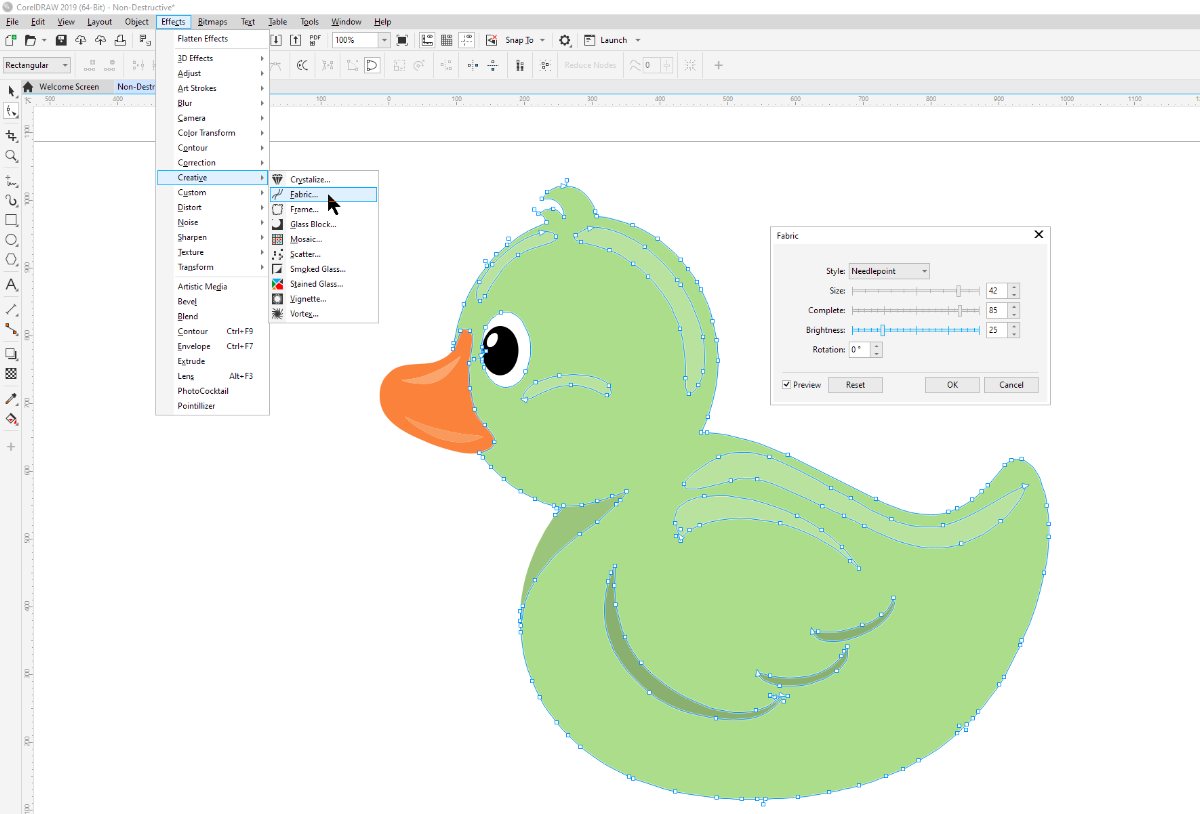 Corel Draw now makes it possible for a designer to add an effect to a shape and then to hide or reveal that effect. Let's select the main body of our little green duck and apply an effect. We'll convert the body of the duck to look like it has been done in a needlepoint stitch. Additional effects can be added and they appear in the Properties docker when the duck's body object is selected.
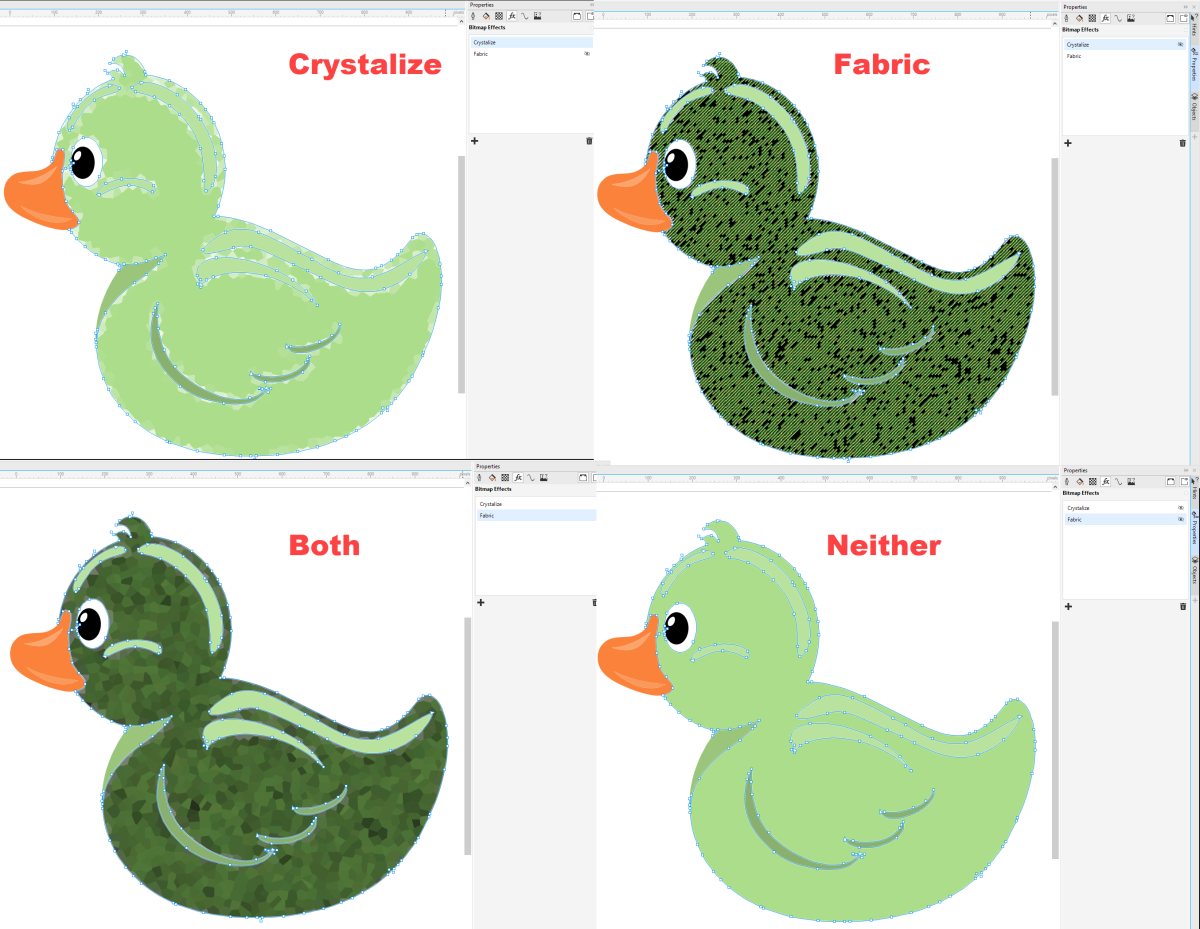 I turned off the fabric effect and added a crystallize effect. Then I had the choice of showing just the fabric effect, just the crystallize effect, or both effects. The stacking order matters, too, so experimentation is important.
Anyone who's old enough to remember when dirt was first proposed will remember being unable to install more than a dozen or two fonts. Those even older will remember when we had access to only two or three fonts and the real antiques among us will recall when computers did not allow users to select typefaces at all. Those days are long gone and many users probably have several hundred typefaces installed whether they know it or not.
By the way, I could make the argument that "font" describes a specific size and weight of a given typeface, but "typeface" and "font" became synonymous so long ago that I can't remember when it happened and I've stopped fighting it.
 About the time the second version of dirt was released, Corel started including the Bitstream Font Navigator. Today's Corel Font Manager 2019, which was introduced in the Corel Draw Graphics Suite X8 (2016), is clearly an outgrowth of that application, but it has come a long way. Anyone who doesn't already have a typeface manager will be happy to have this one and anyone who has some other typeface manager may want to consider uninstalling it and using Corel Font Manager exclusively.
 Adding and using a typeface is an easy two-step process: (1) Right-click the typeface in Corel Font Manager and select Install, then (2) use the typeface. You may have noticed that the context menu includes "Add to collection." A Collection is a virtual grouping of fonts that can contain fonts with a similar style or weight or typefaces that you need for a particular project. Users can create a font collection and add typefaces to it. It's a good way to keep track of typefaces that are needed for a project but that you don't want to have installed all the time.
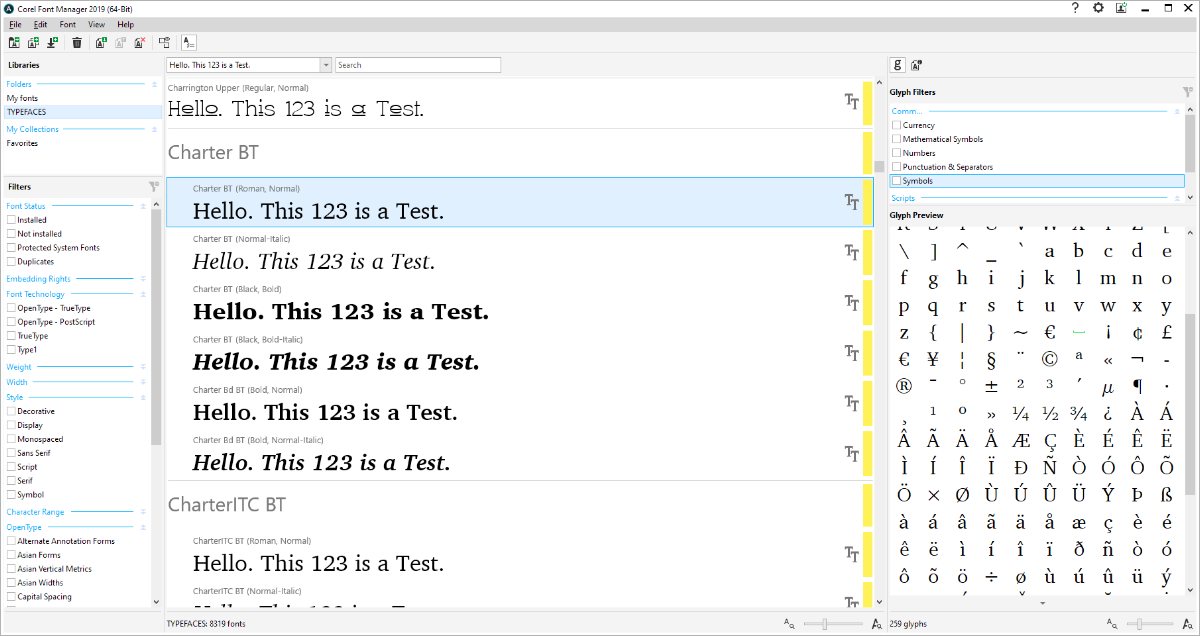
Finding the typeface you want is easier if the font management application makes it possible to filter the results. Corel Font Manager is superb in this regard. There are filters for the following selectors:
The selectors may not always work properly, but this isn't the fault of the application. Not all typefaces have the appropriate (or even correct) information embedded. Still, this is a feature that will make it possible to find the typeface you're looking for a lot faster than you would otherwise.
Corel Font Manager uses colors to indicate a font's status: Yellow means the typeface is not installed. Green means that it is installed. Green with a lock icon means that the typeface is installed and that it is a protected system typeface. To uninstall a font, right-click the font and choose Uninstall or click on the Uninstall icon. Uninstalled typefaces are no longer available but remain on the computer. Protected system fonts cannot be uninstalled.
As I said a while ago, Corel Draw isn't the only component in the package. Besides the indispensable Font Manager, the package also includes a bar-code wizard, Corel Capture, and the Photo-Paint photo editing application. Users can also download a free version of Corel AfterShot 3 HDR, which is intended primarily as a way to introduce the application and sell copies of AfterShot 3 Pro. The free version has severe limitations and it cannot open some camera manufacturers' raw files. It's unclear whether the Pro version recognizes files the basic version doesn't.
 The full price for a new license is $500 but you'll find discounts to $425 and some reviewers have incorrectly reported $635 prices. For those who are upgrading from any previous version (except NFR, OEM, and academic versions), $199 buys a perpetual license. Corel also offers an annual subscription that the company says offers "upgrade protection". Subscriptions cost $198 per year. That's not much of a bargain for an upgrader, but it's a good deal for someone who's buying a new license and who wants to keep up to date.

 Corel Draw Graphics Suite 2019 brings improvements and new features to an already strong application
Corel's outstanding font manager is almost worth the price of admission all by itself, but performance improvements and several new features are likely to be welcomed by longtime users of Draw. It's worth checking out by using the 15-day free trial if you haven't used Draw for a while and note that the upgrade price applies if you have any previous version of the software.
Additional details are available on the Corel website.
Manufacturers of hardware reviewed on TechByter Worldwide typically loan the hardware and it must be returned at the end of the review period. Developers of software reviewed on TechByter Worldwide generally provide a free not-for-resale (NFR) license so that all features of the application will be unlocked.
The Start Menu has been a part of Windows forever, or so it seems. Maybe you were distressed (as was I) when Microsoft eliminated it. It really hasn't been there forever, though. Microsoft added it to Windows 95. And it hasn't really been eliminated. The Start Menu has been a point of contention forever, or at least from the days of Windows 95.
"You have to press Start to shut down Windows 95???" That was one complaint back then. In retrospect, that was silly and I thought it was silly back then. When you start a car (for cars that still have standard ignitions and petroleum-based engines), the ignition key is required. When you shut the car off when you arrive at your destination, the very same ignition key is required. Those who complained about needing to use the Start Menu to shut down the computer quickly earned a place on my "not quite right in the head" list.
 The Start Menu isn't unique to Windows, either. It's common to many Linux systems and can even be added to MacOS computers. It came to Windows computers in 1995 and received a significant update in Windows XP. Windows Vista added minor changes. Then came Windows 8 and the Start Screen. Users (including me) screamed about losing the Start Menu, but by the time Windows 8.1 reintroduced a sorta-kinda replacement for the Start Menu I was in the "who cares" camp. The Start Screen was fine and pinning application shortcuts to the Task Bar or placing them on the desktop turned out to be sufficient for most users.
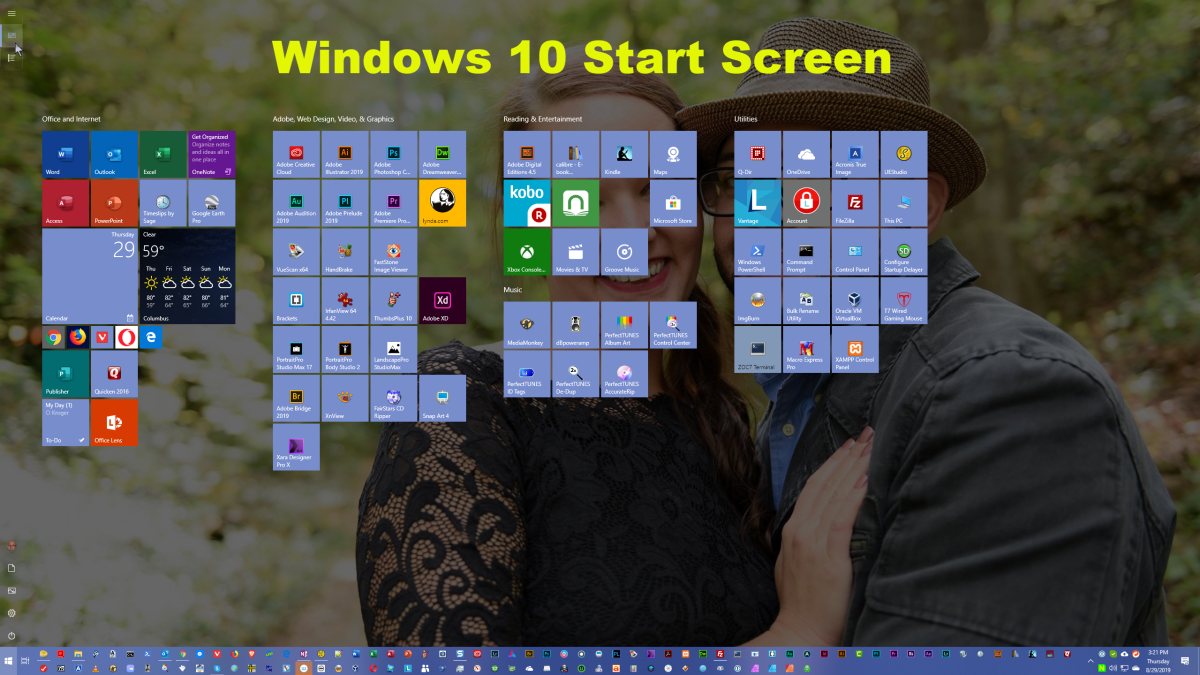
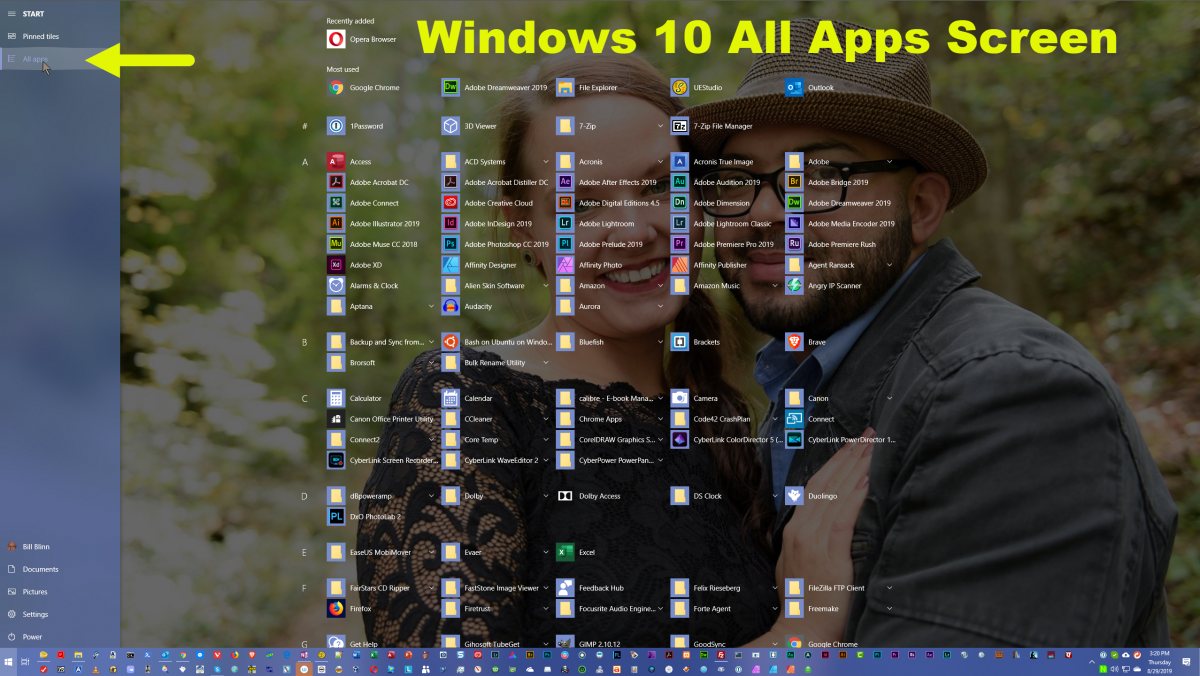
But Microsoft continued to tinker with the Start Menu and Windows 10 uses a 2-column design similar to what was used in Windows 7 but populates the right side with tiles. Applications can be pinned to the right half, and their respective tiles can be resized and grouped into user-specified categories. The left column displays a vertical list, containing frequently-used applications and a link to the "All apps" menu, File Explorer, Settings, and Power settings.
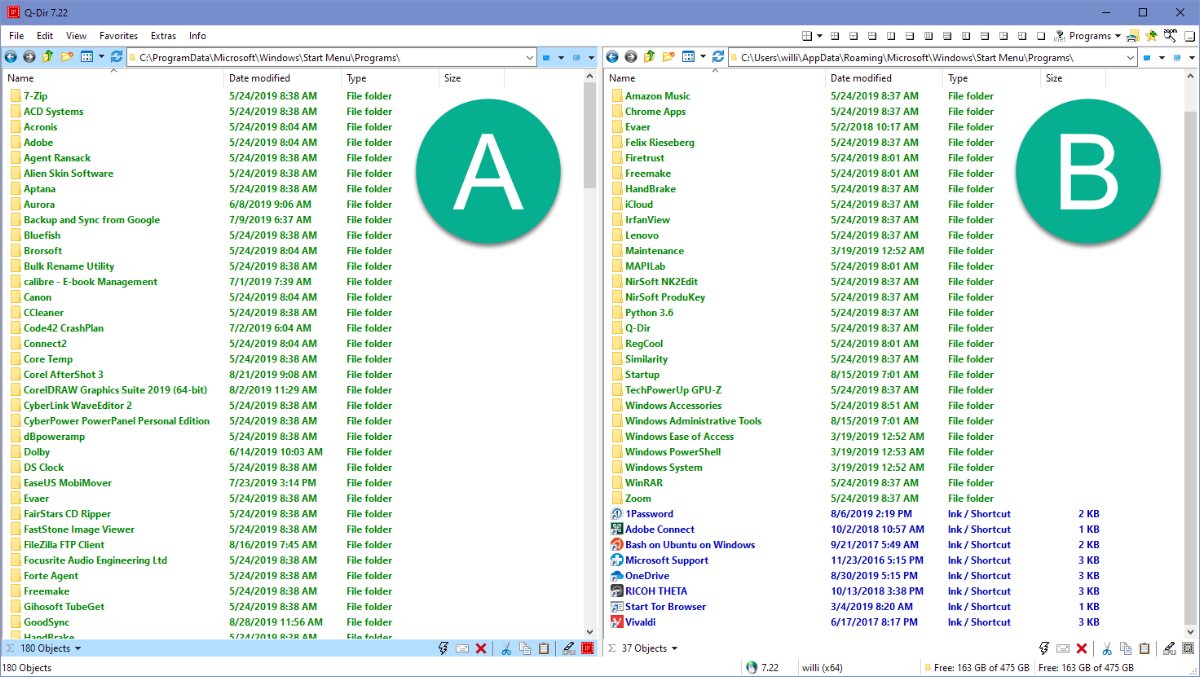 Now you can modify the Start Screen's pinned applications or the Start Screen's "all apps" list. Think of "all apps" like the old Start Menu on steroids. Assuming you're using Windows 8 and above, the contents of the (A) Start Screen are located here: C:\ProgramData\Microsoft\Windows\Start Menu\. Each user also has a menu and the contents of that menu are located in (B) C:\Users\{UserName}\AppData\Roaming\Microsoft\Windows\Start Menu\, which is also referred to as %appdata%\Microsoft\Windows\Start Menu\. For earlier versions of the operating system:
In versions of Windows prior to Windows 8 it was relatively easy to make changes to the Start Menu by modifying the contents of these directories. This is still possible to a limited extent but it's generally faster, easier, and less frustrating to make changes by interacting directly with the tiles in the Start Menu. Even then, sometimes updating an application that you've pinned to the Start Menu ends up losing the Start Menu tile and it begins to take on the appearance of a 7-year-old with a couple of missing teeth.
Unfortunately, there seems to be no way to open the all apps view by default. Getting there requires pressing the Windows key and then using the mouse to click the All Apps icon, which is way up in the top left corner of the screen. That's annoying and it all but eliminates that option for me except when I need to track down a specific application. Still, if you add shortcuts in the Start Menu directory, they'll appear when you open the All Apps view.
For me, the fastest, easiest, and least frustrating way to deal with the Start Menu is not to deal with the Start Menu.
The great advantage that Windows brings to users is that most tasks can be accomplished with any of several methods and the great disadvantage that Windows brings to users is that most tasks can be accomplished with any of several methods. Users can choose whether to place frequently used applications in the Start Menu or Start Screen, or to add shortcuts to the desktop, or to pin them to the Task Bar. All you have to do is figure out what works best for you. So bear in mind that there is no one best way to do anything but there may be a best way for you to do something. Even though my "best way" involves using the Task Bar and ignoring the Start Menu, there are still times when the Start Menu is invaluable. "Always" and "never" are not my friends.
A friend likes to have all of his frequently used applications on the Desktop but I detest having clutter on the Desktop. When new applications are installed, they often add links to the desktop -- sometimes even when I tell the installer not to do this -- so I delete them. Instead, I use the Desktop for applications that are waiting for review and for documents that I need frequently. Maybe you're like my friend, maybe you're like me, or maybe you're somewhere in the middle.
Let's take a look at things you can do to modify Windows so that you can get to the applications quickly and efficiently.

There's the Task Bar, which is what I prefer. Several settings need to be changed to maximize space on the Task Bar. I start by turning off Cortana, Task View, People, Windows Ink, and Touch Keyboard buttons because I don't need any of them on a desktop computer. If you have a notebook computer or a tablet, you may need some of these.
Then I turn off any additional tool bars. Some tool bars are native to Windows and others come with applications such as Media Monkey or may be provided by the computer manufacturer. I don't want or need any of these, so I disable them. If they're useful to you and they're worth the space they consume in the high-rent neighborhood, keep them on.
Before visiting Task Bar settings, I stretch the Task Bar so that it has two layers. This provides enough space on my monitor for 120 applications. That number depends on your screen size and resolution. Then in Task Bar settings, I lock the Task Bar, turn off the option to hide the Task Bar in either desktop or tablet mode, select small Task Bar buttons, activate the Peek option just because it's fun, replace Command Prompt with PowerShell, place the Task Bar at the bottom of the screen, and set the option to always combine Task Bars. You may also notice an option to show badges on Task Bar buttons, but this is disabled if you have selected small Task Bar buttons.
 Further down on the Task Bar settings page, there are options to select which icons appear in the Notification Area.
If the Task Bar is a high-rent area, space in the Notification area is even more valuable. Far too many application developers seem to think that their application deserves space here. Most of them don't. A few icons cannot be removed and the notification area on my primary computer has 18 icons, of which 9 are ones that I selected and 6 are system icons that I've enabled. I have banished 23 icons because I don't need them in the notification area.
On the tablet computer, I have enabled Windows Ink, Location, and Touch Keyboard but these are disabled on the desktop because I don't need them there.
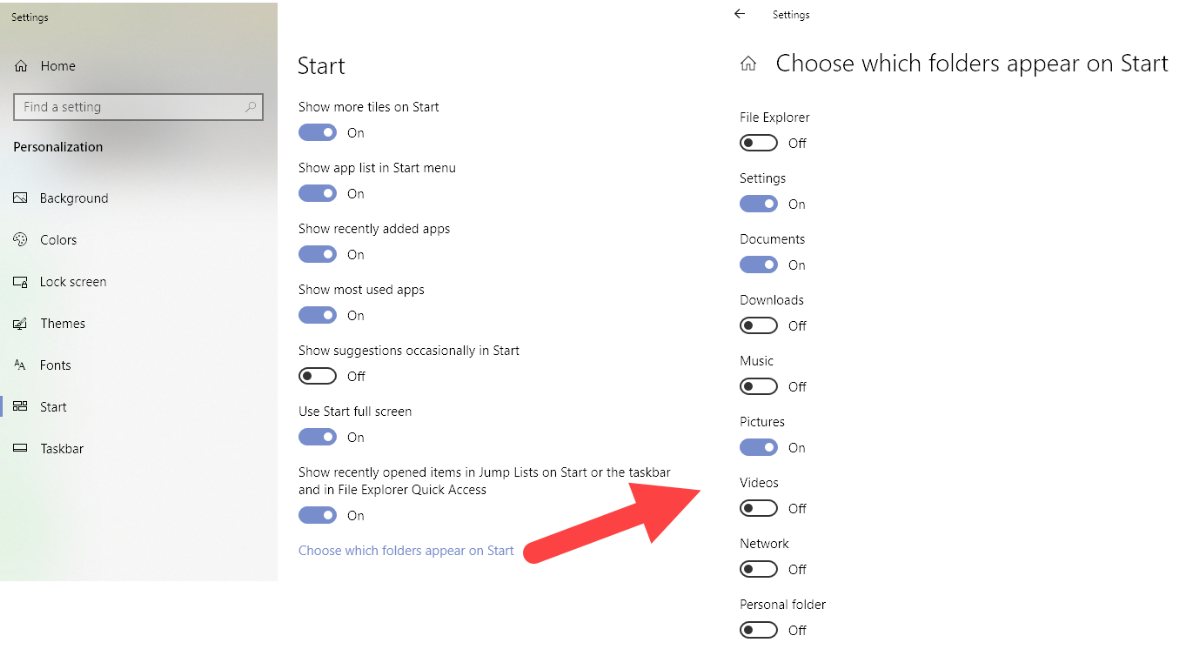
By default, the Windows 10 Start Menu groups tiles in sets that are three columns across when medium-size tiles are used. That seems illogical because large tiles are the width of two medium tiles. Fix this by visiting Start setting and turning on the option to Show More Tiles on Start. That expands the groups to four columns. If you use the Start Menu a lot, setting it to display full screen is a good idea. In fact, the only option I turn off here is the one to show suggestions because "suggestions" is Microsoft-speak for "advertisements".
While you're in the area, taking a look at which folders appear on the Start Menu is also a good idea.
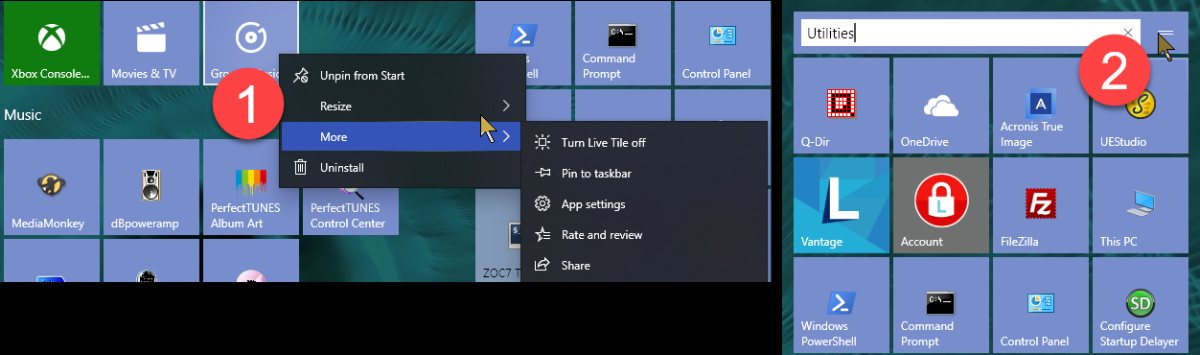 The default organization of the Start Menu probably won't be to your liking. (1) Right-click a tile and you can remove it from the Start Menu, resize the tile, uninstall it, pin it to the Task Bar, turn live tile on or off, and (depending on the application) see other options.
Organizing tiles into groups can be helpful. To create a new group, drag a tile to a blank spot on the Start Menu. (2) Click the hamburger icon and a text box will open so that you can name the group. Groups can be dragged around on the Start Menu and positioned as you like.
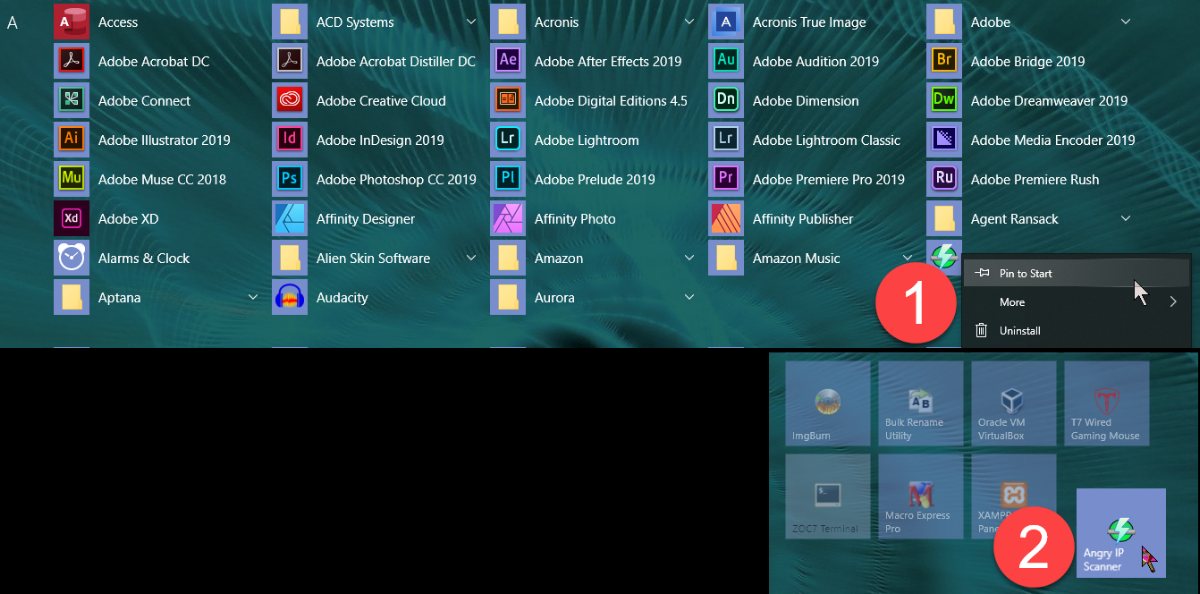
 Adding a tile to the Start Menu is easy. Let's say that I want to make Angry IP Scanner more readily available but it's not an application that I use enough to give it space on the Task Bar. Opening the Start Menu and selecting All Apps reveals Angry IP Scanner in the "A" section. (1) Right-clicking offers the option to pin the application to the Start Menu. It will then be on the Start Menu but not in any group. By (2) clicking and dragging the tile, I can add it to the group of utilities.
Does that seem like a lot of work? It does to me, which is why I use the Task Bar for the 100 or so applications that I need most often and just use the Start Menu's search function for those applications that I use less often. Pressing the Windows key and typing "ang" is enough for Windows to know that I'm looking for Angry IP Scanner. I can then open the application with a single click.
No small number of people like to hate Windows and despise Microsoft but despite occasional idiotic decisions the company has created an operating system that can almost always be adjusted to suit the user's preferences.
Alien Skin Software has routinely created filters and other applications to enhance digital photography, applications that I've always looked forward to with anticipation. It gives me great pleasure to let you know that Alien Skin Software no longer exists.
What ... what???
Sometimes software companies feel the need to change something. The owners Satellite Software International realized decades ago that nobody connected the company name with their most popular product, so they changed the name to WordPerfect Corporation. The same is true for Alien Skin. Over the years, Exposure has become their stand-out product. After becoming Alien Skin in 1993, the company is now changing its name to Exposure Software and they're even using the new "software" top-level domain, so you'll find them at exposure.software but alienskin.com will continue to work for now and will silently redirect you to the new site.
CEO Finley Lee characterizes it as more than just a name change: "The new branding initiative reflects the importance of, and commitment to, making Exposure the best photo editor for creative photographers." The change comes in advance of plans to release Exposure X5 in the fall. Exposure specializes in film simulation, creative looks, and special effects, and the application operates either as a standalone application as well as a plug-in to Photoshop or Lightroom.