Listen to the Podcast
07 Apr 2019 - Podcast #637 - (20:38)
It's Like NPR on the Web
If you find the information TechByter Worldwide provides useful or interesting, please consider a contribution.

If you find the information TechByter Worldwide provides useful or interesting, please consider a contribution.
Digital photography puts us in complete control of our images. Besides being able to take an unlimited number of photographs without concern for the cost, we have tools that give us more capabilities than even the most talented darkroom artist had when film was king. Now perhaps our primary problem is figuring out which tool to use.
Those who are relatively new to digital photography or new to Adobe's photo processing products can learn a lot from the dozens of programs on Lynda.com. Membership is included in paid LinkedIn memberships, but a library near you may also offer free access from home. These are the programs I feel are best for beginners.
Chris Orwig
Julienne Kost
Ben Long
Jan Kabili
Each of these presenters has other programs and I particularly like Ben Long's approach to teaching shooting techniques. If your local library doesn't have access to Lynda.com, check other nearby libraries and those in your state's largest cities.
Although Adobe is the clear leader for professional photographers and serious amateurs, there are many other applications that operate as plug-ins for Adobe's tools, as standalone applications, or both. We've looked at some of those previously, so today we'll be concerned with the best work flow through Adobe Photoshop, Adobe Lightroom CC, Adobe Lightroom Classic CC, and Adobe Camera Raw. Each of these has strengths and you'll create better images with less effort when you see the differences.
One thing that's important to understand is that Adobe Camera Raw and Adobe Lightroom Classic CC have identical editing capabilities. That's why every Adobe Camera Raw update is accompanied by an Adobe Lightroom Classic CC update. The only differences are the user interfaces and the fact that Lightroom Classic uses a database to store edits instead of placing the information in sidecar files as Camera Raw does.
Maybe it's also important to understand that no photo editing application can open a raw file from a camera or write changes back to the raw file. Raw files are simply digital representations of the data from the camera's sensor. If you want to make changes to the image represented by the data, the file needs to be run through a demosaicing process and then be presented to the editing application. Because raw files from cameras are proprietary, no application can write changes back to the file. That's one good reason for converting raw files to Adobe's digital negative (DNG) format when you import them from the camera.
Adobe invented the DNG format and made it available to anyone who wants to use it. Leica, Hasselblad, and Pentax use the DNG format for their cameras. Nikon, Canon, and Sony still use their own proprietary formats. When importing images into Lightroom Classic, you can either maintain the proprietary formats (Nikon's NEF, Canon's CRW or CR2, and Sony's ARW) or convert them to DNG on import.
Whether to maintain the raw format or convert to DNG is a contentious subject. I'll come down on all sides of the issue and say this: It really doesn't matter. Most applications can write changes to DNG files, but have to create sidecar files for raw files. So what? Either way, the changes are recorded. My preference is DNG files, but occasionally I forget to do the conversion and it's not a big deal. It's a typical non-issue that photographers like to argue about.
In addition to all of the various raw formats and DNG, there's JPEG. JPEG files are processed in the camera and that process sharpens the image and applies compression that discards some of the data that was captured by the sensor. You may have heard that you should always shoot raw format. That's wrong. You may have heard that you should always shoot JPEG. That's wrong, too.
So choose raw or DNG if you want to maintain complete control and choose JPEG if you're willing to give up some control. There's one other reason for shooting JPEG files: Journalists and sports photographers often choose JPEG because the images need no additional processing and this saves time. Some cameras offer the ability to save both a raw and a JPEG image simultaneously and this is a good choice if you need fast access to the images (maybe for sharing while you're on vacation) but want to retain the capabilities of raw files.
Click any small image for a full-size view. To dismiss the larger image, press ESC or tap outside the image.
Adobe wants the cloud-centric Lightroom to win the race, but I'm still uncomfortable storing all of my files in any location other than my own computer. That's why I use Lightroom only for images from my mobile phone and Ipad. Once the images from these devices have been synced to my home computer, I save them with "original + settings" to a temporary directory on the computer and then import them into Lightroom Classic.
Adobe also offers Bridge, which works well with Photoshop. Bridge, though, isn't connected to a database and has been deprecated by Adobe. No future versions of Bridge will be released, so depending on Bridge as the primary organizational tool isn't a good idea.
Instead, my recommendation is to import all images into Lightroom Classic and to use it as the primary organizational tool. When images are in Lightroom Classic, you can perform macro edits (cropping, brightness, contrast, color balance, and such) there and pass images that need pixel-level (micro) edits to Photoshop. Many photographs need only Lightroom Classic edits, but there are images that must be passed to Photoshop. Let's consider some examples.
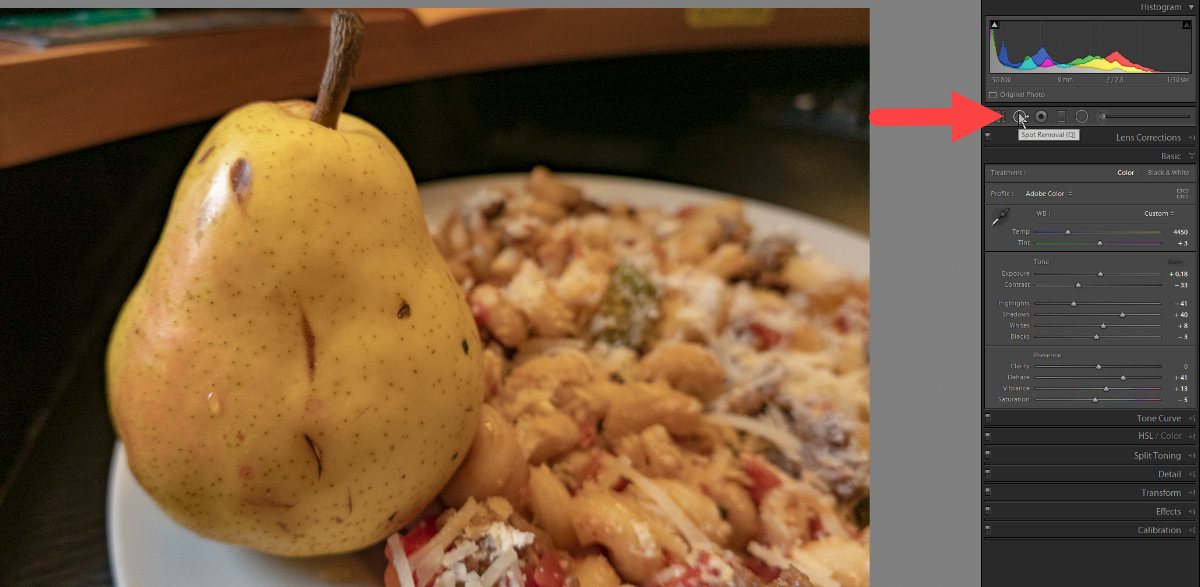 In addition to adjusting color, brightness, and a lot of other factors, Lightroom Classic can remove some image imperfections with the Spot Removal tool. I created a picture of a pear on a dish of pasta. This wasn't an artistic shot, but just a test shot for a camera. It also turned out to be a good example of what Lightroom Classic's Spot Removal tool can do. I hadn't selected the pear as a photographic model. I selected it to eat for lunch, so I didn't care about the bumps, tears, and other imperfections.
 The Spot Removal tool sets a pin for each imperfection the user chooses to fix. The small dots on the left image shows each of the spots where I've used Spot Removal. On the right, the pins are hidden and the pear is much more appealing.
The point here is that Lightroom Classic may be sufficient for what would normally be considered pixel-level editing. Removing power lines from a sky, blemishes on a person's skin, or bare spots in a lawn are all good examples of what can be done with this tool. There's no harm in starting with Lightroom, even if you know that you'll need to pass the image to Photoshop.
More advanced corrections are candidates for Photoshop, where the Clone tool can be used in conjunction with layers to fix difficult problems. When Lightroom sends an image to Photoshop, it creates a full-resolution TIFF file that can include, at your option, all of the changes that have been made in Lightroom.
 I took a picture of Chloe Cat sitting on my lap, but my ugly foot was visible in the background and I didn't like that. The image was captured on an Ipad with Adobe Lightroon, so it was in DNG format.
 < On the Ipad I was able to crop the image so that my foot was no longer in the fame. That's OK, but I really wanted more of the image. Now it's time to move the image to Photoshop.
 By using the Clone Stamp tool on a new layer, I was able to remove my foot from the image, but there's still a lamp behind Chloe Cat and it appears to be growing out of her neck.
 < Additional use of the Clone Stamp tool removed the lamp.
 Fixing a Butterfly's Wing
Nearly a decade ago, I photographed a butterfly at the Franklin Park Conservatory, one of my favorite locations in Columbus with a Canon Powershot G12 (an advanced point-and-shoot camera). The image has some foliage with blown-out highlights. Additionally, the butterfly would work better lower in the image and at the left.
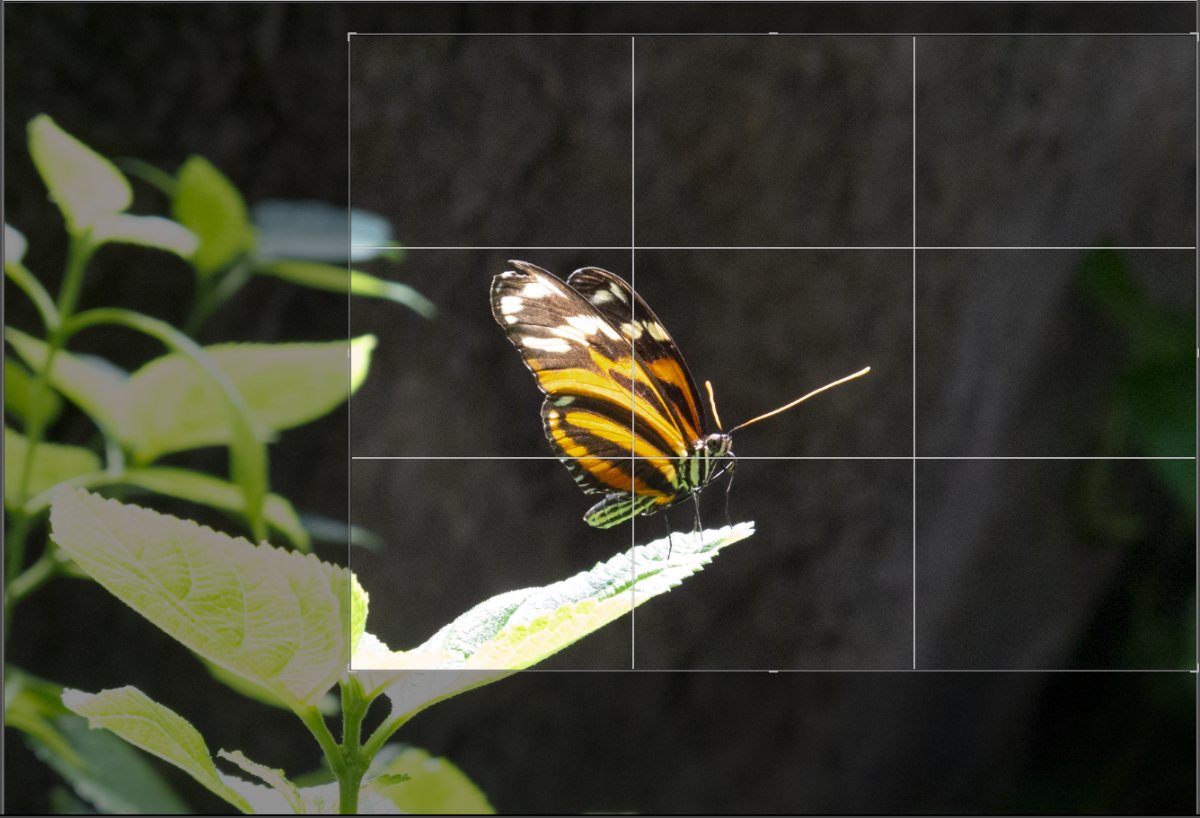 < Cropping the image, color correction, contrast, and such were easily taken care of in Lightroom Classic, but ...
 ... the butterfly had a damaged wing. Fixing the wing is not the kind of enhancement that can be made in Lightroom or Lightroom Classic, so right-clicking the image reveals the option to edit the image in Photoshop.
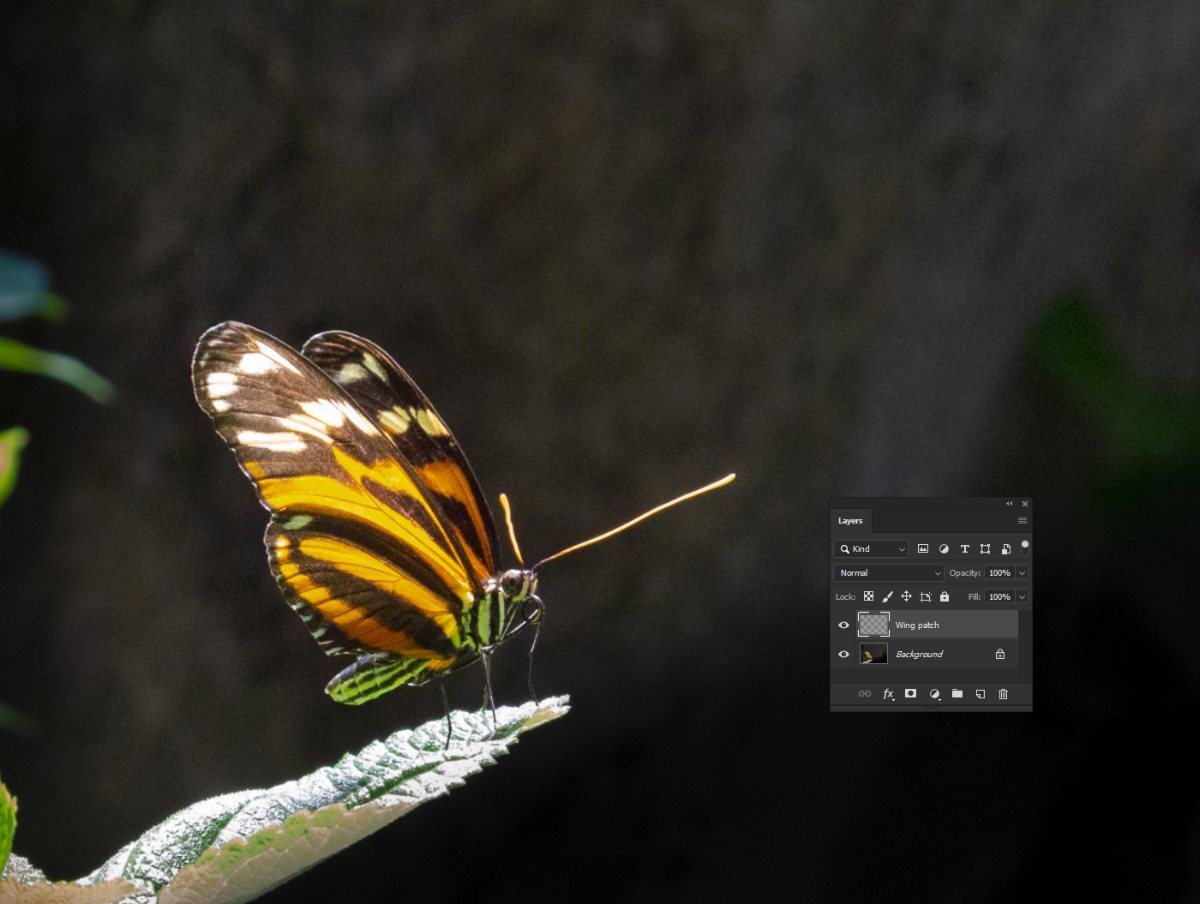 < After creating a new layer for the correction, I brushed the changes onto the file. Some of the new detail in the front wing comes from the wing in back and some of the new detail comes from other locations on the front wing.
 When the editing process is complete in Photoshop, saving the file returns it to Lightroom Classic.
In some cases, an image needs so many changes or the changes are so detailed that Photoshop is the only possible choice.
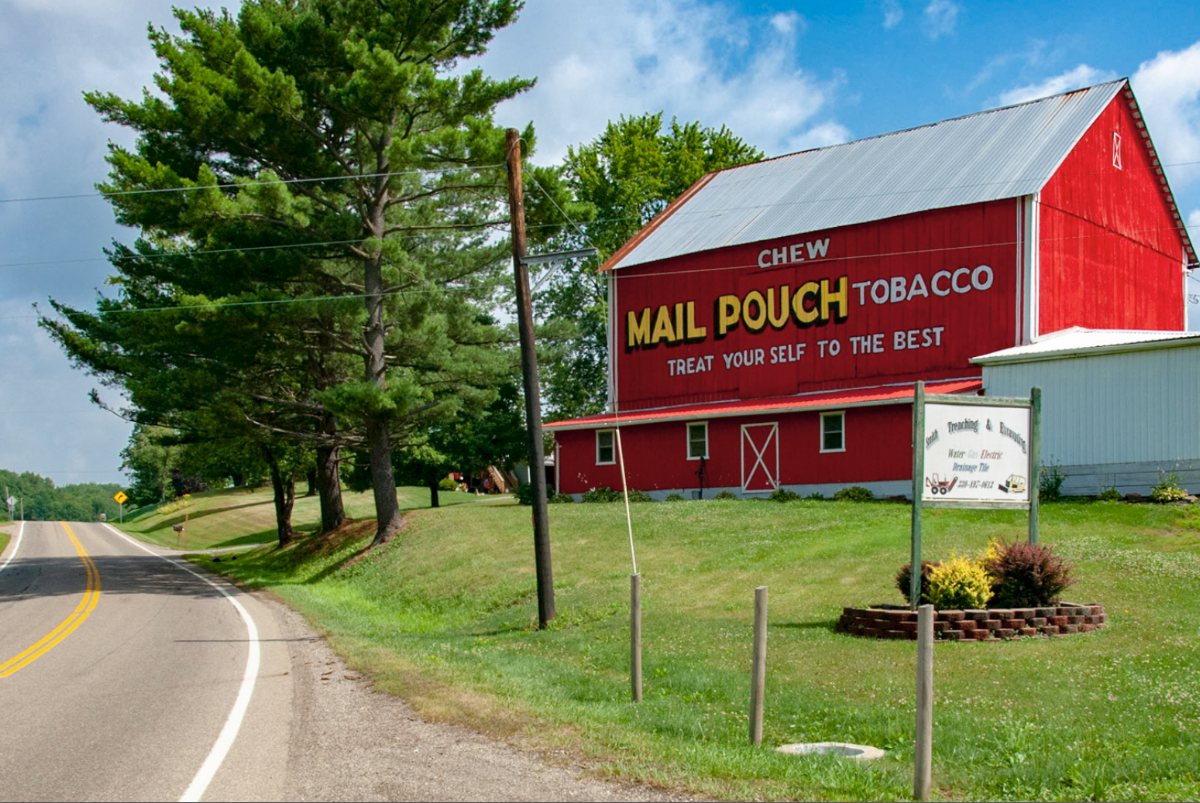 < Here's a photograph of a barn in Ohio's Amish country. I liked the picture when I took it, but it wasn't as appealing when I saw it on the screen. There's a large sign in front of the barn, power lines, a power pole, fence posts in the foreground, an ugly white extension to the barn on the right, a house in the background, power lines, and more. Ugh.
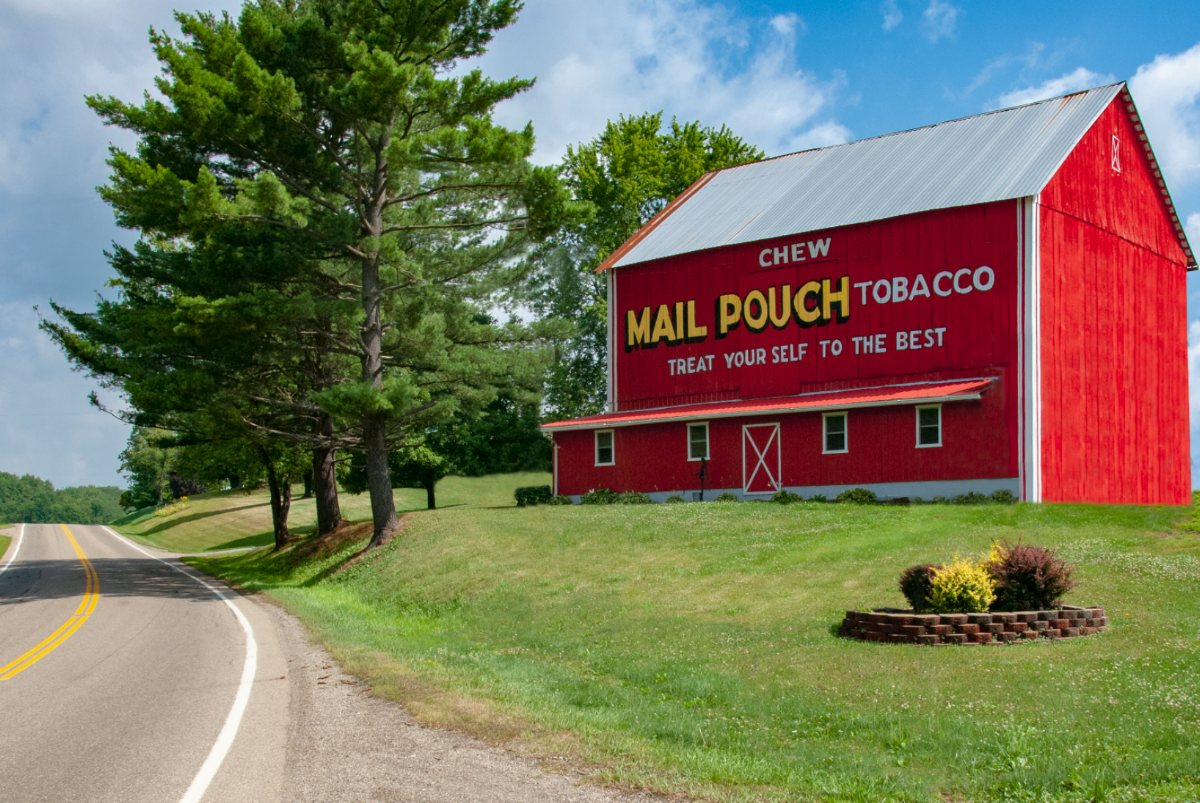 Lightroom Classic took care of color, contrast, and cropping, but I needed Photoshop for the rest of the work.
This isn't the kind of work that I normally do with photographs and I wouldn't make so many changes if my objective was to create a journalistic representation of Amish country. This is artistic, not journalistic, but either way Lightroom Classic CC isn't the right tool for the task. The changes were extensive and I spent at least eight hours on the image over a period of several weeks.
As powerful as Lightroom Classic is, it's not the right tool for every change you might want to make to an image. That's why Adobe includes both applications, along with Adobe Camera Raw, Lightroom, Spark, Bridge, and Portfolio. Your mission is to select the right tool for the job.
Warnings have been issued for several years about cyberthreats aimed at various utilities. The warnings, unfortunately, were accurate and the number of attacks on utilities are continuing to increase.
Research conducted by Vectra, a developer of protective applications for utilities, says that most cyberattacks in the utilities sector occur inside enterprise IT networks, not in the critical infrastructure.
The report says that most companies fail to find threats and that in the past 3 years Russian government cyber actors targeted government entities and multiple critical infrastructure sectors in the United States. Targets include energy, nuclear, and water utilities, along with commercial facilities, aviation, and critical manufacturing businesses.
Once the attackers are inside the IT network, they can move laterally and that's where the most serious threats are. The report says that threat actors who gained access to the IT network then used privileged credentials to access the victim's domain controller, typically using the remote desktop protocol (RDP). On the domain controller, they can use batch scripts to list host devices and users. Other critical information is also exposed.
Attacks such as these often occur over a period of many months according to Vectra. The process is slow and quiet to avoid detection.
The initial access to the IT network is usually accomplished using malware and spear-phishing strategies to steal administrative credentials. Last week, I described an attack that infected hundreds of thousands of Asus computers in an attempt to infect just 600 computers. There's still been no indication who conducted that attack or which 600 machines were targeted.
The Vectra report is worrisome and the full report is available without charge from the Vectra website.
Microsoft gave Windows Vista an amazing capability that is still present in Windows 10. It's a feature that can examine a directory, determine what kinds of files are there, and then select the best Explorer template to use when displaying files from that directory. It's quite clever, but it can also seriously slow the process of opening the directory.
The problem is that the evaluation process takes time. The more files you have in the folder, the longer the evaluation process takes. You'd think that the process would run just once, select a template, and then stop fiddling with it. That's true as long as you never add another file to the directory. When new files are added, Automatic Folder Type Discovery runs again. If you have a folder with a lot of files, the discovery process drags on and on while a green line expands slowly across the top of the screen to show the progress..
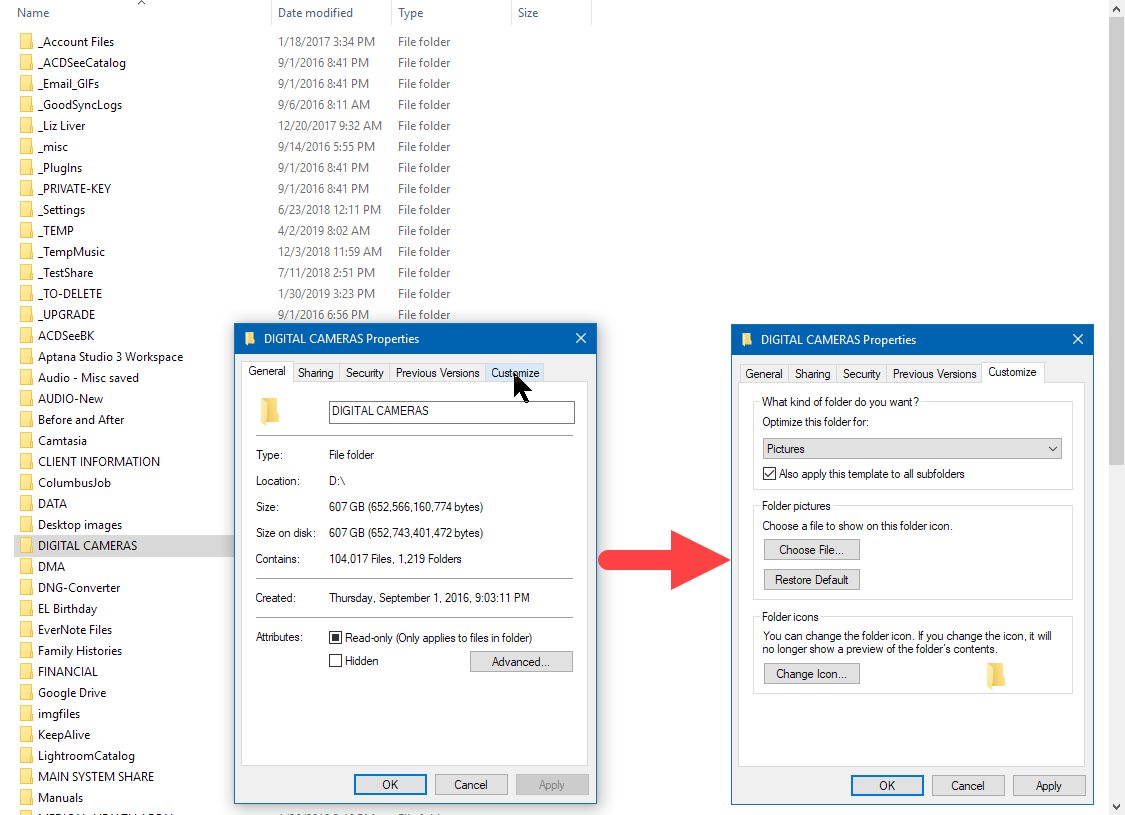 The solution involves telling Windows one of two things: The kinds of files in the directory (music files or picture files, for example) or "General Items". If you set the directory to General Items, the Automatic Folder Type Discovery should stop running and that, perhaps surprisingly, is the right answer. I had tried setting the directory where I keep images from digital cameras to "Pictures", but that didn't speed the process. The file explorer still ran the discovery process, apparently looking for thumbnail images to display. But I don't need the Windows File Explorer to show thumbnails and, if I do, I can quickly turn them on by using the View menu.
 When I need to work with photographs, I'll use Lightroom's or Bridge's thumbnails. So, I thought, maybe the better option would be to set the directory and all of its subdirectories to "General Items". BINGO!
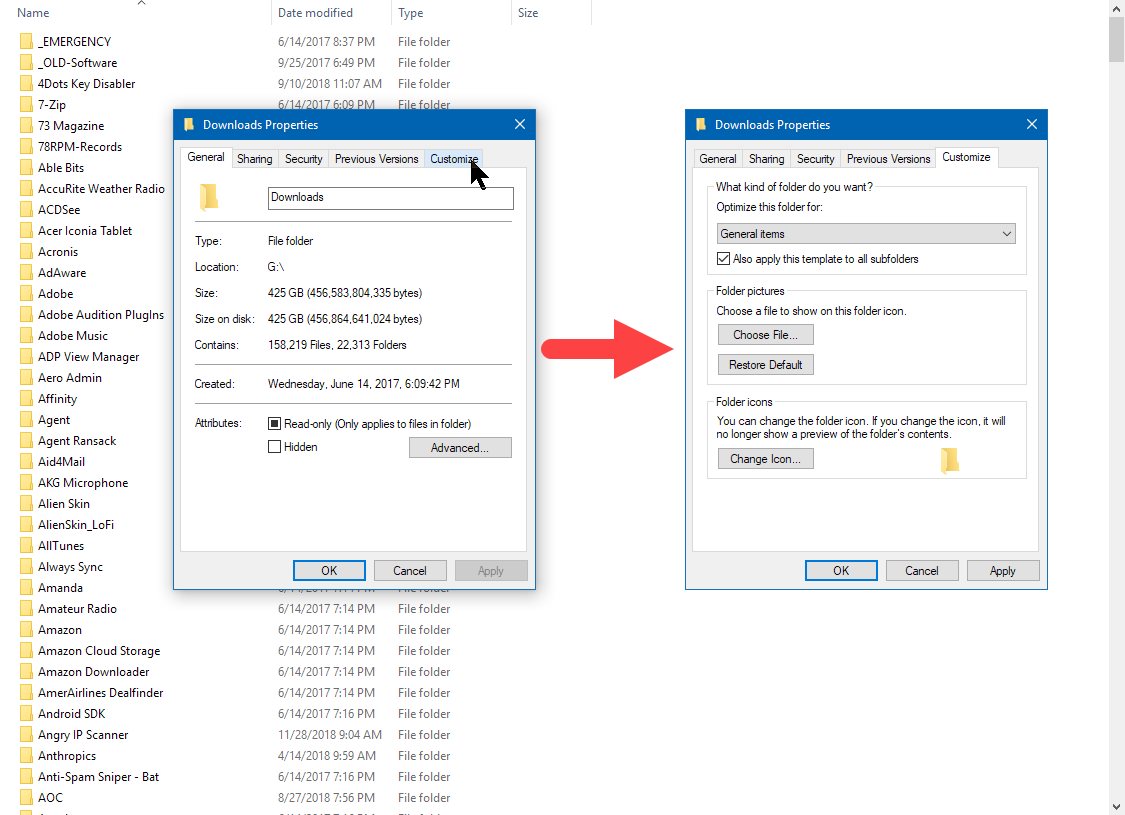
Another directory where this is important is the computer's Downloads directory. By default, this will be C:\Users\{UserName}\Downloads\, but many users want to avoid filling the boot drive with downloads. I use G:\Downloads\ instead. Because the contents of this directory change frequently, turning the detection process off makes a lot of sense.
The process is easy enough. Navigate to the folder in File Explorer and right-click it. Choose Properties from the context list and then select the Customize tab from the Properties panel. Change Optimize this folder for to General Items. You may also want to apply the change to all subdirectories. Then click OK. There's also an Apply button, but you need to click it only if you want to apply the change and then make other modifications to the directory's properties.
Now when you open the previously slow directory, you should see a nearly immediate file list.