The latest iteration of Alien Skin's Exposure adds equal measures of features intended to make file management better and to improve the editing experience. No longer solely a plug-in for Adobe Photoshop and Lightroom Classic, it now gives users full photo management capabilities.
I called out Lightroom Classic because plug-ins are currently not supported at all by Adobe's new Lightroom CC that aims to provide parity between desktop and mobile editing. Lightroom CC probably should be considered more of a "proof of concept" than a fully functional image management system currently. It's likely that the ability to use plug-ins will be added sometime, but Adobe isn't there yet. So if you want to use Exposure X3 as a plug-in, stick with Photoshop CC or Lightroom Classic.
But it can also be used as a stand-alone application to manage images as well as to edit them.
Several significant shortcomings in Exposure have been remedied in this version.
Collections can contain sub-collections, so a professional photographer might have a collection for weddings and then one sub-collection for each individual wedding. A home user might have a family collection and sub-collections for children and a spouse, another for vacations with sub-collections for each separate vacation.
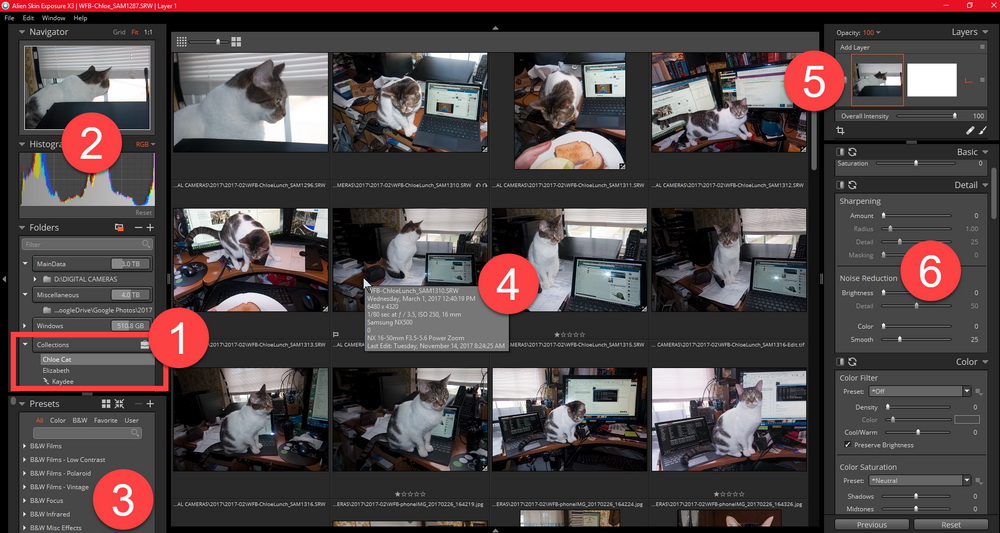
This image shows several aspects of the interface:
 Virtual copies are a most welcome addition because they make it possible to modify multiple versions of an image without having to duplicate the image on disk. Even though disk space is inexpensive now, it's still better to allow the tiny sidecar files to hold information about multiple edits than to create multiple copies of large photo files.
For example, you might want to compare the impact an image has when it's in color against its appearance in black and white. And you're not limited to just a single virtual copy So creating a variety of interpretations is easy.
Click any of the smaller images for a full-size view.
To dismiss the larger image, press ESC or tap outside the image.

 The ability to try several presets simultaneously on a single image to see which might be most useful (left) speeds the process of finding just the right look.
The raw image (1) can be compared with 3 presets. I wanted to see (2) an old black and white Polaroid look, (3) a Technicolor movie process that highlights the cat's eyes, and (4) another black and white look that recreates the appearance of a photo created with Agfa APX 100 film.
Key words (right) can be typed, selected from from a list of recently used key words, or applied from a library of words. A user might create a library of key words to be used with family photographs, another for vacations, and yet another that relate to photographs created for a hobby.
The key words can be added at any time.
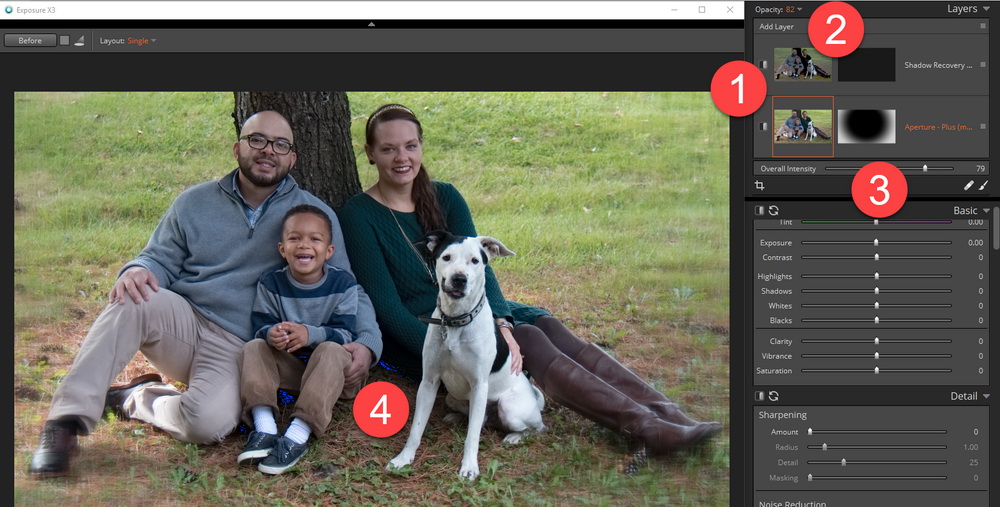 Although layers aren't new in this version, they were a welcome addition to version X2.5. Previously, Exposure could add only one effect at a time and users who wanted to combine effects needed to find workarounds. Now it's possible to add two or more effects to the same image, to apply masks to each of the effects, and then to blend them together.
In this case, I've modified a snapshot to use a preset that recovers detail in shadows and another that softens the focus in some areas.
Exposure initially was only a plug-in for Adobe Photoshop (and, when Adobe added it, Lightroom) so it didn't need the ability to import and manage files. That was left to Lightroom or, for Photoshop users, Bridge. When the standalone capability was added, Alien Skin needed to develop a method to manage images. Lightroom stores information about photographs separately in a catalog file that might be on a disk drive that's not associated with the photos.
 The good thing about the catalog file is that all information about every image is kept in the same place. The bad thing about the catalog file is that all information about every image is kept in the same place. Lose the catalog file and you lose all of the edits. The size of the Lightroom Catalog files is significant, too -- 50GB in this case.
When I talked with Alien Skin CEO Finley Lee, he explained why he chose to use sidecar files instead of a catalog.
Because there's no catalog, Exposure has no concept of importing files. This will seem strange to long-time Lightroom users because the first step always is the file import. It would even be possible for an Exposure user to edit files while they're still on the camera's memory card, but I can't think of any situation in which this would be a good idea.
Applications that use sidecar files to store information about images can place those files in the same folder with the images, as some other applications do, or create a separate directory where the sidecar files are stored. There are advantages to both methods:
 An important advantage of using a subdirectory in the folder with the images is apparent when files must be shared with another user. Copying the full directory of images automatically takes the sidecar files along.
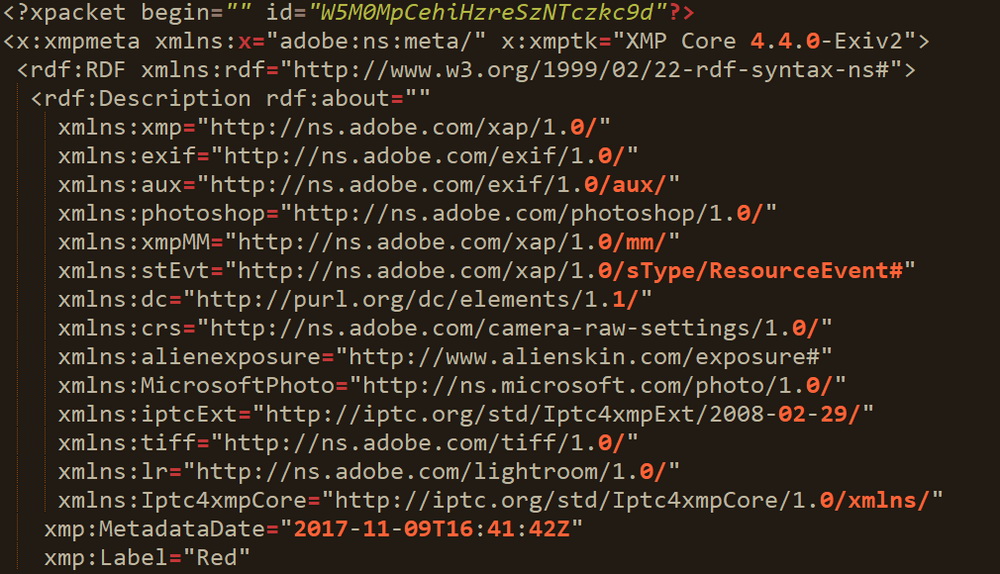
Exposure's sidecar files have an .exposure3 extension and are in XML format. The extensible markup language is an excellent choice for this information because it is more-or-less readable by humans.
Each directory with images that have been edited by Exposure X3 contains an Alien Skin directory and that directory will have at least one additional directory: "Exposure X3". If you have used Exposure X2, a directory will be present for that version's sidecar files. Lee says that the decision to use a subdirectory was the result of feedback from users who didn't want the clutter of having sidecar files in the same directory as the images.
Alien Skin's decision to create a stand-alone version of Exposure may have been at least partially informed by Adobe's decision to switch from perpetual licenses to software-as-a-service licensing. In any event, this new competition might have changed the relationship between Adobe and Alien Skin. I asked CEO Finley Lee about that.
There's a lot to like here whether you're a user of Adobe's applications or not. The ability to use Exposure X3 as a stand-alone application and as a plug-in is worth investigating.

 Exposure X3 offers a different way to manage photographs
Exposure has always been an outstanding plug-in for Photoshop and Lightroom. Now, as the stand-alone version matures, powerful new features make it a viable, if friendly, competitor with Adobe's photo editing applications. Adobe and Alien Skin applications work well together and photographers -- particularly the pros and serious amateurs -- will probably want to experiment and determine the procedures that work best for them.
Additional details are available on the Alien Skin website.
Early adopters of digital photography may have dozens or hundreds -- maybe thousands -- of low quality images on their computers. In 1998, Sony loaned me one of their Mavica cameras. Instead of solid-state memory, these cameras used floppy disks. Image quality was horrid, but it was better than what the original Mavica offered.
Sony introduced the Mavica in 1981 as the first electronic camera. Note that I did not use the term "digital". That's because the Mavica's CCD sensor produced an analog video signal in the NTSC format with a resolution of 570 × 490 pixels -- that's what you'd find on television screens back then. By the time Sony loaned me a camera, it was a digital device. But the basic image size was 640 pixels by 480 pixels. That was adequate for screen viewing at the time, but useless for printing.
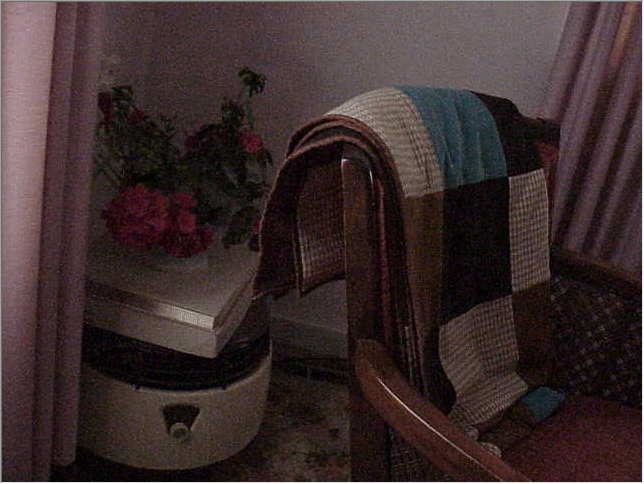 Here's a test image that I created in 1998. If you click the image at the right, you'll see it in it's marvelous 640x480 splendor.
The original image is only 39K. This kind of image reduction was Sony's only way to be able to fit an acceptable number of images of an 1.4MB floppy disk. Because of the extreme compression, artifacting is visible even at normal size.
Click any of the smaller images for a full-size view.
To dismiss the larger image, press ESC or tap outside the image.
A new on-line service called Let's Enhance promises to correct some of the flaws in images such as these old low-resolution and highly artifacted images. Let's see how well the process works.
The service is free and anyone can sign up to use it on the Let's Enhance website. The developers are in Estonia, who say that they use neural networks to up-sample photos in a way Photoshop can't. Submit one photo to the site and it will return 3 images to you: One is called "anti-jpeg" and is just a copy of the image in lossless png format. The second and third images are the ones that have been modified. Image two will include the term "boring" in its name and it is a 4x up-sampling of the image (so the 640x480 picture becomes 2560x1920). The third image includes the word "magic" in its name. This is the one you'll be most interested in because it's a 4x up-sampling that includes efforts to remove artifacting and improve resolution.
 Let's Enhance says "If the system detects that you uploaded compressed JPEG, it automatically applies anti-jpeg neural network. While it is highly efficient in removing JPEG artifacts, it can also lead to some blurring. This is anticipated. If you would like to avoid it, you can save [the] jpeg as PNG-24. This will skip anti-JPEGing, as well as preserve JPEG noise."
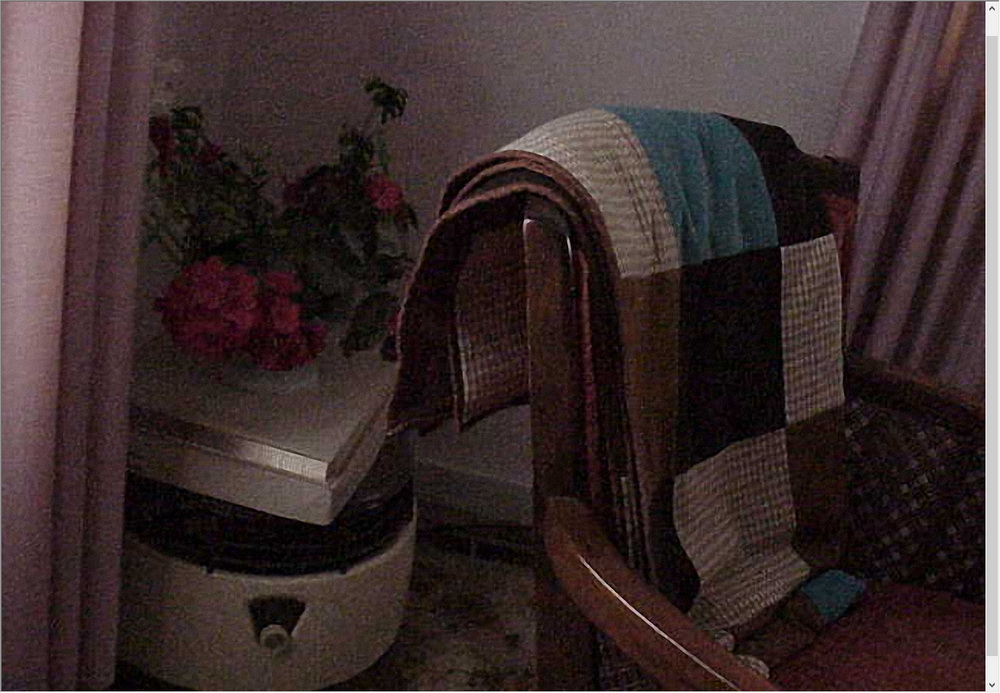
My image was a highly compressed and the blurring by the anti-jpeg process wasn't objectionable. The "boring" 4x version is shown here.
The developers explain the difference between "boring" and "magic" this way: "Boring does upscaling and doesn't hallucinate fine details. This option is good for illustrations, logos, vectors, etc. Magic does hallucinate a bit, so it's perfect for photos."
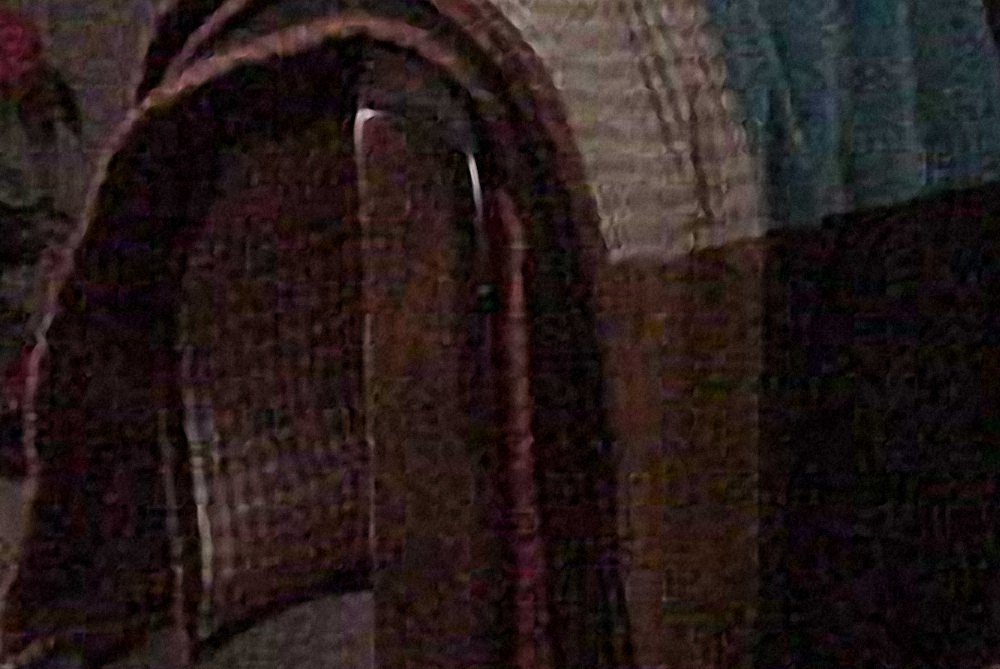
 The image returned by the "magic" process really does seem to extract some detail that simply wasn't there. This is a full-size view of the up-sampled image.
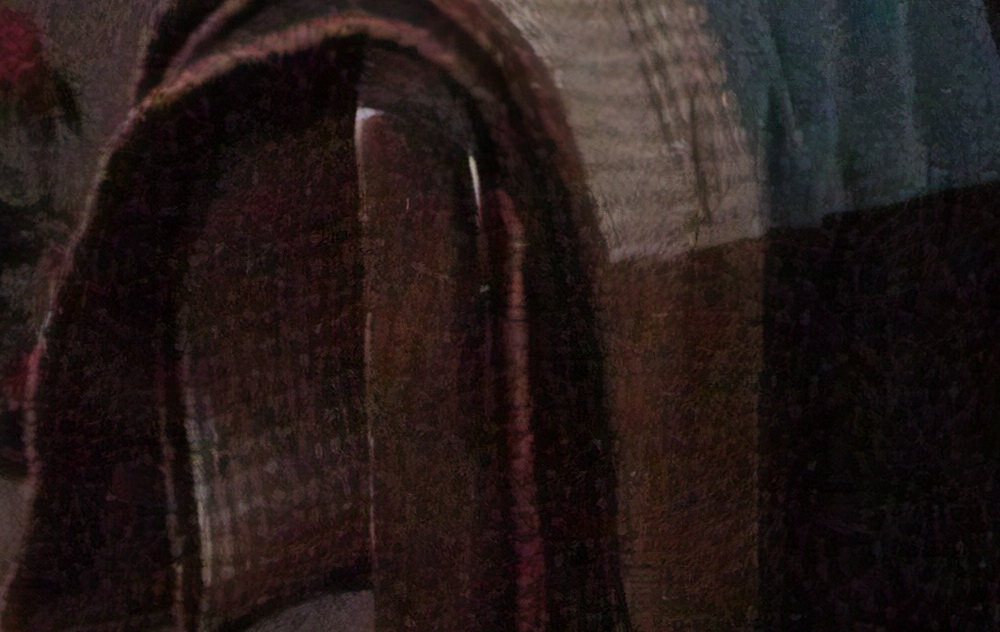
 For comparison, I used Alien Skin's BlowUp 3 application.
The Alien Skin application has been my go-to choice whenever I needed to up-sample an old image, but the noise and artifacting remain more visible than in the Let's Enhance "magic" image.
 Here are the full-size images (reduced to 1000 pixels wide).
The full image as returned by Alien Skin BlowUp3.
 The full image as returned by Let's Enhance Boring.
 The full image as returned by Let's Enhance Magic.
If you have images from old digital cameras, this is a service you'll probably want to take a look at. Although there's a free option, the developers, Alex Savsunenko and Vladislav Pranskevičius, also offer a paid version:
Paid subscriptions receive priority processing -- 30 minutes or less. 10 images for $5, 25 images for $10, and 100 images for $35. A subscription plan allows 20 images per month for $5 and unused image purchases are carried to next month.
So for testing and occasional work with old images, the free service will be sufficient; those with a lot of old images to process may find one of the paid options to be worthwhile.
Details are
on the Let's Enhance website.
Harry McCracken, Fast Company's technology editor, wrote this week that CompuServe's forums are being discontinued. This is very much like hearing a news report that a famous actor has died and realizing that you thought he died years ago.
CompuServe began in 1969 as Compu-Serv Network in Columbus. In the beginning, it was owned by Golden United Life Insurance. In the 1970s, I had returned to Ohio State University to take some graduate level journalism courses. One of these dealt with on-line services and the professor had a complimentary CompuServe account that the students could use. By then, Golden United Life had spun the service off as a separate business.
The company set up forums and, instead of hiring people to manage them, worked with users who were became forum managers and were called sysops (system operators). The sysops were compensated based on the popularity of their forums. In a pre-internet world, CompuServe was everything.
McCracken's article notes that CompuServe was the dominant on-line service "until AOL came along." The forums covered topics from amateur radio to model railroads, PC hardware to comic books. Because the cost of connecting was high ($5 per hour at night and more during the day), the forums were civilized and questions were usually answered quickly. As McCracken puts it, "the signal-to-noise ratio was generally high." In other words, it was nothing like today's internet.
AOL bought CompuServe in 1998. AOL grew large, acquired Time-Warner, got booted from Time-Warner, and is now owned by Verizon. Through all that, CompuServe's forums dwindled but remained alive. They're now close to the end of the road. Any remaining forums will be discontinued in mid December.
I can't say that I'll miss the forums because I haven't had a CompuServe account for nearly 30 years. But I do miss the structure and the willingness of participants to help others instead of belittling them.
McCracken's article is on the Fast Company website.