
Photoshop CS6: Now Enhanced with Magic Pixie Dust
 Adobe Creative Suite version 6 (CS6) will begin shipping soon. I've been working with the many applications in the suite for several weeks and the resulting applications live up to expectations; in many cases, they exceed expectations. In CS5, Adobe spent a lot of time making the applications faster. That has continued in CS6 but this new version also brings with it enough new features to (almost) convince me that Adobe has found a source of magic pixie dust. While that's obviously not true, CS6 makes life tough for those of us who write reviews. Simply trying to select which new features to write about is a huge challenge. Nowhere is this more true than with Photoshop CS6.
Photoshop is probably the most-used application in the suite because of its wide base of users: Both professional and amateur photographers use Photoshop, of course, but it's also in demand by graphic designers who create work that will be used on the Web, in interactive presentations, and in print; and increasingly Photoshop is being used by those who work in video—typically for post-production work, titles, and effects. So there's a lot to cover and this review will not cover it all.
Cooking Raw Images
Adobe's new Camera Raw 7 was first seen in Lightroom 4, where it was an immediate hit because the controls are arranged much better than before and all of them start with a zero position so the aspect of the image that's being modified by the control can be increased or decreased. In previous versions, some aspects could only be increased. Although previous versions of Camera Raw could be used with jpg images, this new version also makes it far more powerful in pulling detail out of even older jpg images.
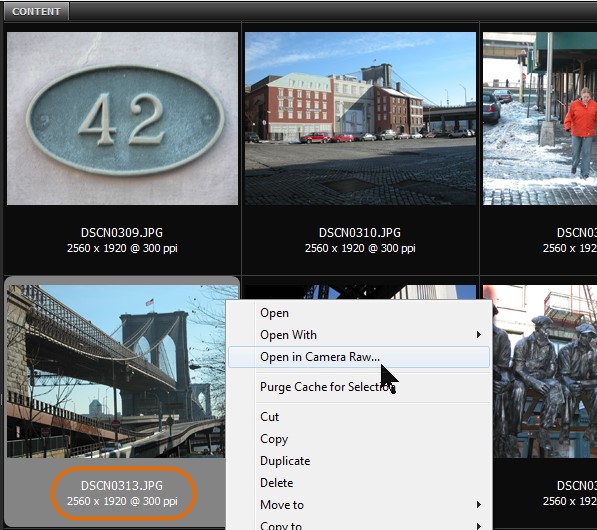 To give Camera Raw a challenge, I decided to start with a photo of the Brooklyn Bridge taken in December 2002 (yes, 10 years ago) with a Nikon N5700 advanced point-and-shoot camera.
Note that this is a jpg image ("Nothing up my sleeve!") and that I'm opening it in Camera Raw.
Click any of the smaller images for a full-size view.
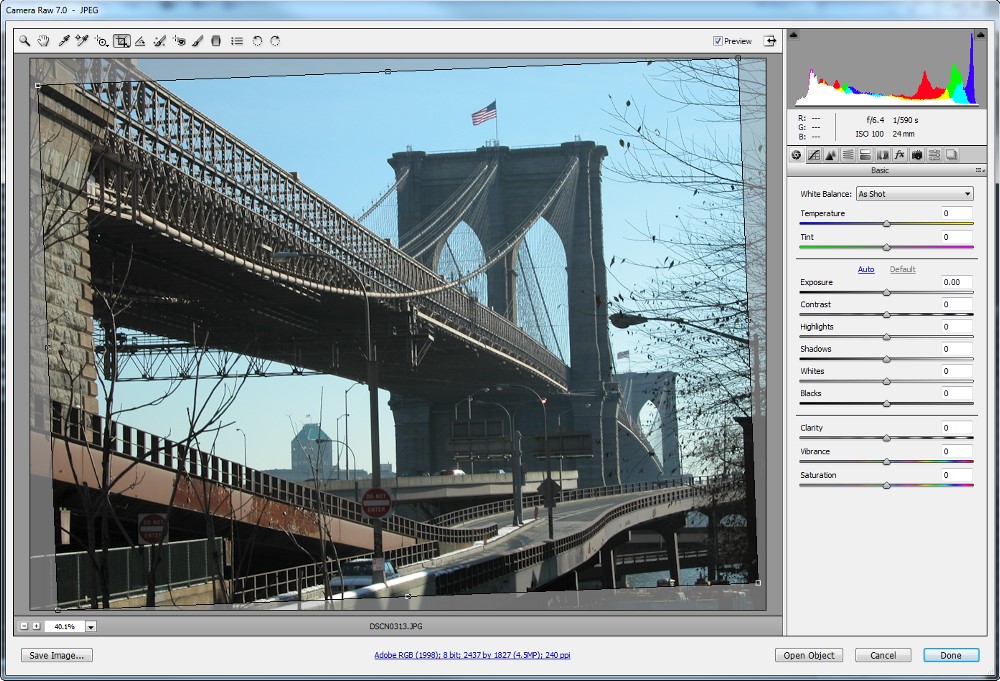 The first and most obvious problem is the fact that the image is crooked. That's easy to fix by selecting something that should be vertical or horizontal and then using the Straighten command.
Now the image is straight but there's a blue, hazy color cast.
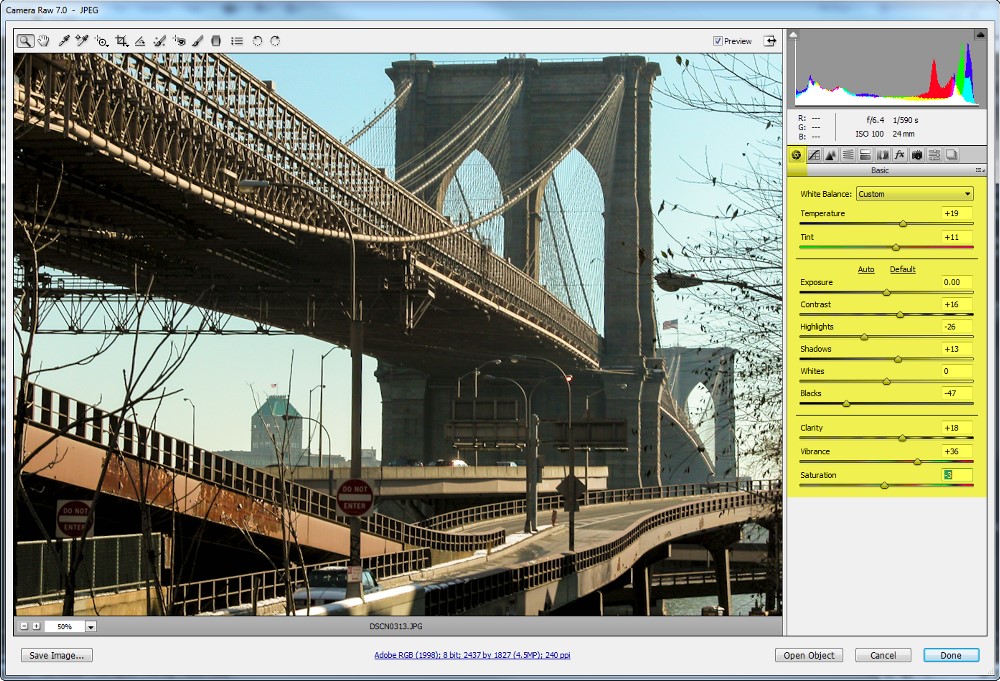 I increased both color temperature and tint a bit, left the exposure value alone because it was OK, boosted contrast, lightened shadows, decreased both highlights and blacks (making both highlights and the darkest parts of the image darker), boosted clarity and vibrance, and reduced saturation slightly.
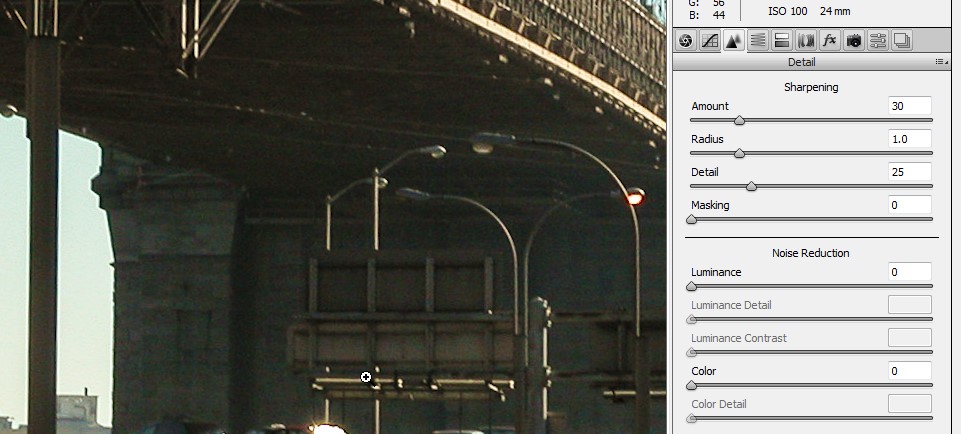 This is a decade-old image and sensors from that time introduced a lot of noise. The color noise was minimal but the image had a significant amount of luminance noise, which appears as bright speckles.
 Reducing noise always softens the image slightly but adding some luminance noise correction make a much better picture.
Whenever you're correcting noise or sharpening an image, you should view it at 100% magnification. That's what I'm doing here.
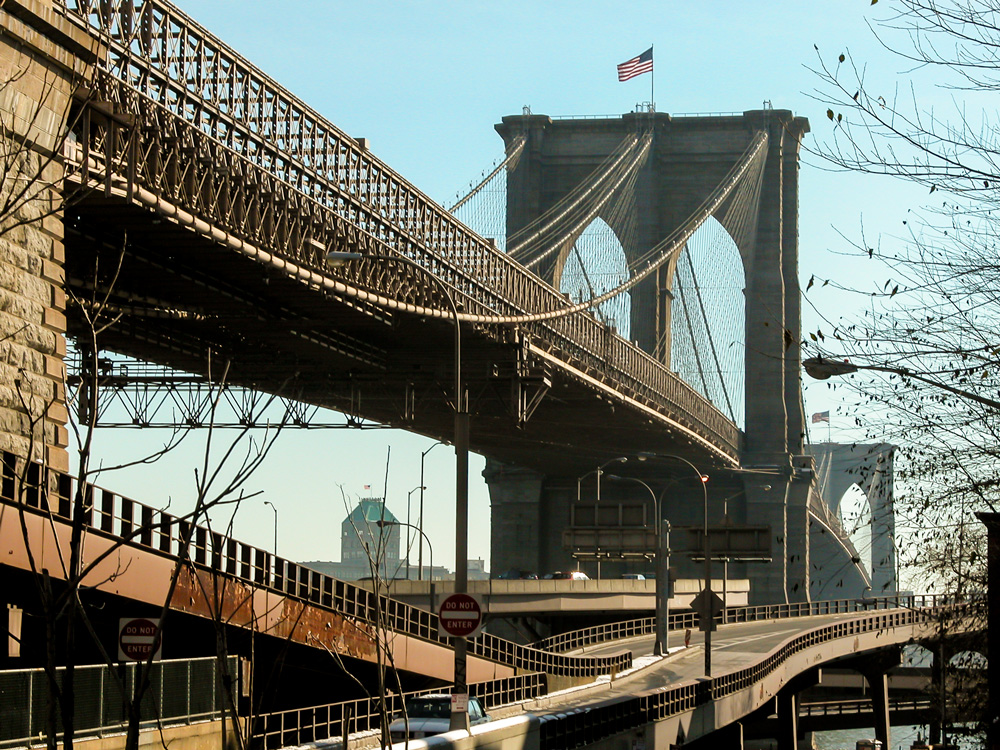 And here's the "final" result.
More could be done to improve this image but a few moments spent in Camera Raw has already make a substantial difference. The image is straight and the colors are vibrant, the way I remember them from that December day in 2002.
Crop Gently
A highly useful Lightroom function has come to Photoshop: Non-destructive crops. Adobe created Lightroom, in part, for amateurs, who sometimes forget to make a copy of an image before performing a destructive act. Any action taken in Lightroom can later be reversed because Lightroom's modifications are all non-destructive.
When I cropped the image of the Brooklyn Bridge in Camera Raw, the crop was non-destructive because that's the way Camera Raw works.
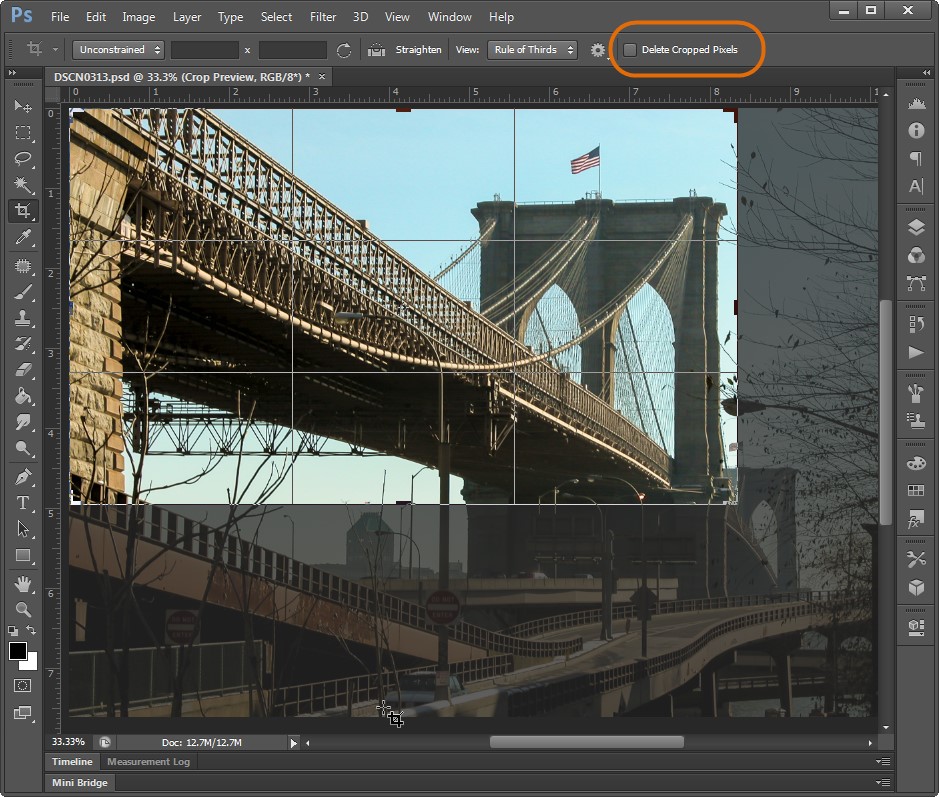 But if I had later cropped the image in Photoshop CS5.1 or earlier, the crop would have been destructive. Any pixels that were cropped out would be gone. In CS6, the user has an option: Crop the old way (destructively) or the new way. The non-destructive crop is the default and I recommend leaving it that way. Here I've cropped away the lower deck and the area south of the bridge. If I later want to modify the crop and restore the cropped areas, I can do so.
Be Aware!
In an earlier program, I wrote about the new Content-Aware Move feature, which joins the existing Content-Aware tools. I won't repeat the Content-Aware Move information here; instead, let's look at Content-Aware Patch. (If you didn't see the earlier article on the ability to move content within an image, click the link above and review the article from April.)
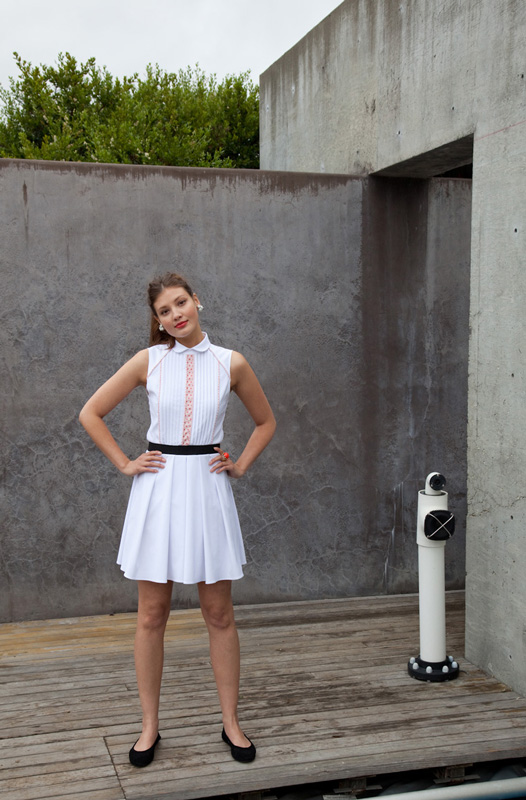 As with most of the Content-Aware tools, Patch will not completely solve the problem at hand in most cases. Consider this image (provided by Adobe) of a woman standing in front of a concrete wall. Perhaps you consider the foliage and the sky in the background to be distracting but you can't crop the image (let's the overall dimensions must remain the same to fit the space provided in a publication and the white pipe on the right is an essential part of the visual message.)
Content-Aware patch comes to the rescue.
I used the rectangular selection tool to select the top part of the image, switched to the Content-Aware Patch tool, and dragged the area down.
 I performed the Content-Aware Patch function twice to extend the wall nearly to the top of the photograph.
You will notice that some of the natural pattern in the wall has been lost and that there is a problem with visible repeating patterns in the patched area but the point is this: The automatic correction that required less than 30 seconds corrected most of the problem presented by the original image.
A minimal amount of additional clean-up work would be required to restore some of the wall's original pattern and to mitigate the visible repeated pattern that was introduced by the patch function.
You Want Text with That?
Most photographers need to combine text with an image rarely, if ever, and the previously available text tools were adequate for those needs. Designers, though, may need to combine text and images more frequently. Granted, Adobe has InDesign, which excels at combining text and images but a designer who has no needs beyond the ability to lay out an illustration, an infographic, or a page might not need InDesign or be willing to invest the time needed to master such a powerful tool.
Photoshop CS6 borrows some design tools from InDesign. Specifically, the ability to define paragraph styles and use them throughout a document.
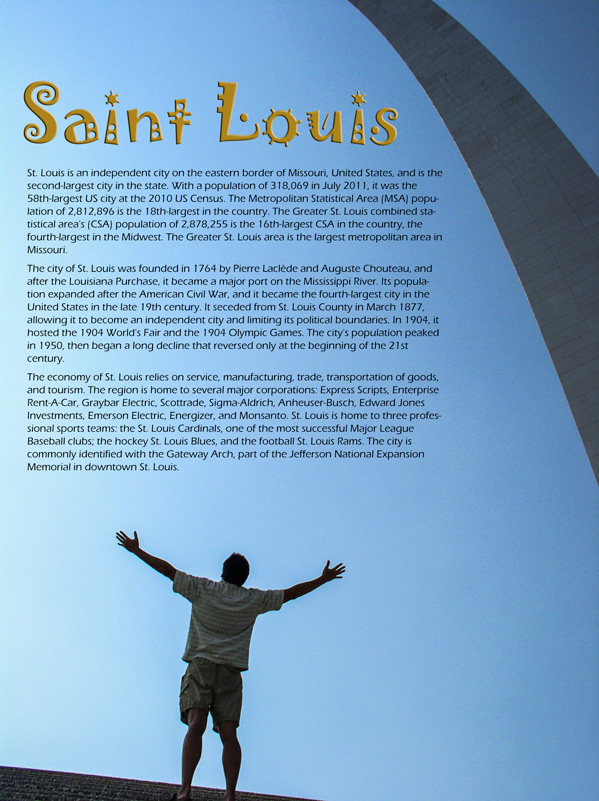
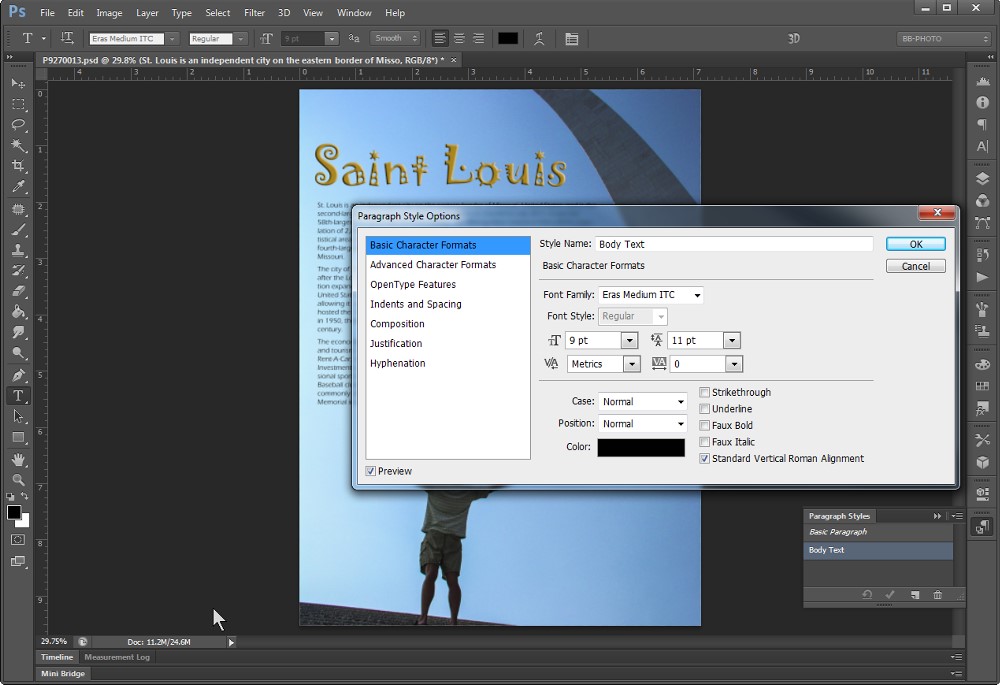 Let's start with an image from the 2002 Corel World Conference in Saint Louis. I did some pre-processing in Camera Raw because it's really exciting to see how much an image can be improved when processed with modern tools. The paragraph formatting tools will be familiar to anyone who has ever defined a paragraph style in InDesign, Ventura Publisher, or Microsoft Word.
 Here's the result.
Like InDesign, Photoshop now has both individual character and paragraph styles that can be set as overrides as well as character and paragraph styles that can be defined. If the term "overrides" is meaningless to you, disregard this section, but know that graphic designers all around the world are excited.
The text is from Wikipedia.
But Wait! There's More!
Photoshop CS6 seems to be the kind of application that would be promoted on late-night TV infomercials because there's always something more. There's layer search, wide-angle corrections, specialized blur effects, the ability to create videos, and lots of new 3D features.
The list goes on and on. Adobe's software engineers have really outdone themselves with this release by adding useful new features to an application that was already a powerhouse application. I'll address some of the other features that I've mentioned here (and some that I haven't mentioned at all) in future programs.
Watch Adobe Senior Photoshop Product Manager Bryan O'Neil Hughes describe this release.

 Adobe Photoshop CS6 Blows the Lid Off Image Processing. Forget Everything You Thought You Knew.
Even thought the magic pixie dust is a figment of my overheated imagination, you might believe that the stuff exists after a test drive of Photoshop CS6. The most distressing concern I have is the amount of time it's going to take me to review and improve decade-old images using this thoroughly modern tool. WOW!
For more information, visit the Adobe Photoshop website.
Adding Eye Candy to Your Photos
Alien Skin is the publisher of several sets of plug-ins for Photoshop and, because the new version of Photoshop will begin shipping soon, I wanted to give some of the company's plug-ins a test run with Photoshop CS6. Plug-ins generally need to be reinstalled whenever the user updates Photoshop so I ran the Eye Candy 6 installer and discovered that it recognized only the previous version of Photoshop; it didn't see the CS6 version. That was entirely my fault.
I had forgotten to check the Alien Skin website to see if there was a new version. There was and it noticed the new version of Photoshop.
Eye Candy's effects are divided into 2 broad categories: Those that work on text and selected areas of images and those that create backgrounds. I've shown some of the text effects previously so this time I'd like to an image-selection effect.
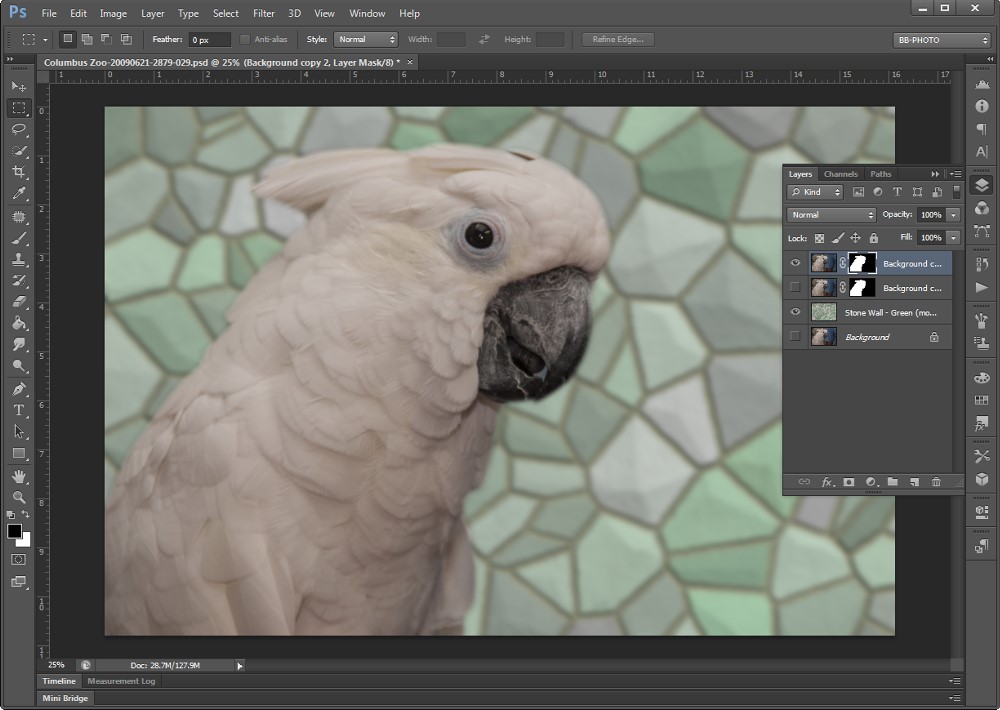
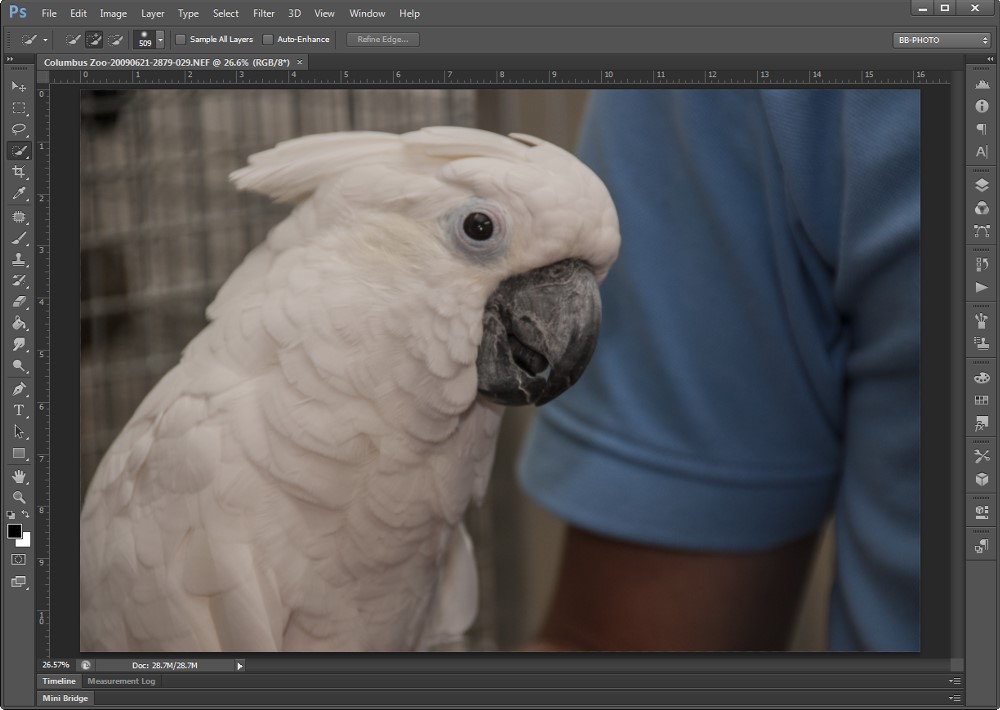 I started with an image from the Columbus Zoo. What might this bird look like if I turned it into an electric bird? This is clearly a job for the corona effect.
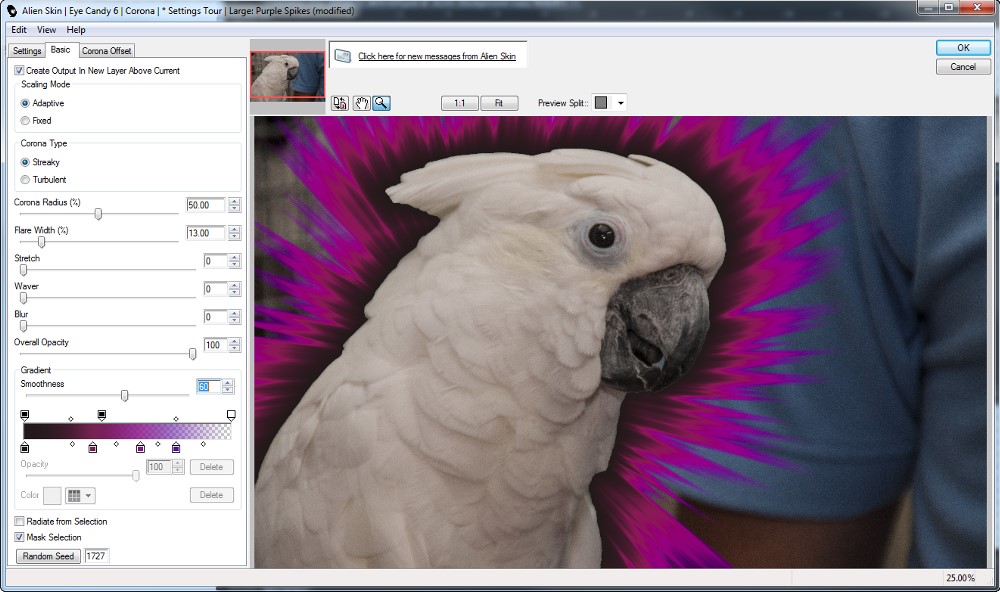 This is a corona with large purple spikes, just the kind of look that an electric bird might have—at least if the electric bird was being featured in a science fiction movie.
As with all Alien Skin plug-ins, I had lots of built-in choices. There are 30 basic filter sets and about 1500 presets. Once you select a preset, you can adjust the various settings to create just the effect you want and, when you've done that, you can save the settings as a preset for later use.
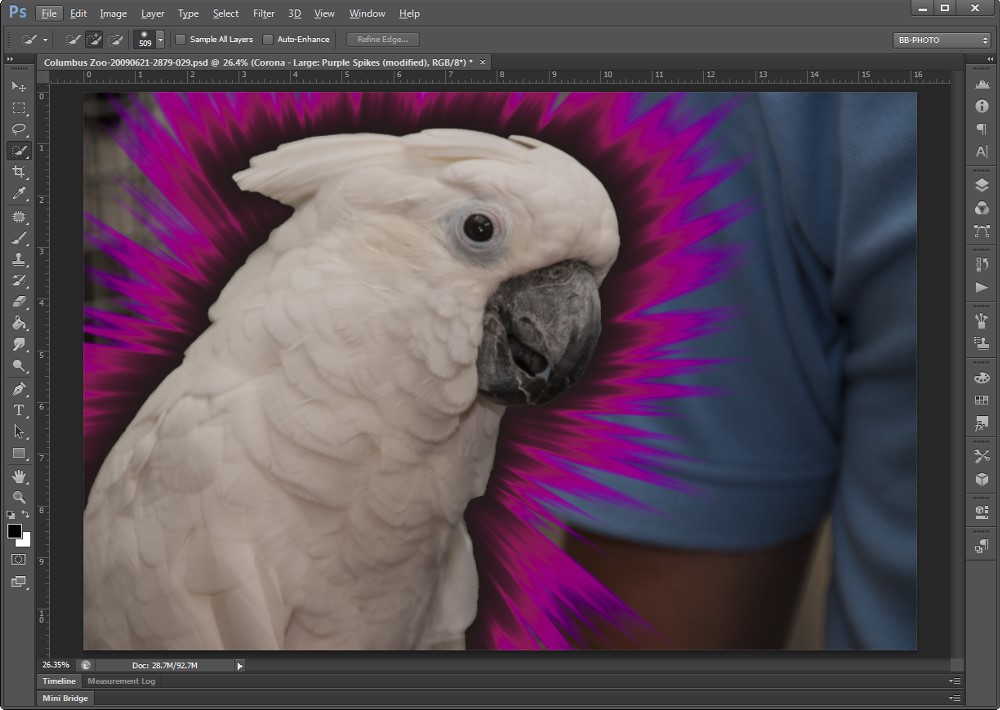 I liked the purple spiked corona bird and here's the final image.
Should I decide later that I would like a plain vanilla bird and not a purple spiked corona bird, there's no problem because Alien Skin's adjustments are always non-destructive. In some cases the effects can be applied to a smart object so they can always be edited or removed. This effect must be applied to a standard layer so Alien Skin automatically makes a copy of the selected layer and applies its effects there.
A Shady Background
Next I wanted to see what I could do with a background. To create a new background, it's necessary to remove the old background.
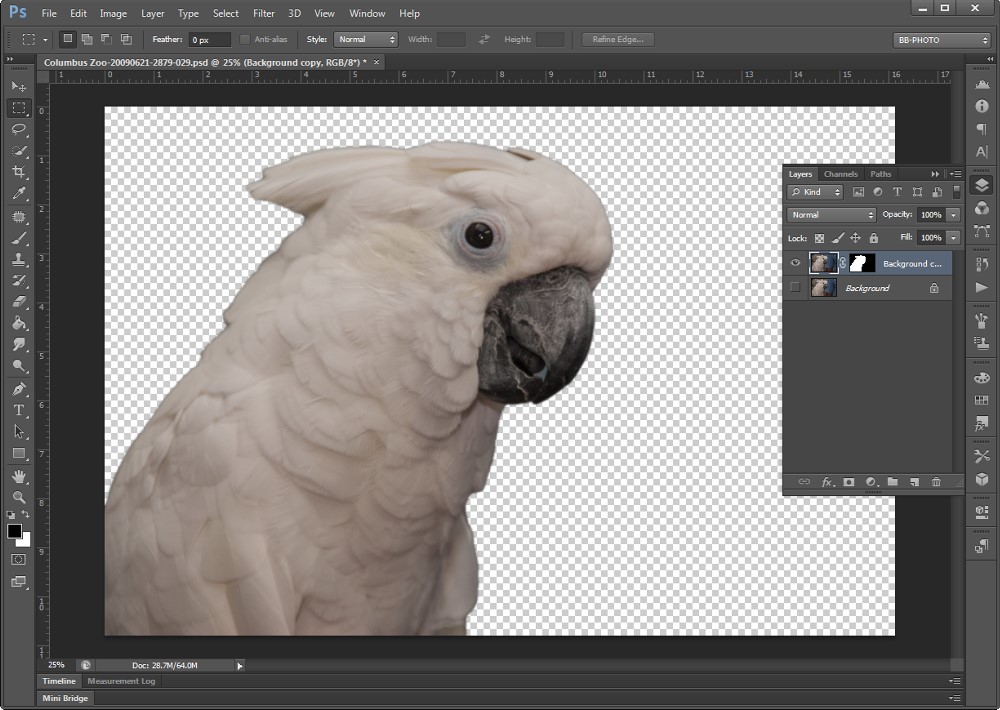 I used the mask that I had created for the purple spiked corona bird to drop out the background.
 The next step was to call on Alien Skin Eye Candy's textures filter. A green stone wall seemed like a good choice for the no-longer purple spiked corona bird. The default stones seemed too large to be believable as a wall for this image so I reduced their size and made a few other minor changes to the default settings.
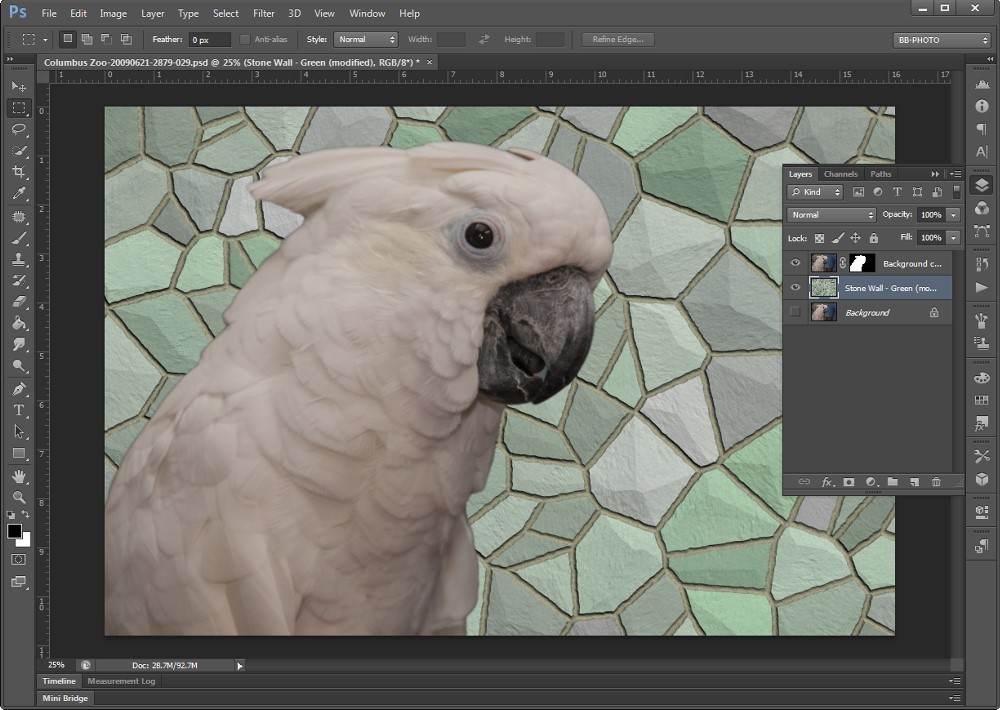 Eye Candy created a new background and I placed it behind the bird.
Not bad, but if you look closely you'll probably see two problems:
- The background is far too sharp and it pulls attention away from the bird.
- I didn't do a very good job with the mask and the edges are harsh. For the purple spiked corona bird effect, this wasn't a problem but now it is.
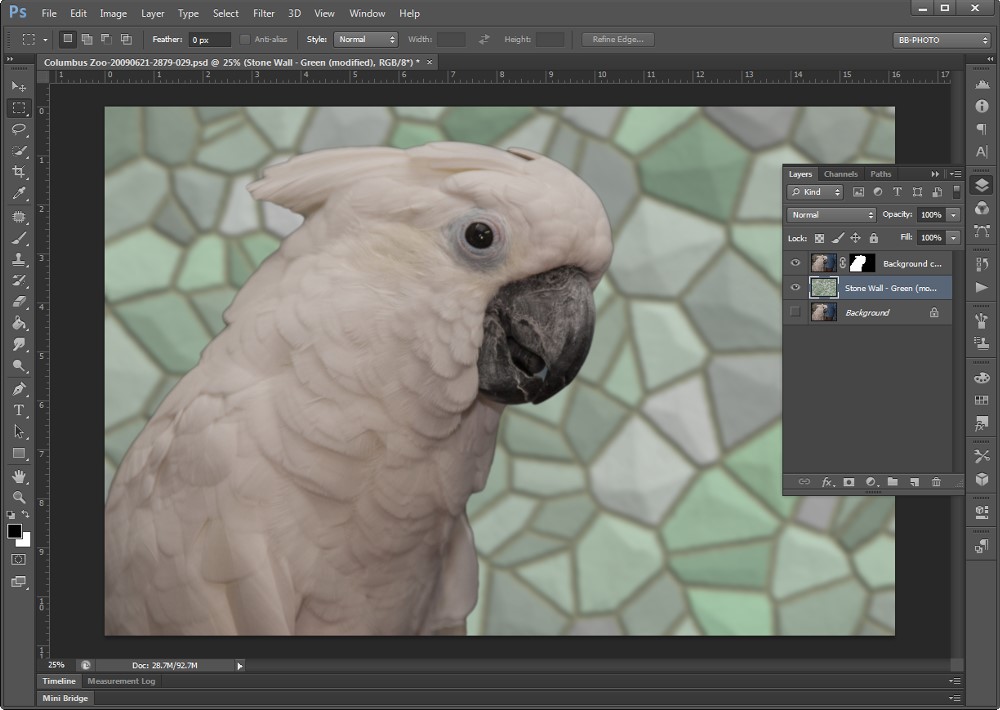 Taking care of the first problem was easy—just add a bit of Gaussian blur to the background layer.
The bird still has a distracting outline, though, so I returned to Photoshop's filter adjustment tool and made some changes.
 With the size of the mask constricted a few pixels and a bit of feathering (no pun intended, really!) the effect is now believable.
There's no cat rating for Eye Candy this time around because a previous review already awarded the application 5 cats. The effects provided by this Alien Skin application are handy ones to have in your bag of tricks even if you'll never need a purple spiked corona bird.
You can find out more from the Alien Skin website.
Short Circuits
Near Photo Quality on a Notebook
Photographic quality is generally defined as approximately 300 pixels per inch. Now Apple has announced a series of new notebook computers that approach the photographic standard. The latest 15-inch MacBook Pro comes with a Retina display, the technology that makes the latest Ipad's display so sharp and crisp. But it comes with a high price tag.
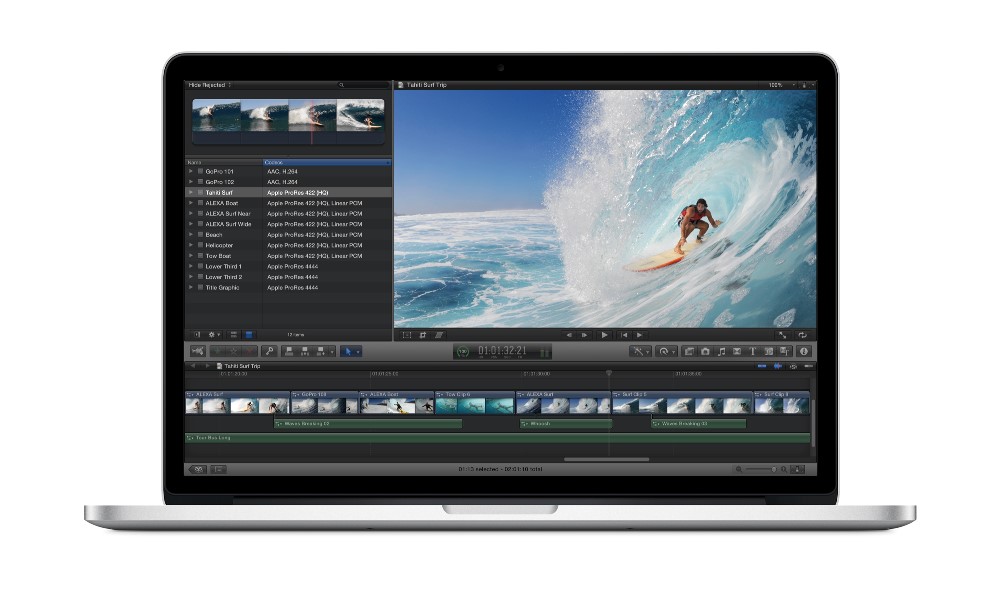 With 220 pixels-per-inch resolution, the Retina display’s pixel density is, according to Apple, "so high the human eye cannot distinguish individual pixels from a normal viewing distance." The Retina display uses IPS technology for a 178-degree wide viewing angle, and has 75 percent less reflection and 29 percent higher contrast than the previous generation. The 15-inch MacBook Pro is available with a 2.3 GHz quad-core Intel Core i7 processor with Turbo Boost speeds up to 3.3 GHz, 8GB of memory and 256GB of flash storage. The least expensive model starts at $2200 and other base units with faster processors, more memory, and larger amounts of flash storage start at $2800. And, of course, there are lots of add-ons to increase the price.
The new MacBook Pro models come with with OS X Lion and buyers are eligible for a free copy of OS X Mountain Lion when it becomes available.
This notebook computer is exceptional for several reasons:
- It shows clearly that Apple is continuing to create innovative computers at a time when many people believe that the PC era is over and everything will move to tablets, phones, and cloud-based applications.
- These computers are not available with hard disks. They come with substantial amounts of flash memory but if you want a hard drive, you'll have to buy an external drive. Just as Apple was the first manufacturer to adopt the 3.5" floppy drive and the first manufacturer to ship computers without floppy drives, Apple is now going to become a leader in diskless computers. (The MacBook Air is this computer's ancestor, not the Mac Book Pro for which it is named.)
- Apple's innovations will force other PC makers to develop higher-quality displays for their computers.
And two other points worth pondering:
- It's going to be interesting to see the new operating systems from both Apple and Microsoft over the next few months along with the new hardware these operating systems will run on.
- Within days, Apple's stock of Mac Book Pro computers with Retina Display was depleted. If you order one now, you'll have a bit of a wait.
When Something Happens That Shouldn't
When the date for filing quarterly estimated tax payments with the Internal Revenue Service was approaching, I downloaded f1040es.pdf from the IRS website. When I opened the file, which contained fillable forms, Acrobat worked properly for a while and then closed abruptly. I tried to re-open Acrobat, but without success. After restarting the computer, I could open Acrobat but opening the IRS file caused it to crash again and I was unable to open it again, even after rebooting. Huh?
I tried opening the file on other computers where Acrobat or Adobe Reader was installed and had no problems. So what I had was a puzzle. How I resolved the situation might be a worthwhile topic so here's the process I followed.
- Reinstalled Acrobat. This seemed like a reasonable step and one that would likely resolve the problem but double-clicking a PDF didn't launch Acrobat and even attempting to open Acrobat failed.
- Researched the problem using Google. (Nothing found.)
- Searched for similar reports on Adobe support site. (Nothing found.)
- Several other half-steps occurred to me but cases such as this usually require a big hammer so that's what I used next:
- Uninstalled Acrobat.
Uninstalled Reader. (Reader and Acrobat really shouldn't be installed on the same computer.)
Deleted C:\Users\Bill\AppData\Roaming\Adobe\Acrobat\10.0\.
Deleted C:\Users\Bill\AppData\Roaming\Adobe\Acrobat\Distiller 10\.
Deleted C:\Users\Bill\AppData\Roaming\Adobe\Acrobat\9.0\.
Deleted C:\Users\Bill\AppData\Roaming\Adobe\Acrobat\Distiller 9\
Deleted C:\Program Files (x86)\Adobe\Acrobat 10.0\.
Ran Regedit but found no keys on HKLM\Software\Adobe\ for Acrobat or Reader. - The I rebooted the computer and reinstalled Acrobat from CS5.5 Master Collection (CS6 is installed on this machine but Acrobat hasn't been updated in the CS6 version).
- Acrobat X Pro now opens.
My point is this: Keep Douglas Adams's admonition in mind: DON'T PANIC. Analyze the situation. Proceed carefully. But don't be afraid to use the big hammer if you need to.
Happy Fathers Day, Tech Guy!
Who's the tech expert at your house? A recent study shows that 93% of us dads think it's us but only 21% of your family members agree with that assessment. You've been displaced in the minds of 42% of family members by a son or grandson and 11% say the tech expert in the family is a daughter or granddaughter.
The study, paid for by TeamViewer, a company that makes screen sharing software for remote support sessions, interviewed more 2000 American adults and was conducted online by Harris Interactive in May.
Sometimes the family tech expert isn't available when needed and for reasons that are understandable:
- The family expert isn't at home when the problem occurs – 36%.
- The family expert is too busy for time-consuming problems – 30%.
- The family expert lives too far away – 23%.
- The person who needs help doesn't want the family expert to see their personal files – 21%.
"These findings demonstrate that help isn't always nearby when a computer problem crops up in the household," said Holger Felgner, General Manager at TeamViewer. "TeamViewer 7 gives families the freedom to receive support from any distance and from any computer, laptop or mobile device, no matter which member of the family is considered the expert. So the next time you have a computer problem and help is not nearby, simply use TeamViewer to connect your computer with your family expert and let him or her fix your problem."
Founded in 2005, TeamViewer is fully focused on the development and distribution of high-end solutions for online communication and collaboration. Available in over 30 languages, TeamViewer is available at www.teamviewer.com


 The author's image: It's that photo over at the right. This explains why TechByter Worldwide was never on television, doesn't it?