
Virtually Perfect
If you need to have more than one operating system on a computer, you may have set the computer up as a dual-boot system so that you can choose which operating system to run when the computer starts. Although boot managers are generally reliable, occasionally they become confused and that does not bode well for any installed operating system. And because you have to choose at boot time, only one operating system can run at any given time and switching between them is a chore. There is a better way! But I have to include this weasel word: Maybe.
If, instead of setting up a dual-boot computer, you install software that creates one or more “virtual machines” (VM), switching from one operating system to another takes just seconds and two or more operating systems can be running simultaneously. Whether this is a good solution for you depends on whether the performance degradation is acceptable. After all, two operating systems will be sharing the computer’s CPU, memory, network connections, and all other components.
So the first thing to consider if you’re thinking of running VMs on your computer is whether it has enough power to do the job. Possibly the most critical component is memory. A computer with only 2 or 4GB of RAM could have trouble because you’ll need to allocate some of the main operating system’s RAM to the second operating system. Typically the primary operating system is considered the “host” and the secondary operating systems, the ones that run inside VMs, are described as “guests”.
Most operating systems need at least 1GB of RAM (exceptions would be DOS or Windows 3.1) so splitting 2GB of RAM between a host and a guest would produce less than optimal results for both. Operating systems such as Vista and Windows 7 need far more memory than that just to function reasonably well so the practical minimum RAM for a computer with VMs installed is probably 4GB for 32-bit systems and 8GB for 64-bit systems.
Hard disk space is also a consideration. The VM software doesn’t require a lot of space but you’ll need to allocate space for each virtual machine and that could consume a considerable amount of space. Space for the VMs can usually be on a drive other than the primary drive if that’s more convenient for you.
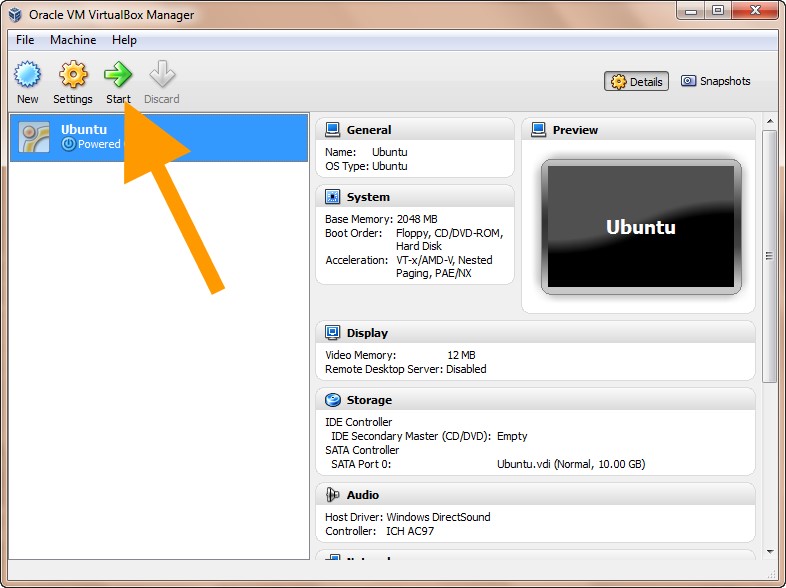
 VirtualBox running an Ubuntu installation on Windows on my computer.
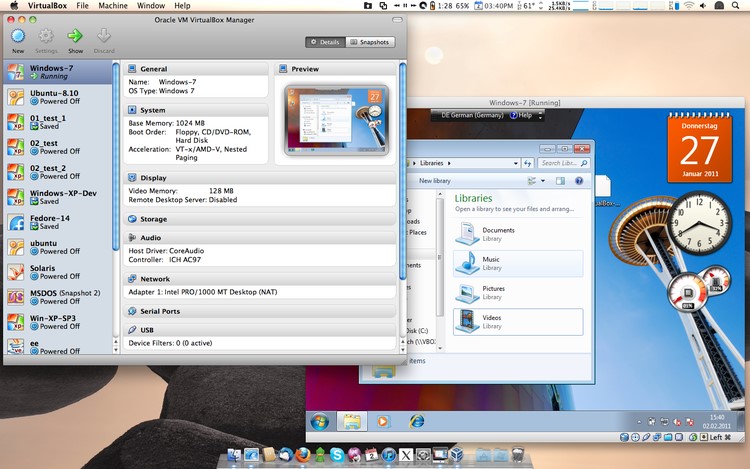 VirtualBox running Windows 7 on Apple's Mac OS X.
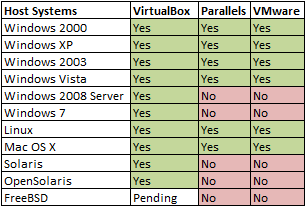
The three primary VM applications are Oracle’s VirtualBox (acquired when Oracle purchased Sun Microsystems), Parallels’ eponymous Parallels, and VMware’s equally eponymous VMWare. I selected VirtualBox, in part because it’s an open-source application that’s available without charge and in part because it supports more host systems than Parallels or VMware.
Hosts and Guests
All three VM applications run under most versions of Windows although VMware doesn’t yet claim support for Windows 7. Any VM application that runs under Windows 7 should run under Windows 8 but I haven’t tested that. Neither Parallels nor VMware offers support for Solaris or OpenSolaris and none of them offer support for FreeBSD, although support is being developed by VirtualBox.
All three VM applications offer support for several versions of Linux and for some versions of Apple’s Mac OS X.
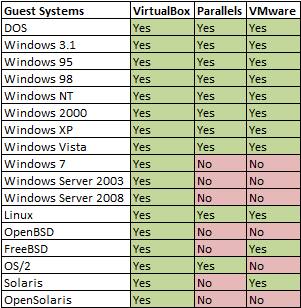
Once you’ve installed the VM application, you can create a virtual machine that runs DOS, Windows 3.1, Windows 95 or 98, Windows NT, 2000, or XP, and Windows Vista. VirtualBox also provides support for Windows 7, Windows Server 2003 and 2008 as guest operating systems. All three VMs support OS/2 and some versions of Linux. VirtualBox adds support for OpenBSD, FreeBSD, Solaris, and OpenSolaris running as guests.
It’s possible that some operating systems not listed here will run successfully as guest operating systems but versions that aren’t fully supported may run slowly or crash frequently. It’s best to limit installations to those that are supported. Although Apple’s OS X Server operating system is supported as a guest, the restrictions are severe. Attempting to run standard OS X operating systems as guests is expressly prohibited by Apple so if you try this, you’re entirely on your own.
Each of the VM systems offers various additional capabilities. Here are some of the ones that I consider important.
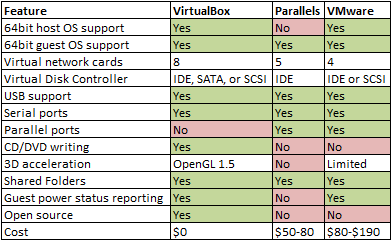
Installation
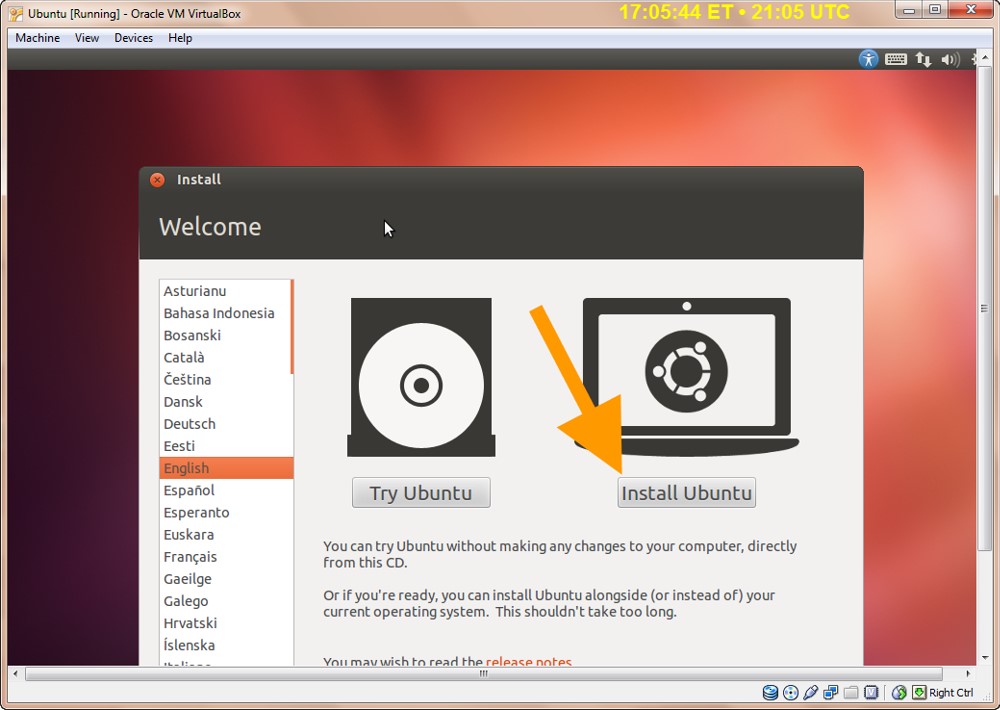
The first virtual machine you set up will be a 2-part installation: Installing the VM application and then installing one or more guest operating systems. Both parts are surprisingly easy despite some misdirection in some of the dialog boxes.
I downloaded the VirtualBox application (91MB for Windows 7 64-bit systems) and version 12.4 of Ubuntu Linux (701MB). Installation of VirtualBox is trivial: Start the installer, respond to the licensing questions, and specify the location. A few minutes later that process will be complete.
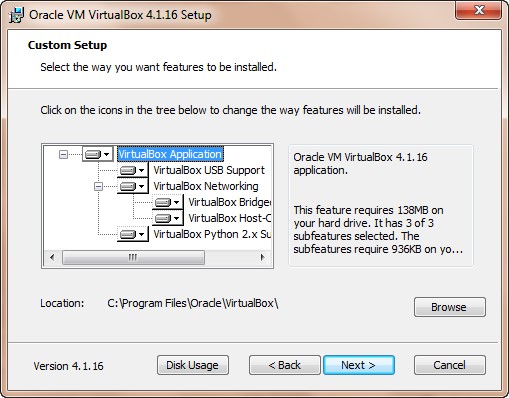 By default, all functions will be installed. If you don't need Python support, you can deselect that option or install Python. Leave the support settings for USB devices and networking. During the installation, you will be prompted to allow several device drivers to be installed. Allow all of these.
The installer will offer to start VirtualBox.
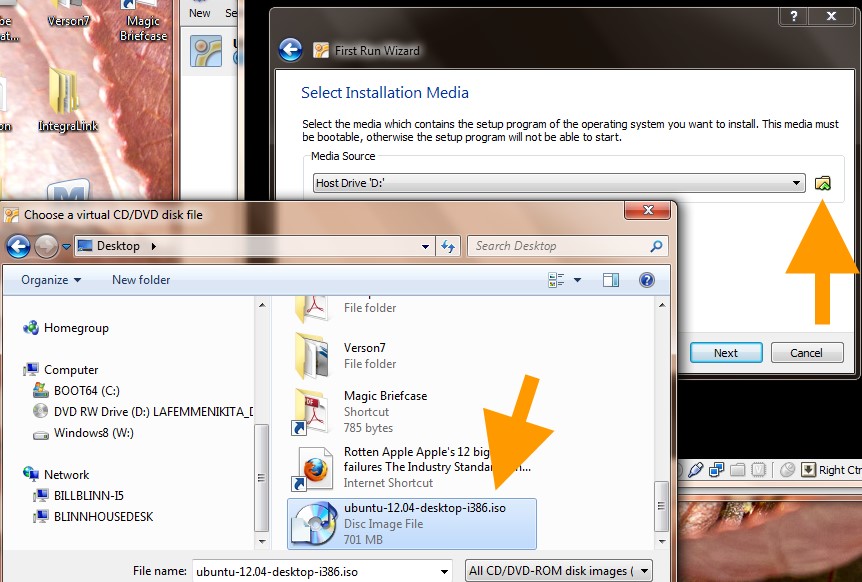
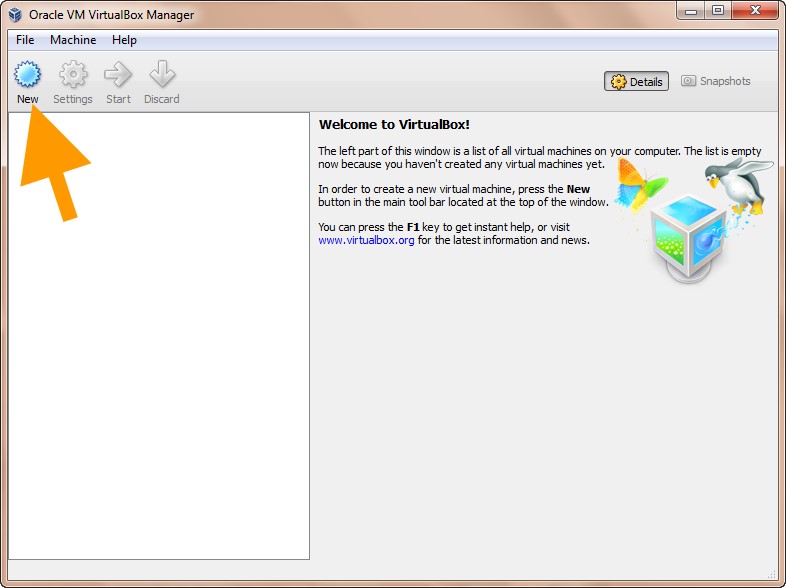 To install a guest operating system, you need the installation files on a DVD, a CD, floppies, or as a disc image (ISO) file. I could have burned the Ubuntu installer to a CD but VirtualBox includes a function that can mount as ISO file as a disc so I used that. The initial screen will show no virtual machines, so click New to create one.
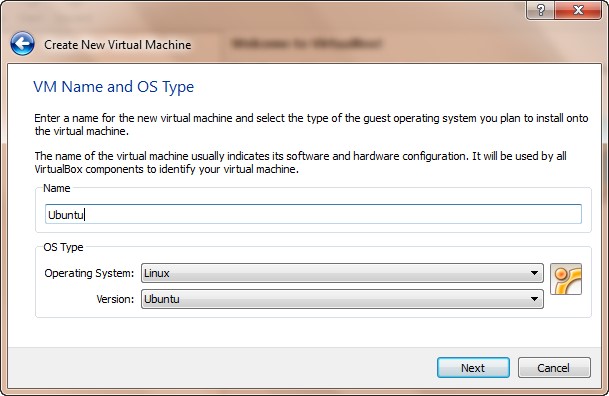 You'll be asked to name the virtual machine (this is a name to be used by humans, not the computer, so name it something you'll recognize.) You then need to specify the operating system system and version.
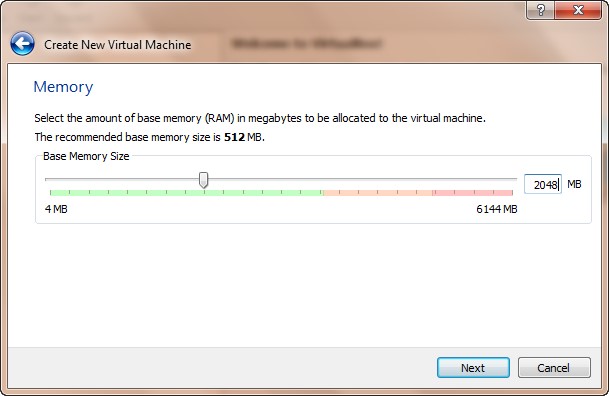 Specify the amount of memory that you want to make available to the guest operating system.
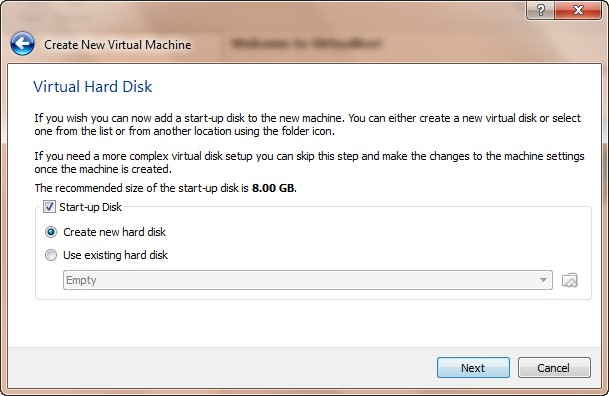 You'll probably be creating your first virtual machine and you will want it to be a start-up disk. The "disk" will actually just be a folder on your primary hard drive. (That's all any drive is.)
 If you have no other virtual-machine software that will need to use the disk you're about to create, use the VDI default disk type.
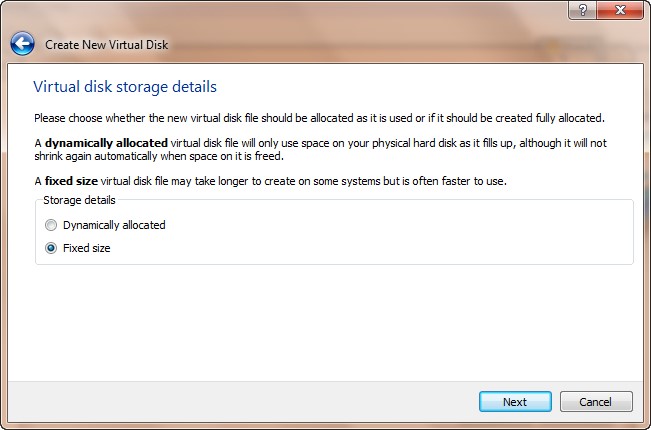
Now you need to decide whether you want to specify a fixed size for the new drive or allow it to be allocated as needed. If you have plenty of space on the drive, specify the size because this will create a faster virtual machine. If space is really tight, allow dynamic allocation (or reconsider your decision to install VM software on this computer.)
 If you've selected the option to specify a size, you now need to do that. Ubuntu will run on a small drive, but I like to give it plenty of room to breathe. I increased the default from 8GB to 10GB. By default the location of the new drive will be inside your user's account. If you prefer to locate the drive elsewhere, browse to the new location.
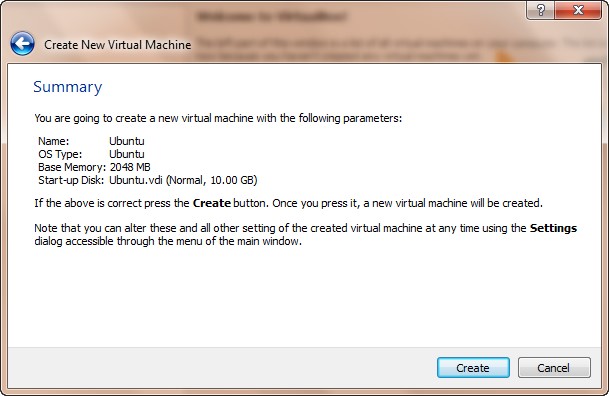 Read the summary! Be sure that you specified the system as you intended to, then click Create. VirtualBox will create and format the new drive in the existing space on your computer. This process will take a few minutes and at the conclusion of the process you'll have a virtual drive that's ready to have an operating system installed.
 Once the drive has been created, you need to create the virtual machine.
Creating Your Virtual Machine
 Press the Start button to start the virtual machine. Keep in mind that no operating system has yet been installed. You'll see some messages about auto-capturing the keyboard and mouse. Accept these.
The first-run wizard will ask you to specify where the installation disk is. This is a bit confusing. The drop-down list displays drives that contain nothing but note the file folder at the right. Click it to browse to the location of your ISO file.
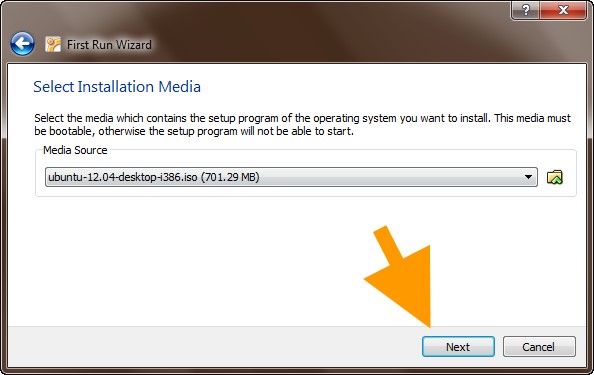 Once you've done that, click Next.
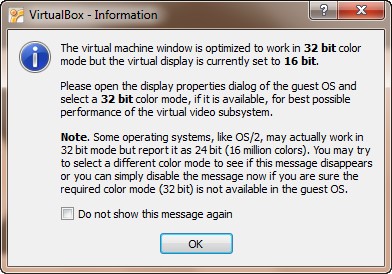 As the process starts, you may see a message about video settings. This can safely be ignored. The installation process will continue to the scary part.
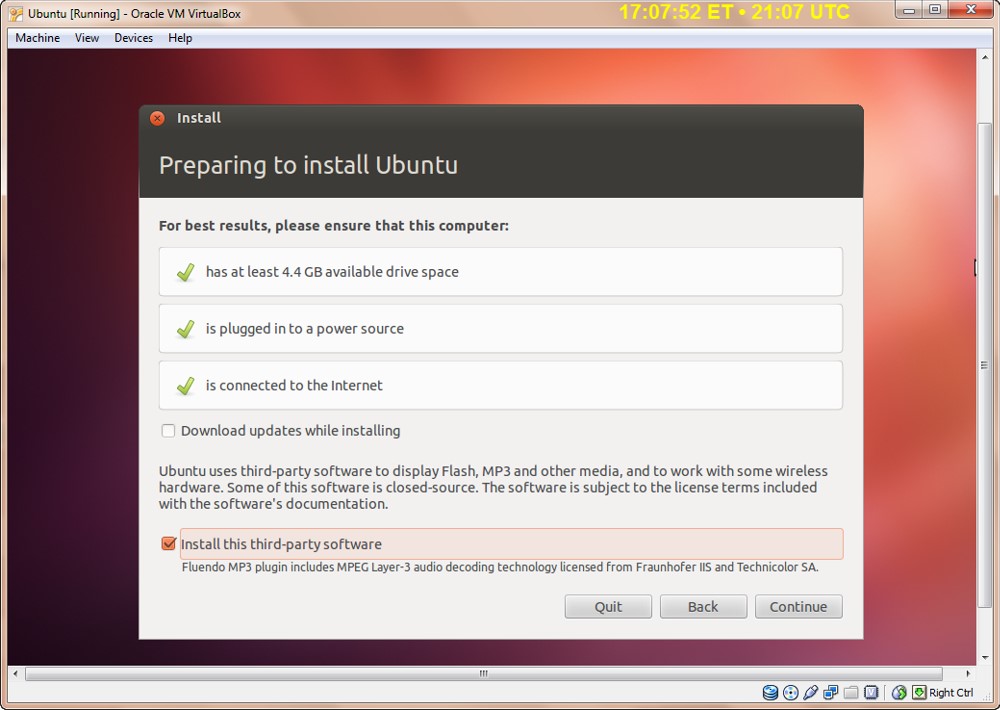
 Ubuntu is now running from the virtual CD and you want to install it. You should install 3rd-party software and you may want to download updates while installing. If you download the updates now, the installation will take longer but you won't have to do it later.
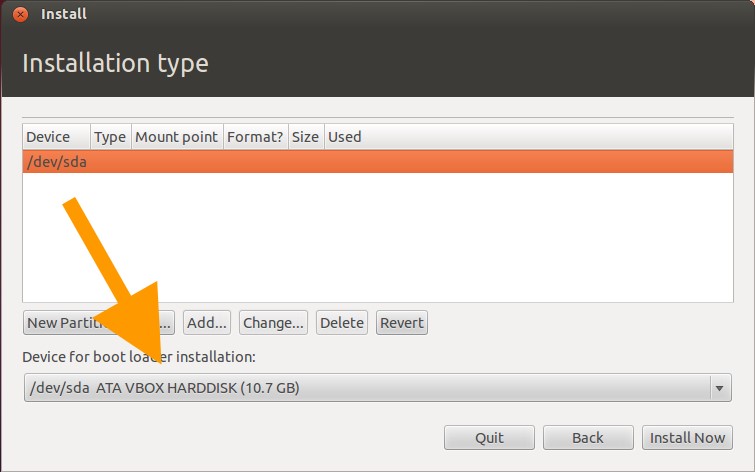
 Here's the screen that scares people. You have 2 choices: "Erase the disk" or "Something else". If you choose Something Else and then click Continue, you can confirm that the installation will be on a disk that's the size of the one you created.
 Once you allay your fears, click Back ...
 ... and revert the setting to Erase. Then click Continue.
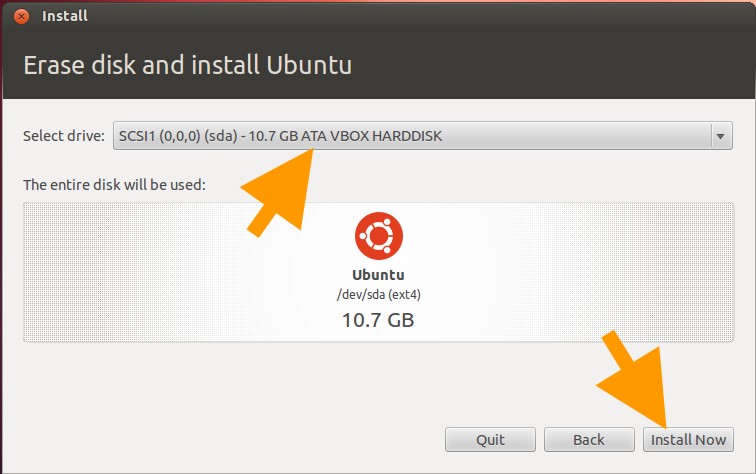 You'll see one final (scary) confirmation. Click Install Now.
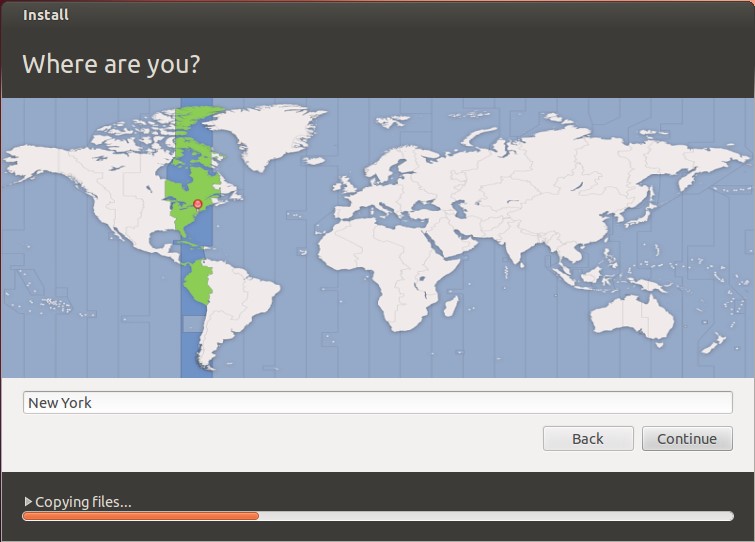 You'll be asked to specify your location and several other bits of information and then Ubuntu will be installed.
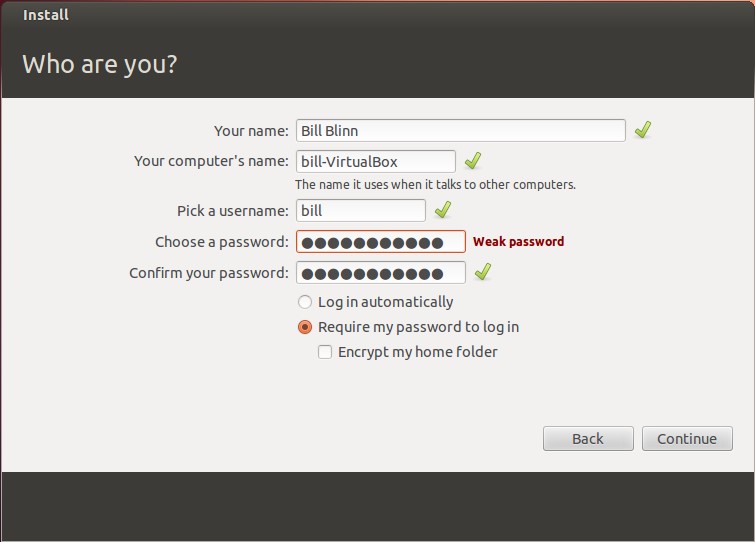 During the process you'll be asked to create a user name and password for your Ubuntu account (and, yes, my password for the VM is weak.) The installation will continue and depending on the speed of your computer, this could take an hour or more.
Documentation: Understanding This Stuff
It’s hard not to appreciate someone who thinks software virtualization such as that used by VirtualBox isn’t particularly complex: “In theory, software virtualization is not overly complex. In addition to the four privilege levels (‘rings’) provided by the hardware (of which typically only two are used: ring 0 for kernel mode and ring 3 for user mode), one needs to differentiate between ‘host context’ and ‘guest context’. In ‘host context’, everything is as if no hypervisor was active. This might be the active mode if another application on your host has been scheduled CPU time; in that case, there is a host-ring-3 mode and a host-ring-0 mode. The hypervisor is not involved. In ‘guest context’, however, a virtual machine is active. So long as the guest code is running in ring 3, this is not much of a problem since a hypervisor can set up the page tables properly and run that code natively on the processor. The problems mostly lie in how to intercept what the guest’s kernel does.”
[Oracle VM VirtualBox User Manual, page 171.]
Despite the ease with which virtual machines can be set up, started, and operated, VirtualBox offers a wide range of settings that you can use to change the way things work.
The downloadable Oracle VM VirtualBox User Manual is a 300-page document and even though it’s well written and easy to follow, a 300-page document will still take some time to review, even if you just skim parts of it.
The good news is that for basic use, the manual probably won’t be necessary—at least at the beginning. As you become more familiar with the VMs you’ve set up, you may find some limitations and wonder if there are ways to eliminate them. In many cases, these methods exist and you’ll find them either in the user manual, by reviewing the FAQ section on the VirtualBox website, or by participating in some of the forums hosted on Oracle’s website.
One discussion I found was long and explained how VirtualBox uses what the writer calls a “nasty trick” to trap the guest’s ring-0 activity by assigning it to ring 1, which is typically not used on x86 architected CPUs. If you really want to know what’s going on, read chapter 10. If not, feel free to skip it.

 Oracle’s VirtualBox—When One Operating System Is Not Enough
VirtualBox was a surprise—easier to install than expected and much easier to use than expected. You can even run a 64-bit guest operating system under a 32-bit host operating system if the hardware is a 64-bit system. The ability to run multiple operating systems concurrently and to share both directories and the clipboard can be a real time saver. Try setting up a virtual machine the next time you’re considering a dual-boot operation and you may never go back.
For more information, visit the VirtualBox website.
Xara Designer Pro X: Too Fast. Too Much. Too Little.
Every time the folks at Xara send me a new copy of their Designer program, I wonder how they're able to make a relatively small program (the installer is just 88MB) do so many tasks, perform them so well and so quickly, and charge so little for it. I'm a bit confused about the program's name (Designer Pro X) and its version (8)—I presume X is 10 but 8 is still 8. If that's all I can find to complain about, this must be a remarkable application.
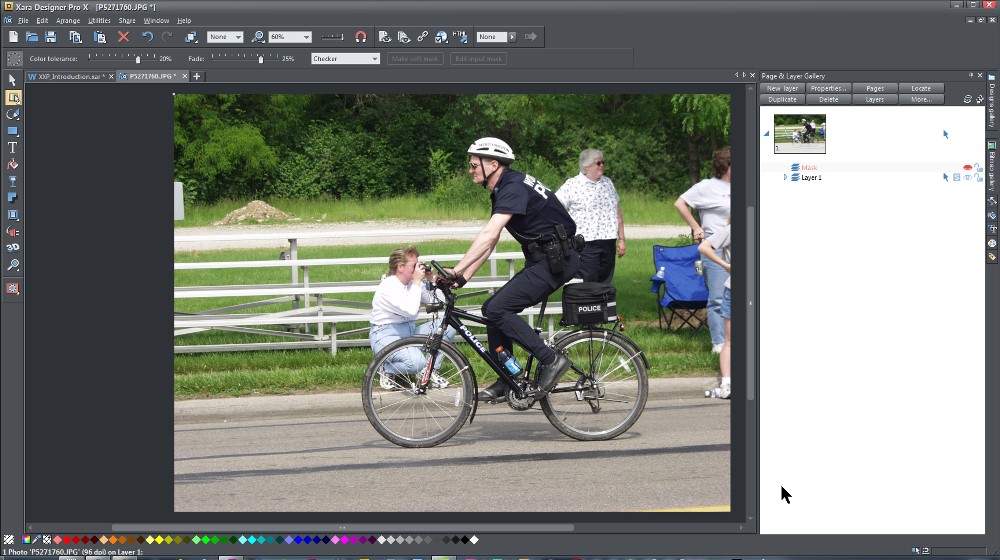
 In the world of graphics, two types of images exist: Vector (created from lines and primitive shapes) and bitmaps (photographs). Typically designers use one program for vectors and another for bitmaps although most programs that handle one type of image can now provide some support for the other because they need to be combined in many cases.
Xara has an interesting history. Many years ago when Corel Draw was the killer graphics application for PC users, Xara created a small, fast application that worried the folks in Ottawa. Corel entered into a marketing agreement with Xara and borrowed some of its technology to make Corel Draw better. The marketing agreement ended and Xara was once again on its own. In the intervening decade, Corel has stumbled badly as Xara has continued to reveal its prowess when it comes to creating programs that are fast, easy to use, and inexpensive. This is usually the combination that is described with the words "pick any two"—fast and easy, but expensive; easy and cheap, but slow; fast and inexpensive, but impossible to use. Xara wins the trifecta time after time.
And so it is with the latest version.
Impossible
After installing Xara Designer Pro X, I tried to open a digital negative (DNG) file. The DNG format is essentially an open-source file format for raw digital images. Regardless of what your camera's raw format is, it can be converted to DNG and this is a good choice for the future. Canon and Nikon may modify their proprietary raw formats, but DNG should be supported for a long time.
So I thought that it would be interesting to watch Designer Pro X try to open a DNG and fail. But that didn't happen. The file opened and Xara converted it to the Xara format. The attempt to make Xara fail failed. But could I apply a monochrome effect to the image? I selected the image and then picked a light tan color. I could also have just dragged a color swatch onto the image.
Although I expected this to fail, it didn't. We're up against a pretty good opponent here, one that understands not only the complexities of graphics but also one that understands the need to make an application easy to use.
Inexpensive
The second part of the trifecta is inexpensive. As usual, Xara offers two versions of this application: One that is designed for professionals and one that will do most of what the average user needs.
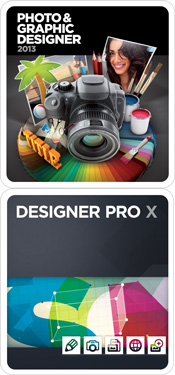
Xara Designer Pro X (v8) is priced at just $300 and, yes, that's the pro version. The amateur version, Xara Photo & Graphic Designer MX (v8), sells for just $90. The professional version includes extras such as all the features and templates of Web Designer MX Premium and Photo & Graphic Designer MX; support for PDF/X, Pantone colors, color separations, and multi-core processors; and enhanced import and export filters.
Fast
Consider my previous test with the DNG document. The 10MB file opened in less than 5 seconds and when I applied the color cast to the image, the process had completed before I could even start a stopwatch—maybe 100 milliseconds to apply a color cast to a 10MB file.
Powerful
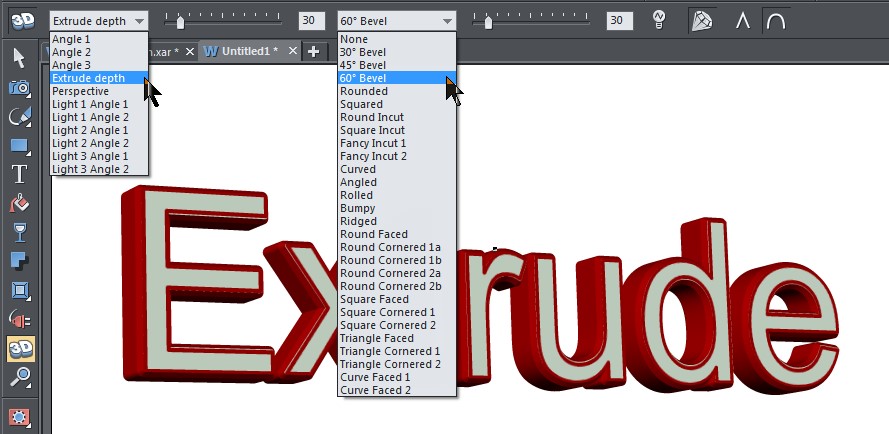 Xara's 3D Extrusion effect is second to none because it's fast, accurate, and full-featured. The presence of 27 bevel/side styles makes that clear and the ability to view and modify the various light sources within the image adds to the versatility. Change the angle and rotation of the object either by using sliders or just grab the object with the mouse cursor and drag it until the appearance is what you desire. I created this example image in less than 30 seconds and that included changing several of the settings.
 One new feature is the Color Select & Erase tool that allows you to make parts of an image transparent based on the color of that part of the image.
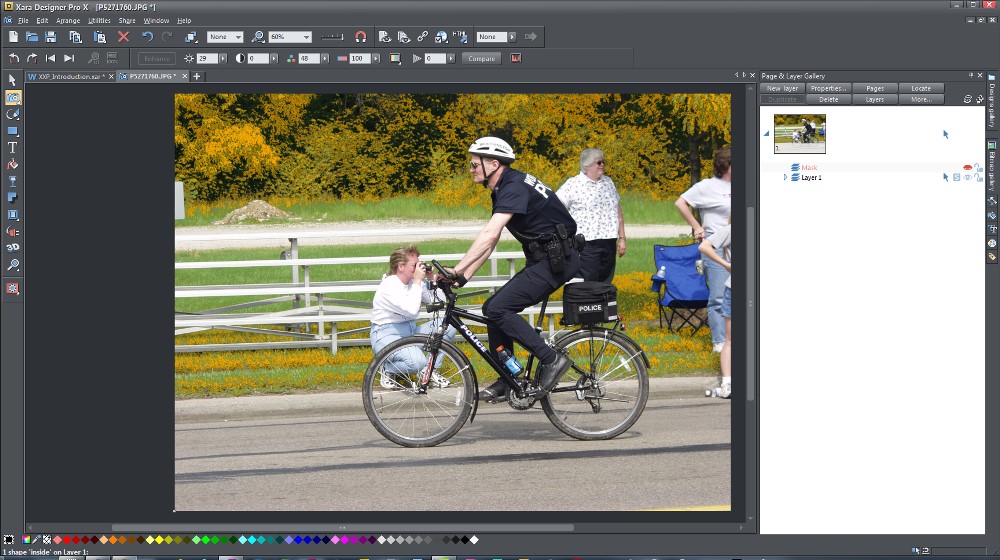 Once you've selected specific colors to be adjusted, the Photo tool enhance option can enhance the existing color or modify the color of objects.
Xara's Panorama Stitching Tool has been improved and you can now use up to 8 photos. The limit with earlier versions was 6. If you have a multi-core computer, you'll notice that processing is faster, too, because it uses the multi-thread capability of the processor.
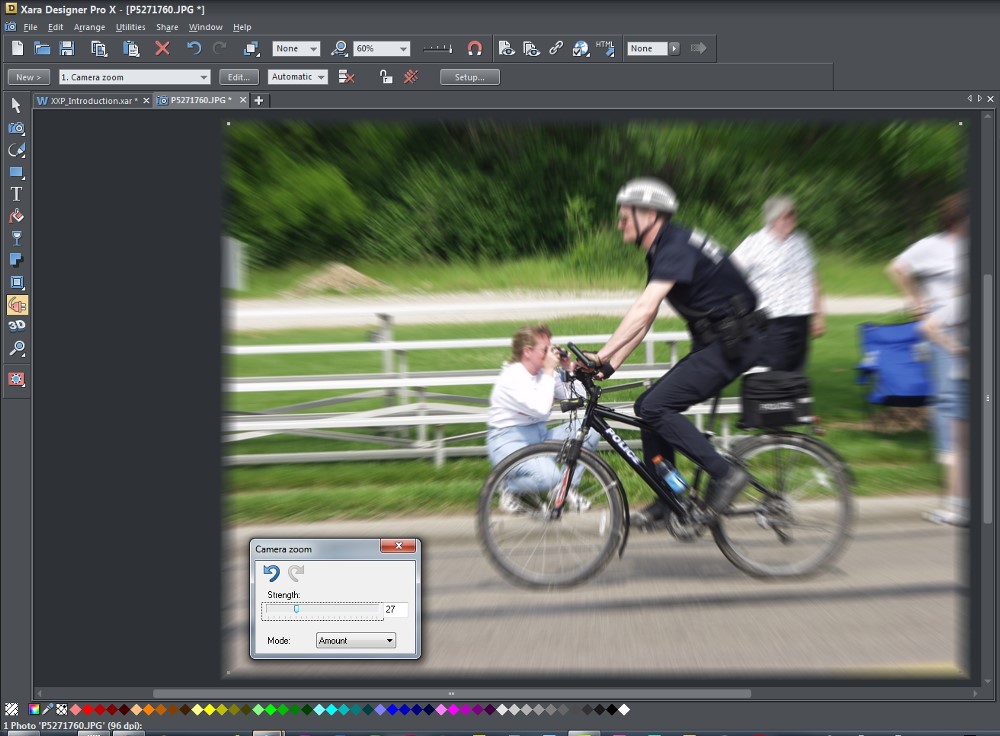 It's not unusual these days for graphics applications to support plug-ins that are written to the Adobe Photoshop standard and Xara does just that. So this gives you access to a gigantic number of plug-ins, both free and paid, that can be used to create striking effects. But Xara Designer Pro X comes with more than 40 built-in Live Effect plug-ins such as the zoom effect shown here.
As usual, Xara offers 2 versions, Photo and Graphic Designer MX 2013 and Designer Pro X. The lower priced Photo and Graphic Designer MX 2013 omits features that professional designers would need such as support for Pantone colors, color separations, PDF/X, multi-core processors, and a variety of website design tools that would be important for designers but not so important for those who develop hobby sites. I've already mentioned the prices, but I think I'll do so again because they're as remarkable as the feature set. Designer Pro X costs $300 compared to Photo and Graphic Designer MX 2013 at $90 and upgrades from previous versions are even more reasonable.
Once Again, Xara Hits Its Target
Xara isn't for everyone. Those who need to maintain compatibility with the Adobe line of products won't be able to take advantage of Xara's extraordinary speed, power, and price but a lot of people who are involved in design work, either as professionals or as amateurs, will find Xara Designer Pro X (or even the bargain-priced Photo and Graphic Designer MX 2013) will be sufficient to suit their needs.
For more information, visit the Xara website.
Short Circuits
LinkedIn Cleaned Out
The social networking service for business people, LinkedIn, is investigating reports that crackers made off with user names and "hashed" passwords belonging to all of the networks's nearly 7 million members. Passwords that are hashed aren't directly usable and should be impossible to reverse in a way that reveals the true passwords.
Several security experts downloaded the file containing the data from a site in Russia that is frequented by computer crackers and there are reports that some users have found their user names and passwords posted online.
If you're a LinkedIn user, you should change your password immediately but at least one security expert says that the crackers may still have access to the LinkedIn system. If that's the case, you may need to change your password more than once.
The passwords at LinkedIn are protected by Secure Hashing Algorithm-1 (SHA-1), which is one of the weaker hashing formats and is not recommended by security experts. Brute-force methods are known to be effective against SHA-1.
Windows 8 Release Preview Is Available
Microsoft released the latest preview version of Windows 8 about a week ago. I've installed it on a 64-bit laptop and on a 32-bit laptop. Progress has continued and, if those who simply reject anything new out of hand don't get in the way, my predition is that Microsoft will have a winner. There's still the issue of the missing Start Menu but, as I've mentioned before, after a day or two, you probably won't miss it.
The first thing I noticed is that both the installation and all other aspects of the system operation are faster than with the previous Consumer Preview or the Developer Preview that came first. That's to be expected because the earlier previews undoubtedly contained a lot of code used for debugging. Even so, Windows 8 was considerably faster than Windows 7 in tasks such as start up and shut down. With the debugging code gone, the difference is even more dramatic.
Today's quick look at Windows 8 is one of a series of articles that I've written over the past year or so, starting with some early pleas for Microsoft to reconsider and restore the Start Menu. The companay is still going to take a lot of heat for this decision and the easy decision would have been to keep the Start Menu. But the right decision, I have concluded after working with it for a while, is the decision Microsoft made.
Neither of the computers I have installed Windows 8 on has a touch screen. Instead, I have a keyboard and a mouse. To me, Windows 8 is primarily a faster version of Windows 7.
Some of the more negatively vocal critics have referred to Windows 8 as reminding them of Windows 3.11 and they might be right. Windows 3.11, also known as Windows for Workgroups, was the best and final version of Microsoft's first attempt at a true graphical user interface. It was far superior to previous versions of Windows and had some extensibility that allowed forward-thinking users to envision what Windows 95 would look like.
And that might just be what Windows 8 is: The best and final version of this stage of operating system development. Windows 8 is the bridge between notebook and desktop systems and highly portable handheld systems. Desktop systems aren't going to go away anytime soon because some tasks simply need big screens, big processors, big memory, and big disk drives but portable systems such as smart phones and tablets are going to be much more important than they have been to date.
Microsoft wants to play on both sides of the room.
Random Data Points
- On the 64-bit machine, Windows 8 Release Preview didn't activate properly on day one as it did on the 32-bit machine but activation was automatic on the second day.
- The Release Preview's version of the Windows Media Player still doesn't play DVDs and this is apparently by design and is rumored to have something to do with copyright concerns by Microsoft. The assumption is that the Media Player will work as expected in the final release. If not, there's always the free VLC media player, which is what I'm using on the Windows 8 machine to judge DVD playback.
- One irony in my acceptance of the removal of the Start Menu is an Android tablet that I've been using for several months. I purchased an add-on keyboard and the keyboard has a glide pad. In other words, I have a touch-centric computer that also has a keyboard and a mouse(-like) device. I've found that switching between keyboard and screen or between mouse and screen is both easy and, after a day or two, totally natural. For that reason, I'm really looking forward to the clam-shell computers that will be released when Windows 8 begins shipping.
- I've also found that I really like the ability to link multiple computers via a Microsoft cloud-based service.
- For those of us who use more than one monitor, Windows 8 offers some extraordinarily nice new features, specifically the ability to move the Task Bar from one screen to the other. And even if you extend the display across two screens, each screen can have its own wallpaper. A small thing, perhaps, but I like it.
- Stability, good even under the Developer Preview, improved under the Consumer Preview and seems even better in the Release Preview. Microsft, once known for releasing buggy operating systems too soon (need I mention Windows Me or Windows Vista?) seems to have learned from those experiences.
If Windows 7 is "Vista Done Right", then Windows 8 might be "Windows 7 Done Better".


 The author's image: It's that photo over at the right. This explains why TechByter Worldwide was never on television, doesn't it?