
A Smart Way to Make Your Computer Dumb
Mainframe computers and mini-computers are designed to be used with "dumb terminals", video screens with a keyboard but no computer. Years ago, a terminal on my desk connected me to a Digital Equipment Corporation 11/70 minicomputer running RS/TS. This was eventually replaced by a personal computer, but the PC needed to connect to the DEC minicomputer, so we used a terminal emulation program that made the PC look like a dumb terminal to the minicomputer. Fast-forward a couple of decades. At the office, you may still need to connect to a corporate computer and you'll still need to make your computer look like a dumb terminal. If so, you should take a look at Van Dyke's Secure CRT.
Most of the applications I tell you about fit into what's call the "SOHO" market. SOHO is not an acronym for South of Houston in this case, but for "small office/home office". SecureCRT doesn't exactly fit into that category.
I've found Secure CRT to be the best terminal emulator for many years and the latest version of Secure CRT (6.5) has an updated user interface with tabs, real-time keyword highlighting, and a variety of other improvements.
The purpose of any terminal emulator application is to create a terminal window that provides access to the computer's command-line interface and connects the desktop computer to a mainframe system or to a computer that's running Linux, Unix, or another operating system. These connections can by made via a modem, a telnet session on a network, or a secure-shell (SSH) session.
SecureCRT supports SSH, telnet, rlogin, serial, and the telephony application programming interface (TAPI) protocols. The primary advantage of SSH is, as the name suggests, security: Login, data transfer, and terminal sessions are all encrypted.
The most common terminal types follow DEC or Wyse standards and SecureCRT supports the DEC standards (VT100, VT102, VT220) as well as Wyse 50/60, ANSI, SCO ANSI, Xterm, and Linux console.
 SecureCRT goes well beyond the standards by making it possible to have many sessions open simultaneously, each in its own tab and by allowing users to establish sessions that exceed standard terminal line lengths. If you use scripts to speed your work, you can attach those scripts to buttons for easy access.
Security and Flexibility Are Supreme
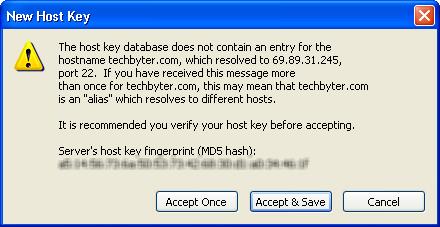 The first time you connect to a secure site, SecureCRT will ask you to confirm the security key. This needs to be done only once. Although SecureCRT can run as a standard telnet application, you should use secure connections whenever possible.
A welcome addition is ActiveX scripting support. By turning on the SecureCRT macro recorder to capture the keystrokes and actions required to perform a task that you need to repeat, you'll have a script that you can fine-tune and use. As with most applications that record macros, the recorded macro will need some editing. The advantage is that the macro will repeatedly and consistently perform the task. It won't be distracted and forget to do something. It won't mis-type a command.
Windows has a built-in telnet application, but it's not secure. Starting with Vista, Microsoft disables telnet by default.
Van Dyke provides a 30-day free trial. To obtain it, you must fill out a form and the company will contact you after you've downloaded the application. The contact by e-mail is of course a sales effort, but low-key. The primary purpose of the message is to answer any usage questions that a prospective customer might have.
Van Dyke Software has been around since 1995 and is located in Albuquerque, New Mexico. The first product, the CRT terminal emulator, was released to coincide with Windows 95. SecureCRT is at version 6.5.
 Bottom Line: Terminal Emulation Done Right
If SecureCRT has a disadvantage, it's the price. The $100 price tag includes 1 year of support and updates, but not SecureFX, a secure FTP application. Adding SecureFX, which integrates well with SecureCRT, adds another $30. That's the only disadvantage, though, and the wealth of features goes a long way toward justifying the cost.
For more information, visit the Van Dyke website.
A Photoshop Question from Vista
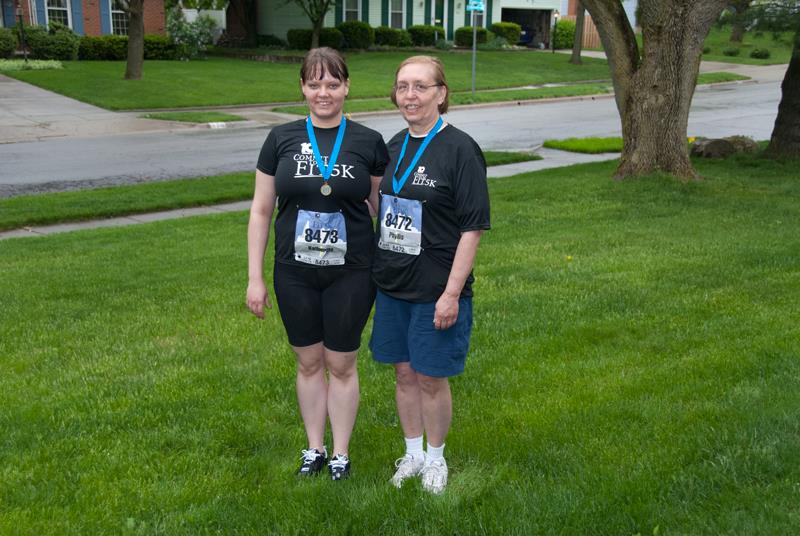
No, not the operating system. The question is from a reader in Vista, California: "I still miss how to use layers and last week's article on what you did to the Kaydee-Phyllis photo provides me with an example. I would save the photo with a new name, clone the grass in place, and flatten. Then I would do the same thing to get the legs in place. The two things I don't get are the advantage of doing it on separate layers and how to get to just the new legs that I want, in a new layer, without extensive, painstaking erasing of the rest of the picture that I don't want to insert." I feel an illustrated example coming on.
I have to admit that once I didn't see the value of layers, but eventually I grew tired of returning to an image that I had modified the previous day, last week, or 6 months ago. Invariably, I would see something that could be improved, but there was no way to roll back or modify any of my changes. I had made the changes, destructively, to the image itself. To tweak the image, I had to start with the original and make most of the previous changes (adding or removing steps I thought would help).
When you use layers, that problem ceases to exist.
One of the best explanations of layers is by Adobe's Michael Ninnes. His Photoshop CS4: Blend Mode Magic at Lynda.com makes extensive use of layers. The Lynda.com site makes some of the sessions available without charge so that prospective students can decide whether a particular session is one that answers the questions they have.
Photoshop magicians often use a dozen or more layers on a image, and I've seen some images with more than 100 layers. My use of layers is quite simplistic. So let's deconstruct the image and build it again.
On the previous program, I described why I wanted to change the position of Kaydee's feet and I won't repeat that here.
 The first step is to convert the single-layer background image to a layer. This isn't always an essential step, but it's needed much of the time so I just do it automatically. Here I've pulled the layers palette off the interface and dragged it out onto the image.
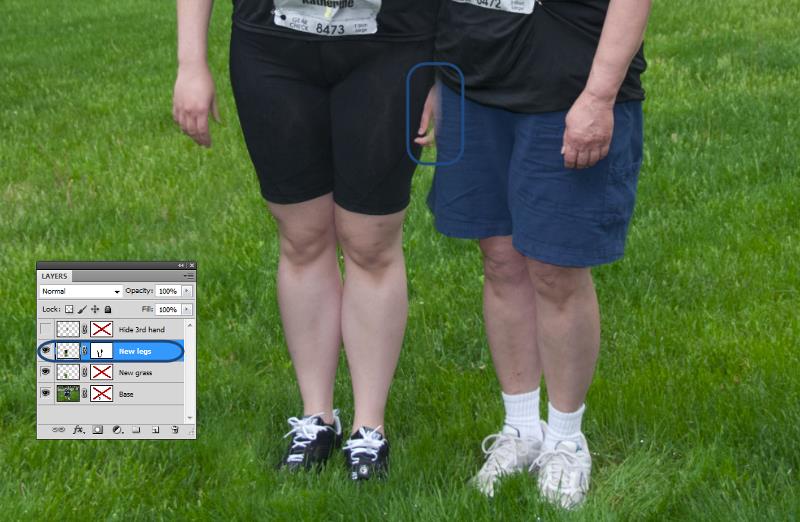
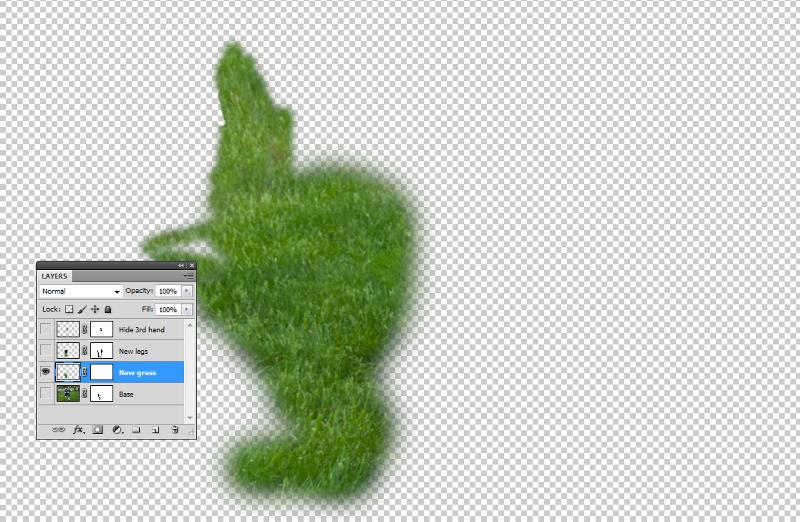
I created 3 additional blank layers and attached a layer mask to each of them. In this image, only the base layer is visible and all of the layer masks are disabled.
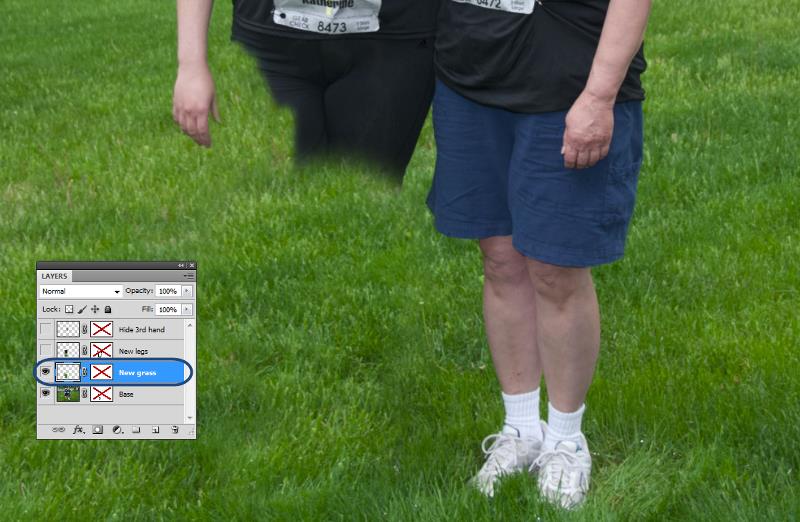 I called the layer above the base layer "New grass" because that's where I wanted to place the grass that would replace Kaydee's feet and legs.
The layer mask is disabled on this layer, but I'll come back to it later.
 The next layer is "New legs" because it contains the legs and feet from the other picture. Note in particular how Kaydee loses a thumb and how the cut lines are visible on the sides and at the bottom of the rectangle.
There's also evidence of a 3rd hand in the picture. You can't see it here, but Kaydee has her left arm around her mother, so having her left hand at her side is a problem.
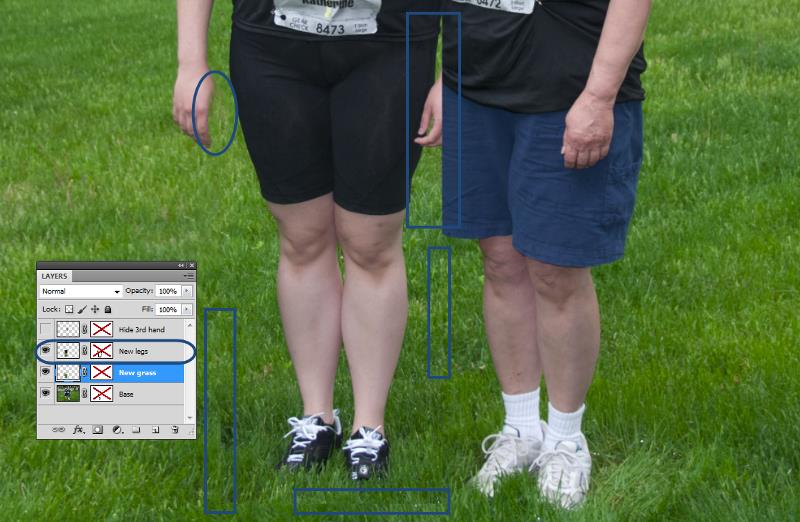
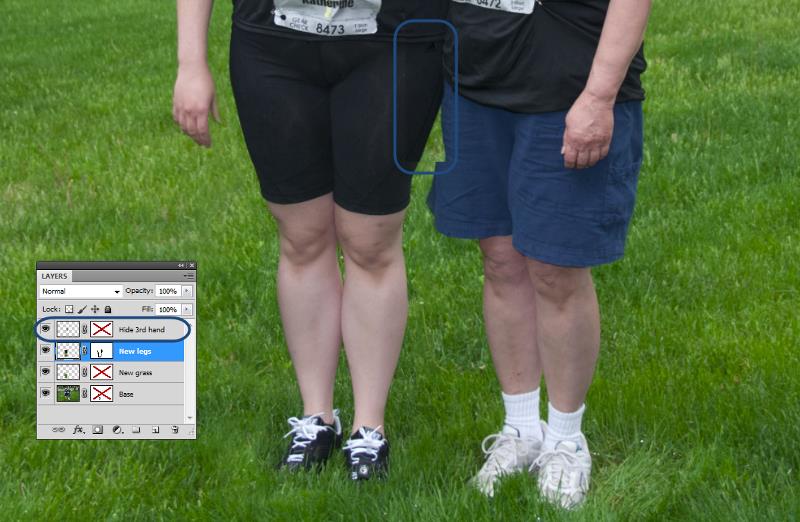
 In this image, I've turned on the layer mask on the image with the legs. The layer mask is used to make some of the layer invisible. By doing that, I can make parts of the new grass layer and the base layer visible.
The key point here is that I'm controlling transparency, not erasing part of an image or layer. Erasing is a destructive change, but I can always return to the layer mask and modify it or even remove it entirely.
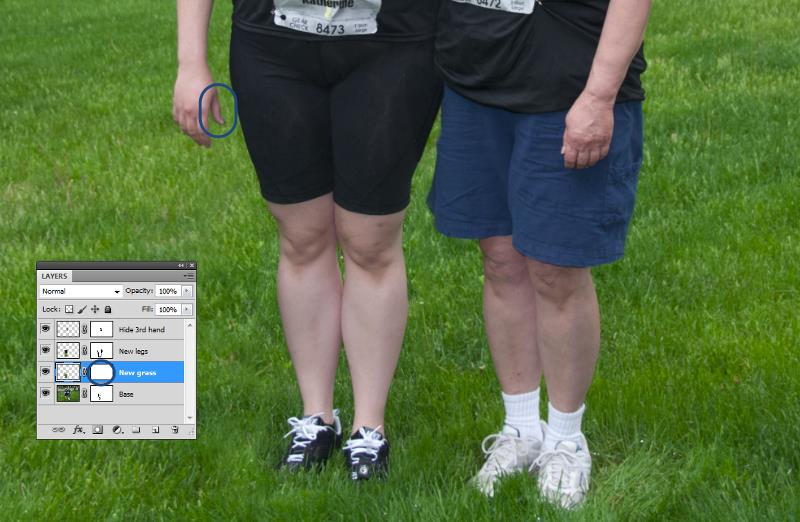
 To hide the extra hand, I grabbed another bit of the other image. It's a rectangular chunk and its presence is quite obvious, but I can use a layer mask to fix that.
 Here it is with the layer mask. Some of the transition is still somewhat visible.
 Before we look at the layers individually, take a close look at Kaydee's right thumb above. It's still not quite right because some of the layer with the new grass is covering part of her thumb.
Now, with the addition of a minor mask tweak, her thumb is back.
Layer by Layer
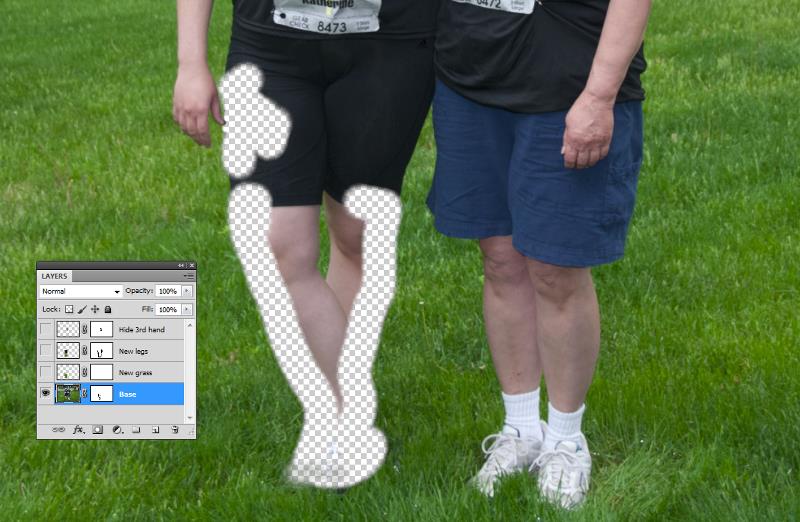 Here's the base layer with the layer mask active. This really wasn't necessary, but I wanted to be sure that I could see the area that needed to be filled.
 Here is just the grass area. Notice how it fades out at the edges.
 If I were to do this again, I would spend more time on this layer. The transitions are a bit too sharp. They could be made less obvious.
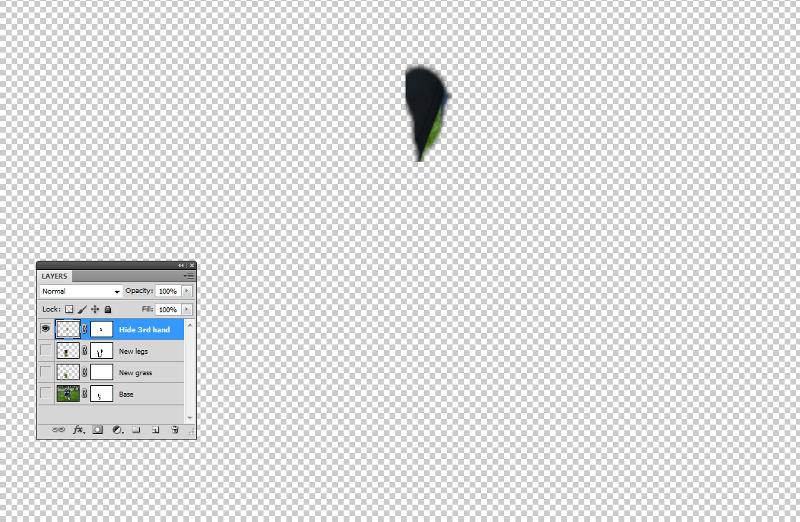 And the final bit of the puzzle is the piece that hides the extra hand. It's a small piece and most of it is masked out.
Feeling Destructive?
Everything I've done here with layers and masks could have been done by overlaying, erasing, and flattening bits of the image. If I had chosen that route, though, I could never go back to modify the masks.
 My primary justification for using layers and masks, then, is that I'm lazy. I really don't like to do the same job many times. The ability to save every component piece of an image so that I can return to it at any time to make modifications is a huge time saver. It's also good for my mental health.
At the right is the final image after I made some modifications to the masks on the legs layer and the layer that hides the third hand.
Short Circuits
The Worst Keyboard Ever
I enjoy writing favorable reviews because such a review means that I've found something that somebody else might like to use. For many years I enjoyed using a Microsoft Natural Multimedia Keyboard. In fact, I even wrote about taking it apart and cleaning it instead of replacing it. Eventually it needed to be replaced and I bought Microsoft's Natural Ergonomic Keyboard 4000, thinking it would be an upgrade. Wrong!
I still have a Multimedia Keyboard at the office and the key configurations differ significantly between the two models. For unknown reasons, Microsoft decided to place the Insert, Delete, Home, End, Page Up, and Page Down keys in a non-standard order. Because of this, I often hit End when I want Delete.
But the more significant problem is that the printing has worn off many of the keys: E, R, S, D, C, O, L, and M are essentially mystery keys. I'm a touch typist, but I still find this unacceptable.
I must use a USB keyboard because my current computer has no PS/2 ports, but this keyboard is despicable. Why couldn't Microsoft have simply converted the Natural Media Keyboard to USB and left well enough alone?
 Bottom Line: Avoid this keyboard!
The only good feature I can cite is the ergonomic layout and Microsoft somehow managed to botch that with subtle and not-so-subtle changes from its outstanding Natural Media Keyboard layout.
For more information, visit the Microsoft website.
Postscript: Microsoft has offered to replace the keyboard with a different model. I found one with a keyboard layout that's closer to the one I prefer, but not an exact match. And it has the same black keys with white letters that the Natural Ergonomic 4000 keyboard has. It's also wireless and I've never been a big fan of wireless keyboards or mice. So I'll let you know how this works out.
Symantec Expands into Authentication
Possibly because competing organizations such as Comodo offer services that Symantec doesn't, Symantec has agreed to acquire VeriSign's identity and authentication business unit. The VeriSign check mark appears on more than 90,000 websites in 160 countries and the business unit would seem to be a good fit with Symantec's existing security business. Symantec says that it will incorporate the VeriSign check mark into a new Symantec logo when the deal closes.
Symantec will be acquiring VeriSign's Secure Sockets Layer (SSL) Certificate services, Public Key Infrastructure (PKI) services, VeriSign Trust services, and the VeriSign Identity Protection (VIP) Authentication Service. Symantec would seem to be on a roll. After several years of providing mediocre products, the company's protective products have gained wide acceptance and positive reviews starting in 2009.
According to Symantec President and CEO Enrique Salem, "people and organizations are struggling to maintain confidence in the security of their interactions, information, and identities online." The challenge is to permit the easy use of digital services and devices without putting personal information at risk.
Symantec will purchase VeriSign's security business and the majority stake in VeriSign Japan, for approximately $1.28 billion in cash.
Symantec says the acquisition will allow it to help businesses incorporate identity security into a comprehensive framework. This will be increasingly important as information is moved away from local computers and private networks to be stored on servers connected to the Internet.
The Next Step in Disk Drives: Free?
That is, of course, hyperbole but not a lot of hyperbole. Remember when handheld calculators cost $400, then $100, then $10, and now you can buy them for $2 or less in bulk. I needed to buy a 500GB external hard drive a few weeks ago and found one from Seagate for about $70 delivered. Today I could buy a 2TB hard drive from NewEgg for $120. Granted, it's from a 2nd-tier manufacturer (Samsung), it's a slow (5400RPM) drive with only a small (32MB cache) and a mediocre (8.9ms) seek time. But still, that's a huge amount of storage for the cost of about a dozen lunches at a fast-food joint.
For just $140, you can buy a faster (7200RPM) Hitachi drive. Western Digital and Seagate both have several 2TB models for less than $200. These are "bare drives", intended to be installed inside a computer. External drives have USB circuitry, power supplies, and controllers installed and these push the price up. Even so, I picked up that 500GB drive for $70.
NewEgg lists 70 external 2TB or larger hard drives from $70 to $3500. What do you get for $3500? A 4TB 8-bay device that weighs nearly 20 pounds. But it's hard to find any 2TB external device that costs much more than $200.
After I bought the drive, NewEgg sent a message promoting the Seagate STDSA10G-RK FreeAgent DockStar Network Adapter, which converts a standard USB external device into a network attached storage (NAS) device. For reasons that are too complicated to explain now, it turned out that I really didn't need a 500GB external drive for my notebook computer. So maybe spending another $70 for the network adapter would allow me to add a NAS device that would be available to any computer on the network.
Or maybe I should just assign the external drive as yet another backup device.
 The author's image: It's that photo over at the right. This explains why TechByter Worldwide was never on television, doesn't it?
